In this area of the window, the trap parameters and information concerning the objects involved are shown in the following form:
Hide
| Hide all objects which are above the selected object. |
| Show the hidden objects. |
Note: When objects are hidden, all further actions can now be run more simply on the remaining visible part of the page. |
Traps
This option lets you show a page with and without traps displayed.
Transparent
This option enables pages to be displayed with or without objects with transparent colors. This enables the traps to be checked, even if the whole page is covered with a transparent varnish.
Highlight
It is not always easy to detect all the traps on a page. With the next two functions you can highlight single and/or all the traps in one of three predefined flashy colors.
All Traps
This option highlights all the traps on a page.
Selected
This option highlights all the selected traps.
Note: All traps are highlighted if both options are selected. The selected traps are then highlighted in the appropriate complementary color. |
Overprint
This option highlights all overprinting objects, i.e. at least one separation is set to overprint ("-" sign).
Note: In some situations Prinect Production PDF Toolbox creates overprint objects instead of traps. |
| Double-click one of the three color patches to select the color best suited to highlight the traps. |
The changed colors are automatically saved.
Selection
This button enables you to set the trap selection function depending on the situation:
•All Traps
All traps for the previously selected objects are selected.
•Same Pairs
All traps from the objects with the same color pair are selected from the group of previously selected objects.
•Single
Only one single trap is selected from the previously selected objects.
Edit Traps
| Edit selected traps; edit the trap description |
| Edit trap path |
| Delete selected traps; changes to the overprint attributes are preserved. |
| Trap selected objects. All selected objects are trapped against all objects lying below them using the current valid trap setting. Already existing traps remain unchanged. |
Note: The setting for "Trap Selection" or a selected trap neighbor does not affect this function. |
This partial trapping enables the use of different trap settings for different areas of the page without it being necessary to define trap zones.
Overprint/Knockout of selected objects
Note: You can only change the overprint attribute if an object is not trapped. This should be done when you start your work. The changes are then retained when the page is retrapped. |
| Selected objects are given the attribute "Overprint". |
| Selected objects are given the attribute "Knockout". |
Undo
| Undo last action |
| Restore the last action |
Note: Deleting all traps or re-trapping the entire page can not be undone. |
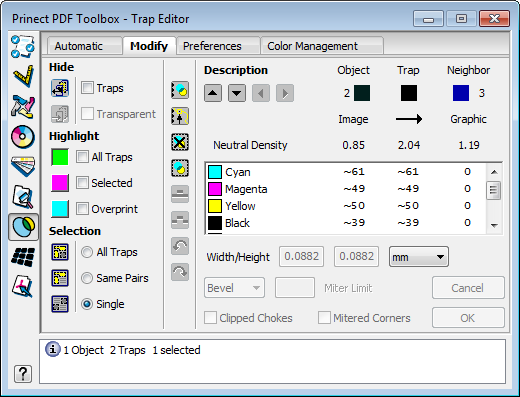
Description![]()
If an object or a group of objects has several traps, you can select the previous/next trap or the trap above/below using these buttons.
Note: You can select a trap as follows: |
Object, Trap, Neighbor
The color of the selected object is shown to the left and the color of the adjacent object is shown to the right, at the top of the field. The color of the trap is shown in the center. The relevant object numbers are shown in addition to the object colors.
The type of object for the selected and adjacent object is shown below this.
The following object types are possible:
•Object types:
Graphic | Colored graphic | |
Text | Colored text | |
Stroke | Colored line | |
Image | Image | |
Blend | Vignette (many small levels) | |
Shade | Soft vignette (level 3) | |
Bitmap | PostScript linework | |
Copydot |
•Direction:
| Trap towards the abutting object | |
| Centerline trap | |
| Trap towards the selected object |
Click the arrow, if necessary a few times, until you have the trap direction you want.
Neutral density
This row shows the neutral density of the selected object, the trap and the adjacent object.
List of process colors used
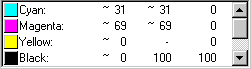
Each row shows the values for the selected trap and the relevant adjacent object for each separation.
Points to note:
•The "~" sign in front of a separation color value marks an average color value (e.g. for images and smooth shadings).
•The "-" sign means that the separation concerned is set to "Overprint".
Width/Height
Trap width in horizontal or vertical direction.
Note: If a value is entered in the field on the left, this value is automatically adopted for the field on the right. |
Bevel
Click the triangle to expand the display for the geometry parameters.
The geometry setting controls how the trapper reacts with regard to line joins which are generated and in cases where three colors meet.
Clipped Chokes/Mitered Corners
See the Line Join: for details on the parameters.
| Quit edit mode without adopting changes. |
| Applies the changes to the selected trap. Quit edit mode. |

Privacy Policy | Imprint | Prinect Know How | Prinect Release Notes