
Importing Files of Type ".eps", ".pdf", ".ai", ".emf", ".wmf"
The objects of these file types have no associated style types. This is why you can assign a style to each line automatically when importing. Format filters define which line is assigned to which style. This is a group of rules that define associations to the styles based on the colors, widths and patterns of the lines.
Note: You can also import PDF files that have several pages. More details can be found in Import of Multiple-Page PDF Files.
The dialog "Import Preview" opens when you import a file of the ".eps", ".pdf", ".ai", ".emf" or ".wmf" format:
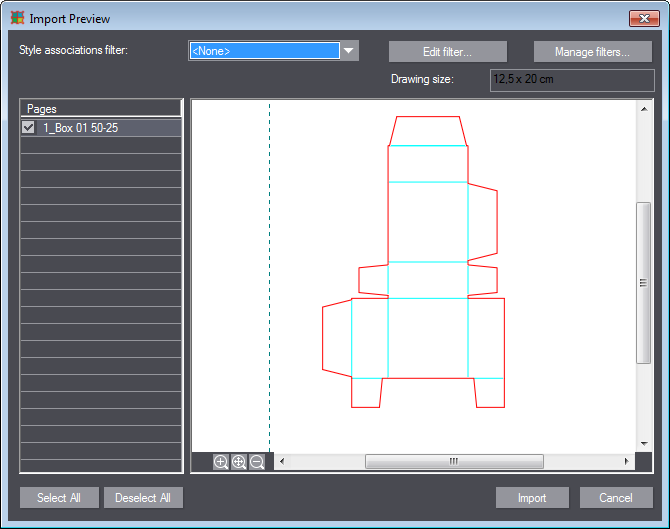
Choose a filter in the list box or create a new filter in "Edit filter...".
On the left, highlight the pages to import. When you click "Import", the filter will be applied to the file, and the objects will be imported in the appropriate style.
You want to assign all red lines the "Cutting" style.
1.Select "<None>" as Style associations filter.
2.Click "Edit filter".
3.Enter a filter name.
4.Click "Add".
5.Highlight "Color" and choose "Red" in the list box.
6.Choose "Cutting" as the style.
7.Click "OK".
8.Confirm the "Style associations filter" dialog box with "OK".
9.Select the new filter.
10.After you click "Import", the new file opens in Prinect Packaging Pro
|
Controls for eps, pdf, ai, emf and wmf Files in the "Import Preview" Dialog |
|
|---|---|
|
Assigns the "style association filter" from the list box. You can select predefined filters, add new filters to the list or edit the properties of existing filters. |
|
|
Edit filter... |
Opens the Dialog "Style Associations Filter" where you can modify the parameters defined for the selected filter. |
|
Manage filters... |
Opens the "Manage filters..." dialog. |
|
|
Scales up the zoom detail in the preview pane. |
|
|
Fits the drawing into the preview pane. |
|
|
Zooms out the drawing in the preview pane. |
|
Import |
Imports the selected file to the Prinect Signa Station Packaging Pro & Label Pro module. |
|
Cancel |
Cancels the import and closes the dialog. |
Dialog "Style Associations Filter"
Click "Edit filter..." in the dialog "Import Preview". The Style Association Filter dialog displays:
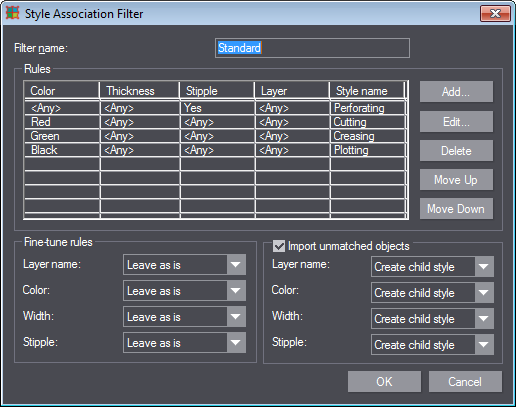
You can modify the parameter of the selected filter in this dialog. You can add, edit or delete parameters. You can also define the priority of the parameters with "Move Up" and "Move Down".

Note: A table lists all the parameters. The order of the parameters in the table is important as the application prioritizes them.
|
Controls in the Dialog "Style Association Filter" |
||
|---|---|---|
|
Filter name |
Define the name of the new style filter here. |
|
|
Rules |
||
|
Color |
Defines a condition for the color of the respective line. All the objects of the imported structure having the specified color and meeting the criteria for thickness and stipple are associated to the style or converted to the style defined in the respective row of the "Style" column. |
|
|
Thickness |
Defines a condition for the object line (rule) thickness of the respective line. All the objects of the imported structure whose thickness complies with the specified range and having the specified color and meeting the criteria for stipple are associated to the style or converted to the style defined in the respective row of the "Style" column. |
|
|
Stipple |
Defines a condition for the stipple of the respective line. All the objects of the imported structure matching the specified line properties "straight" or "dashed" and meeting the criteria for color and stipple are associated to the style or converted to the style defined in the respective row of the "Style" column. |
|
|
Layer |
Designates the name of the layer in an external file containing objects of a certain style. |
|
|
Style |
Defines the style that all the objects complying with the line criteria color, thickness and stipple are associated with and into which they will be converted. |
|
|
Add...
Edit... |
Both buttons open the "Style Association Rule" dialog: 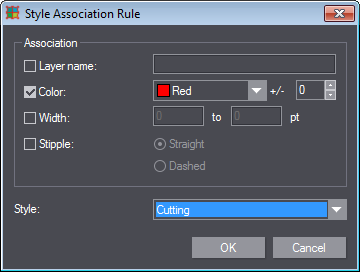
This is where you can create a new Style Association Rule for the style filter or edit an existing rule. Select the properties to include, and specify the desired parameters. In the list box, select the style to be associated with the objects meeting the properties mentioned before. |
|
|
Move Up / Move Down |
Moves the rule up or down in the list, giving it a higher or lower priority. |
|
|
Fine-tune rules |
||
|
In this group, you can fine tune the rules for the line import. For each property, you can select from the following options: |
||
|
|
Leave as is |
The objects are imported in the style specified in the "Style" column. The respective property of the external file (name, color, thickness, stipple) is ignored in this case. |
|
|
Override per object |
The objects are imported in the style specified in the "Style" column. The respective property of the external file (name, color, thickness, stipple) is not ignored in this case but applied to the object. |
|
|
A child substyle of the parent style listed in the "Style" column is searched for among the global styles. The substyle is to differ from the parent style by the respective property (layer name, color, width, stipple). The objects will be imported in this style if such a substyle is found; in the adverse case, the objects will be imported in the style defined in "Style". |
|
|
|
A (local) substyle derived from the parent style in the "Style" column is created. It differs from the parent style in the respective property (layer name, color, width, stipple). The objects are imported in this new style. |
|
|
|
Search and create child style |
In a first step, a child style is searched for. See table row Search child style. A new style is derived if a suitable style is not found. See table row Create child style. |
|
|
Search, create and override. |
A child style of the parent style listed in the "Style" column is searched for among the global styles. The child style is to differ from this style by the respective property (color, stipple). A new style is created if such a style is not found. Other objects whose properties (e.g. color) differ from this new style are imported in the parent style specified in the "Style" column. The property of the external file is not changed. |
|
Layer name |
This is where you choose one of the options above ("Leave as is", "Search child style" etc.) for the layer name. |
|
|
Color |
This is where you choose one of the options above ("Leave as is", "Search child style" etc.) for the line color. |
|
|
Width |
This is where you choose one of the options above ("Leave as is", "Search child style" etc.) for the line width. |
|
|
Stipple |
This is where you choose one of the options above ("Leave as is", "Search child style" etc.) for the stipple. |
|
|
Import unmatched objects |
||
|
In this group, you can fine tune the rules for importing objects that could not be associated with the exiting rules so far. You can choose from the following options for each of the properties: |
||
|
|
Create Unrecognized |
The objects are imported in a style named "Unrecognized". If an external file contains, for example, layers named A, B, and C, the objects contained therein will be imported into layers named "Unrecognized1", "Unrecognized2" and "Unrecognized3". |
|
|
Override per object |
When importing, the respective property of the objects (color, stipple) remains unchanged. |
|
|
Search child style |
A global style having the same property (layer name, color, width, stipple) is searched for. The objects will be imported in this style if such a style is found. Otherwise, the objects will be imported in the parent style (for color and stipple) or in the "Unrecognized1" style (for layer name and width). |
|
|
Create child style |
A new style is created. There are differences depending on the property: Layer name: The program creates a (local) project style whose name is identical with the name of the layer in the external file, and imports the objects in this style. The number of (local) project styles created corresponds to the number of layers in the external file.
Color/stipple: The program creates a (local) style in which all objects of the same color/stipple are imported.
Width: The program creates a (local) style and imports the objects in this style. Every style with a different width is imported in a new style. Let's assume there are 6 objects: three of width X, two of width Y, and one of width Z. In this case, three new styles X, Y, and Z will be created in which the objects are imported in their respective widths. |
|
|
Search and create child style |
The program searches for a style with the same property (layer name, color, width, stipple) in the global styles. The objects will be imported in this style if such a style is found. Otherwise, they are imported in a new (local) project style. Example for "Color": If the external file contains four colors, and one of them is associated with a global style, the objects in this color will be imported in this style; the objects in the three other colors are imported in three new (local) project styles. |
|
|
Search, create and override |
The program searches for a style with the same property (color, width, stipple) in the global styles and imports the objects in this style. Example for "Color": If the external file contains four colors, and one of them is associated with a global style, the objects in this color will be imported in this style; the objects in the three other colors are imported in the colors they had in the external file in a new (local) style. |
|
Layer name |
This is where you choose one of the options for the layer name. |
|
|
Color |
This is where you choose one of the options above for the line color. |
|
|
Width |
This is where you choose one of the options above for the line width. |
|
|
Stipple |
This is where you choose one of the options for the line stipple. |
|
|
Cancel |
Opens an alert message and on confirmation deletes the selected association |
|
Back to Controls for eps, pdf, ai, emf and wmf Files in the "Import Preview" Dialog.
Click "Manage filters..." in the dialog "Import Preview". The following dialog displays:
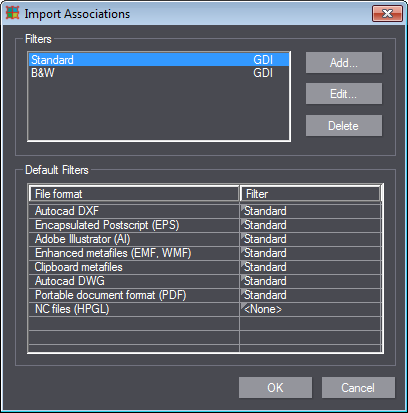
The "Filters" group contains a list of all filters. You can "Add...", "Edit..." and "Delete" filters.
You can assign supported file formats to a filter in the "Default Filters" part. Use the list box in the "Filter" column to assign them.
|
Controls in the "Manage filters..." Dialog |
|
|---|---|
|
Filter |
|
|
List |
Contains a list of all available filters. You can add new filters, and edit or delete existing ones. |
|
Add... |
Opens the "Filter Type" dialog, where you can define the type of new filter.
|
|
|
GDI (Graphics Device Interface): Application programming interface between the operating system and the logical graphics devices (graphics card, printer).
|
|
|
HPGL (Hewlett Packard Graphic Language): A page description language developed by Hewlett-Packard for driving pen plotters (cutting plotters). HPGL is used as the data exchange format for vector data because it is simple. Many CAD applications support export in the HPGL format.
|
|
|
The Dialog "Style Associations Filter" opens after you have selected the filter type and confirmed with "OK". |
|
Edit... |
Opens the Dialog "Style Associations Filter". |
|
Default Filters |
|
|
In this section you can define a default filter for the various file formats. |
|
|
File format |
Displays the file formats that you can associate with style filters. |
|
Filter |
This is where you associate file formats with default filters. To do this, click the "Filter" column and then select one from the list box. |
Back to Controls for eps, pdf, ai, emf and wmf Files in the "Import Preview" Dialog.
Import of Multiple-Page PDF Files
When you import cutting die files as PDFs with multiple pages, these pages are listed separately in the import dialog. You can view a preview of each page in the graphic window of the dialog. The list on the left lets you select which pages in the PDF you want to import.
In this way, you can import a particular 1up from a PDF containing several 1ups.

Return to Controls for eps, pdf, ai, emf and wmf Files in the "Import Preview" Dialog
Back to Importable Formats.


