"Modify bleed"
|
|
"Modify bleed" |
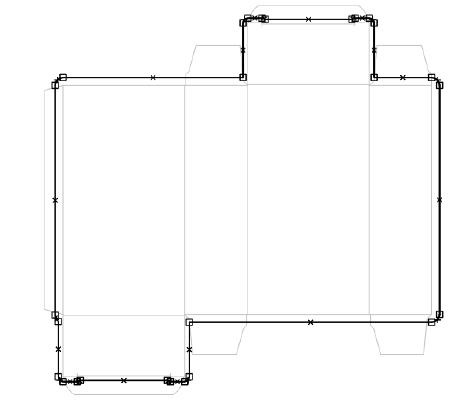
The mode "Modify Bleed" lets you modify individual bleed lines and points manually. You can enter this mode from the "Layout", but also from the "1Up" tab.
1.Click the 1up whose shape you want to edit if you are in the "Layout" tab.
2.Click the "Modify bleed" button in the toolbar. The screen changes: All elements except the bleed turn gray, and the corners of the bleed outline appear. The shape offers two types of selection handles:
·Corners (squares)
A square indicates the point where two lines meet. Dragging a square moves two connected lines simultaneously
·Arc points (crosses)
A cross identifies the center of a line. When you drag a cross, the original line turns into an arc.
3.You can now do the following:
·Click a point, a line or an arc and move it by dragging it with the mouse.
·You can change the curvature of an arc by clicking the cross in the middle of a line/arc and dragging it with the mouse.
·With the Ctrl key pressed, click a corner (square) to remove the point and to join the two lines it connects to form a single line.
·With the Ctrl key pressed, click an arc point (cross) to split the line into two segments and to convert the arc point into a corner point (square).
Back to Tool Bar in the "Layout" tab.