"Generate Production Phase"
Dialog "Production Phase Generation Wizard"
|
|
"Generate Production Phase" |
With the help of this wizard a production phase is generated in a few steps. The process goes through selecting folding type and X and Y dimensioning sequence.
Click the "Generate Production Phase" button. A dialog with four steps opens that supports you in creating a production phase:
•First step: "Select Folding Type"
•Second Step: "X Dimensioning"
When you create a production phase, it will appear in the tabular area as a phase named "Production". You can create several production phases for a cardboard box.
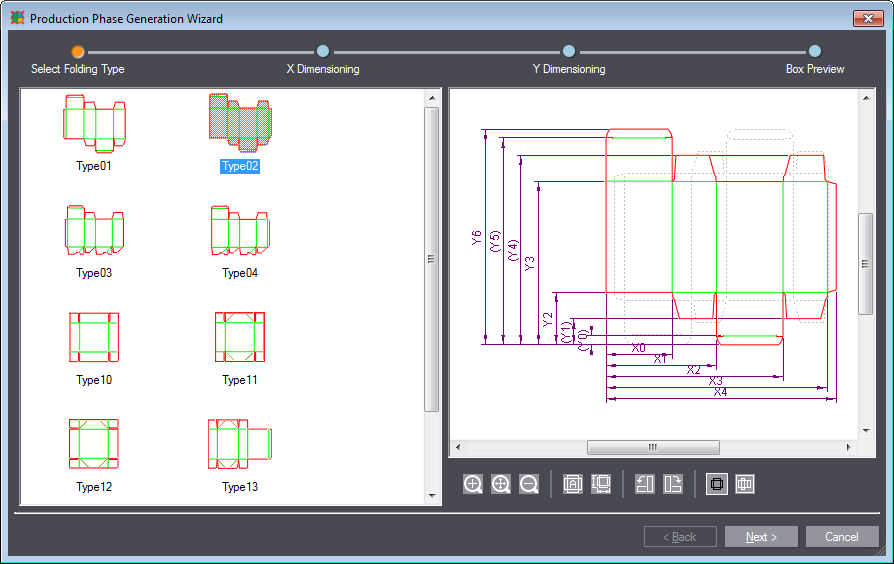
First step: "Select Folding Type"
In this step, you can choose how the package is to be folded. The available types offer different folding models. Select the folding type that suits the package best for which you are going to create a production phase. The production phase for your package applies the folding actions predefined for the selected type of package.
1.Select the folding type you want.
The preview on the right shows the selected folding type with gray dashed lines.
2.Click "Next".
|
Controls in "Generate Production Phase" "Select Folding Type" |
|
|---|---|
|
|
"Zoom In" Scales up the zoom detail in the preview pane. |
|
|
"1:1" Fits the drawing into the preview pane. |
|
|
"Zoom Out" Zooms out the drawing in the preview pane. |
|
|
Selects the type matching the 1up automatically. |
|
|
Sets the measure lines automatically if possible so that setting them manually in the following steps is not necessary. |
|
|
"Rotate left" Rotates the 1up by 90° counterclockwise. |
|
|
"Rotate right" Rotates the 1up by 90° clockwise. |
|
|
"Show folding type" Changes to the Folding Scheme view. The package drawing is visible in the background. |
|
|
"Show Drawing" Changes to the Drawing view. The folding type is visible in the background. |
In this step you select the vertical crease lines along which the package is folded. There are two panes:
•Left: folding type and the pane with the required X dimensions
•Right: the active pane where you can point and click on the corresponding creasing/cutting objects and thus add the corresponding folding dimensions.
Proceed as follows if dimensioning was not performed automatically:
1.The dimension to be entered is highlighted in the left pane.

Note: The dimensions shown in parentheses are optional. You can use the "Skip optional" button to skip them.
2.Move the mouse point over the respective vertical crease line of the package in the right pane.
3.If the dimension is displayed below, confirm it by clicking on the crease line.
(4).To undo a folding line, click the "Back" arrow below the drawing pane.
5.Click "Next" when you are finished with dimensioning.
|
Controls in "Generate Production Phase: Dimension" |
|
|---|---|
|
|
"Go to the previous dimension" Cancels the dimension last specified. |
|
|
"Skip" Skips the optional dimensions displayed in parentheses (if any). |
In this step you select the horizontal crease lines along which the package is folded. Proceed in the same way as for the X dimensions before.
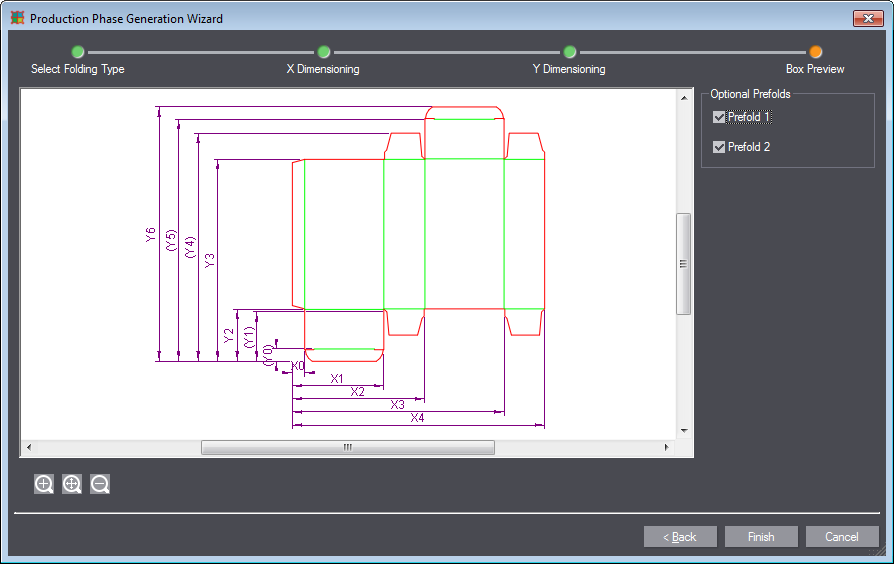
In this step, we see a preview of the folding lines of the package. All X and Y dimensions are displayed together and you can specify if pre-fold steps should be performed here. When you are ready, press the "Finish" button. The system generates the production phase.
Back to Tool Bar in the "3D Presenter" Tab.
I


