
You will find a detailed description of how to work with marks in the Working with Marks.
You can set the following parameters in the "Marks" step:
•Set/remove automatic print control marks
•Define colors and scaling for automatic marks
•Set parameters for any collating marks, folding sheet labels and cut marks
Note: When a job is reloaded, the marks used are compared with the current resources and can be refreshed if needed. This comparison is run for marks that are filed in the job but not used whenever a mark is enabled in the loaded job.
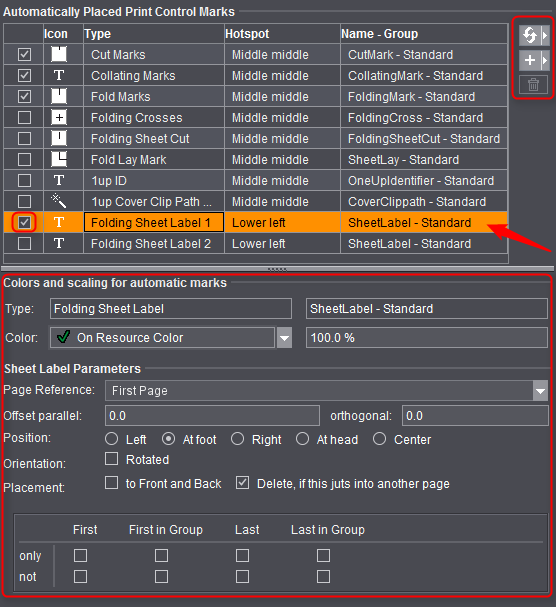
Automatically Placed Print Control Marks
Cut marks, fold marks, collating marks, folding crosses, folding sheet cuts, fold lay marks, 1up ID, 1up cover clip path mark and folding sheet labels are automatically set for the product part if you enable one of these options.
You can define any number of folding sheet labels. Define new ones with the "Add another folding sheet label" button to the right of the table. Use the "Choose Resource..." button to replace the existing mark by one from the resources. You can remove a custom folding sheet label with "Delete".
The new table gives you a clearer overview of the default parameters and configuration of the print control marks:
•When you select an inactive mark, its parameters show below the table (cannot be edited).
•When you enable and select a mark, you can edit its parameters below the table.
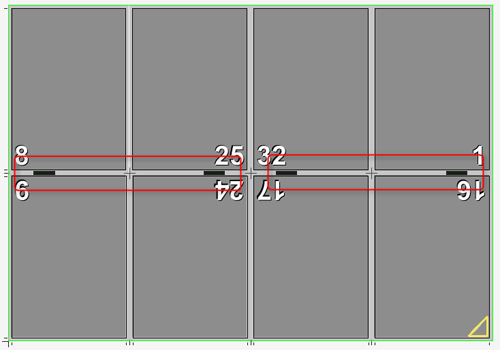
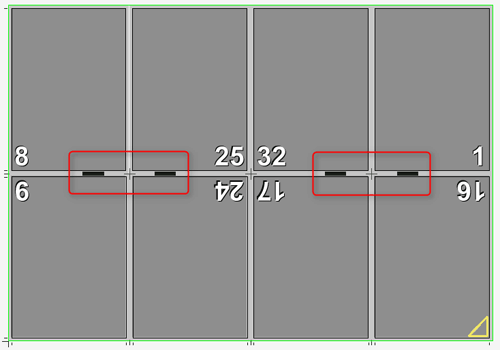
Automatically placed cut and fold marks cannot be changed to start with because the positions of these marks are always unique. These elements are indicated by a red frame in the graphic window when you select them. You can modify them only by explicitly disabling the automatic function in the graphic window. They are then highlighted by a yellow frame. More details can be found in Automatic Function for Automatic Cut and Fold Marks.
You can then select and modify all other automatic mark types in the graphic window or in the inspectors. These marks are also highlighted by a yellow frame.

Note: The "1up ID" mark was designed especially for gang jobs or for multiple sheet optimization. More details can be found in Introduction to a Gang Job with Sheet Optimiza-tion.
When cut and fold marks are set, the program always checks whether the gaps on the folding sheet/assembly block are big enough for the automatic marks and for the page bleed. If necessary, the marks are deleted and the bleed reduced so that they don't jut into the adjacent page. This applies for front and back printing.
The cut and folding marks can no longer be modified. These elements are indicated by a red frame in the graphic window when you select them.
The automatic fit for bleeds is not used if a custom bleed is set on a special master page. There are special cases where a bleed must jut into the adjacent page. You can allow this by creating a special master page with a custom bleed ("Master Pages" step). In addition, you can disable the "AutoReduce Bleed" option in the Page/1up Inspector.
The cut marks and folding sheet labels are set in relation to the page and are listed in the Page/1up Inspector in the "Marks" step (see in the Page/1up Inspector).
The fold marks, folding crosses, folding sheet cuts, fold lay marks and collating marks are set in relation to the folding sheet and are listed in the Folding Sheet Inspector in the "Marks" step (see also Folding Sheet Inspector, Marks).
You can assign marks for these types of marks that are then set automatically either by clicking the "Select..." button or in "Preferences > Resources > Marks Default". See also Marks in the 'Imposition' Mode.
Manually set marks are handled based on the following rule:
All folding sheets and press sheets are fully recalculated if you change the layout in the product part, e.g. page size, gaps, paper size. etc. In this case, any manually set marks are lost. The layout is not recalculated and the marks are kept with other types of changes such as creeping on/off, position of the page contents, etc.
You can only select automatically set marks in the "Marks" step. You can set manual marks in the Press Sheet Inspector, Folding Sheet/Assembly Block Inspector and Page/1up Inspector.
Colors and scaling for automatic marks
This is where you can select which separations will be printed with marks. This is easy to do with the list box that appears as its use is self-explanatory.
You can also correct the scaling (size) of the marks manually.
The resource you selected is set by default.
Set print control marks on banners (digital printing)
This requires that there is a plate template for a digital web. Can be operated using the "Banner" list box.
Assembly block labels (Montage only)
You can use this automatic mark only in the "Montage" work mode. The mark is not set by default.
Marks that provide additional information about the assembly block are required analog to the folding sheet label in the "Imposition" mode.
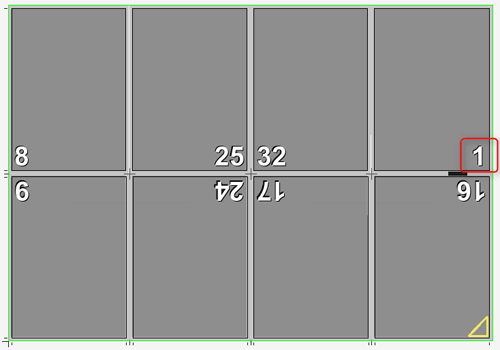
Precutting marks (Montage only)
You can use this automatic mark only in the "Montage" work mode. The mark is not set by default.
Precutting marks are set on the margins of the assembly block. If precutting marks are active and set for the selected assembly block, a check is also run to see whether the gaps are at least the sum of the margins. This check makes sure that, when two assembly blocks abut each other, the precutting marks of one assembly block do not cut away the content of the other assembly block. If this is done, a warning triangle displays in the "Gaps" text box. Your attention is drawn to the issue in the tooltip of the text box.
Precutting marks may jut into another page when these marks are used for CAD assembly blocks (e.g. if the CAD assembly block does not have a shape). Nevertheless, precutting marks are wanted for precutting assembly blocks.
You can control whether the precutting marks will be removed or kept with the "Delete, if this juts into another page" option.
You can use the automatic mark in the "Imposition", "Montage" and "Packaging" work modes. The mark is not set by default.
A Cover Clip Path mark is set automatically to every page/1up with this type of mark. This prevents marks set to "Background" jutting into the page/1up content or overlapping white parts within the bleed box.
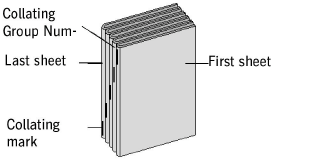
The collating mark is a control device that allows you to check whether the folding sheets have been assembled completely and in the correct order.
You can use the default CollatingMark, a line approximately 11 mm long and 1 mm wide containing the folding sheet number, if you wish to use a collating mark. You may, however, use any mark, including marks created by yourself for this purpose.
•Position: Back margin - At foot - Outer - At head - Last page
This is where you select on which edge of the outermost page the collating mark will be found.
There is now the added option of setting the mark to refer to the "last page" of the folding block.
"Back margin" (left edge of the first page) is set by default.
•Distance: Automatic - Custom
This is where you can select the amount by which the collating mark will be shifted per sheet. Select "Automatic" for the offset to correspond to the height or width of the unscaled mark, depending on the direction and rotation. You can also define your own offset.
•Range: Automatic - From: To:
This is where you can define the first and last position of a collating mark on your reference side. Select "Automatic" if you want the height or width of a page to be taken as the range, starting with "0".
•Direction: Ascending - Descending - Zigzag - Zagzig
In general, a thick rule is printed on the fold between the first and last pages, which is then visible on the spine of the finished folded sheet. The first collating mark is at the top of the first folding sheet. For each subsequent sheet, the rule is offset by its own length, so that for a correctly and completely assembled book, even steps are obtained. This step can be ascending or descending. Collating is ascending - descending in the case of zigzag and descending - ascending for zagzig.

Note: The position must always start with "Back margin" if you select "Ascending".
•Collating group: Additional mark at the edge of the page.
The number of the collating group is positioned in addition at the edge of the page. You can select the position.
Explanation:
The collating group (CollatingMarkExtension) is an extension of the normal collating mark (CollatingMark). It allows additional identification of the booklets that will be produced or additional information about them.
Note:
Remember that the collating group is not a subordinate function of a folding sheet group ("Schemes" step > "All Folding Sheets").
·Variable height
You can define a different height for the mark for each collating group (booklet).
•Special Application: on multiple pages
Normally, the collating mark is set only on the first (default) or last page of a folding sheet. This option lets you set identical collating marks on all even or odd pages of a folding sheet. The "Last Page" option determines whether on even or odd pages. A collating mark is set on the last page of a folding sheet when this option is selected.
"Special Application: on multiple pages" and "Last Page", both not selected:

"Special Application: on multiple pages" selected, "Last Page" not selected:

"Special Application: on multiple pages" and "Last Page" selected:

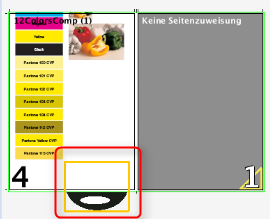
Sheet Label Parameters A and B
Position the folding sheet label as you need it.
"to Back"
This function is a new addition because the paper stack often lies on the front before finishing, making a label on the back necessary in order to recognize the folding sheet.
"Delete folding sheet label, if this juts into another page"
If folding sheets are close to each other, the folding sheet label may jut into another page and be printed as well. When this option is set, the mark is removed when the clip path of the mark collides with the clip path of another page. The original folding sheet label displays again when enough space is made for the mark, for example, by moving the folding sheet.
Page Label ("Imposition" Mode) / 1up Label ("Montage" Mode)
Automatically placed print control marks analog to the folding sheet label, e.g. page-specific data that are set directly onto the page in Proof Color; any number of page labels or 1up labels can be created.
When a label is selected, it is set onto every page. You can define the reference point on the page onto which the label will be set and the position of the label relative to the reference point. In addition, you can define the orientation (0°, 90°, 180°, 270°). You can restrict placement to left pages only or right pages only. The label is removed when the clip path of the mark collides with the clip path of another page if "Delete, if this juts into another page" is enabled.
Fixed Cut Marks in Creeping
The cut marks are not moved in creeping. This affects the ProofColor layer, it gives you a better check of the proof.
If the cut marks in the back margin superimpose specially created fold marks or hinder further processing for other reasons, you can use this function to keep the cut marks only on the outsides. Exception: Suppression does not work if the edge on which the marks are to be suppressed is on the outer part of the folding sheet because this is probably where the sheets will be cut and cut marks are needed. If you use this function often, we recommend that you set this function as a default in the Preferences in "Defaults". You can always deselect it at any time in the "Marks" step on a case-by-case basis.