
Note on "Target Date" column: Only when you have the gang run form is it clear which processing steps are needed to process all the products on a sheet. Target date and press date can differ from each other accordingly. If the press date is defined, this date displays instead of the target date.
It is possible to view the gang pool (pool for gang jobs) at an early stage. You can create a gang job if there are enough jobs in the pool. The "Job Import from Gang Pool" dialog can stay open the whole time to monitor incoming jobs. All changes in the folder display automatically.
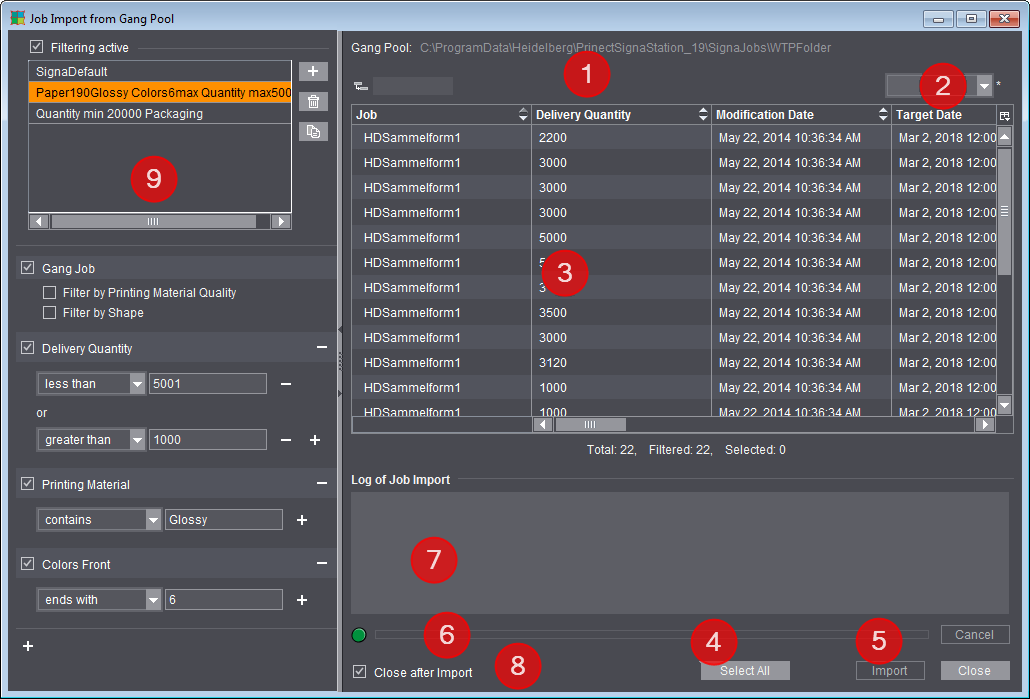
1.Display of the selected folder for gang jobs (the folder set in "Preferences > Ganging Optimization" or, if different, the folder set in the current job in the "Product Part" step).
2.List box for saved table settings or option for saving the columns currently shown. See Customizing the Column Set.
3.Display of the jobs in the pool with automatic and dynamic matching of the folder.
4.Selects all jobs that display in the folder.
5.Imports the gang parts to the gang job.
6.Progress bar for import of the jobs.
7.Error-free and faulty jobs display after the import.
8.Closes the window automatically after import.
9.Section for defining filters for the job list view.
If filtering is active, only the jobs matching the currently selected filter display in the list. For more details on the filter section, see Filters.
You can customize the table view of the folding sheets/assembly blocks or customer jobs in the "Job Import from Gang Pool" dialog, i.e. you can hide columns or change the order of columns.
To do so, choose "Customize" in the list box using the context-sensitive menu and disable the columns you do not wish to see, or show them again if necessary. Using the buttons to the left, you can move the items up or down and to the top or bottom.
You can save this custom setting and, when required, load it again using the list box.
You can define filters in the left part of the dialog (1) to confine the view to the possibly large number of gang parts and to give the "Job Import from Gang Pool" dialog a clearer structure.
You can create several filters with different filter criteria. When filtering is enabled (2), the list of the gang parts is confined to the criteria of the currently selected filter. When you disable filtering, all the jobs of the gang job pool display again.

Note: In automatic ganging optimization via the Prinect Signa Station Gang Server, these filters are needed for controlling the tasks, for example, to single out all the jobs for a certain paper grade and use them for the optimization run (see Planned Gang Jobs ).
Create a new filter
You can create a new filter using the button with the plus sign beside the list. Firstly, you will see a dialog for entering the filter name. Then the filter is created in the list and you can add filter criteria.
You can also duplicate an existing filter, double-click to display the dialog for assigning a name and customize the name.
When deleting filters, you must make sure that no check is running to see whether the filter may be used somewhere else in the software, e.g. in "Planned Gang Jobs > Tasks > Gang Pool Filter".

"Gang Job" filter
When you create a new filter, the criteria "Gang Job > Filter by Printing Material Quality" or "Filter by Shape" are available by default but not active (3).
The compare value in "Gang Job" is determined from the gang job. This means, for example, if you filter by printing material quality and gang job A has "Glossy" paper quality, then only jobs with "Glossy" paper quality will be selected. If the paper quality of gang job B is "Coated", then only jobs with a "Coated" paper quality are selected with the same filter. The same behavior is also applicable for the shape.
If a shape is loaded for gang jobs in the "Montage" or "Packaging" mode, you can facilitate the search for suitable jobs by enabling "Filter by Shape". In this case, only jobs that match one of the loaded shapes display.
Edit filter
You can add additional filter criteria in two ways:
•By clicking the plus sign below the last filter criterion (4): The "Filter Rules" window opens where you can select one or more filter criteria and add them to the filter.
•By dragging-and-dropping one of the columns from the right table to the filter section. (5)
All the filter criteria that are defined and enabled (check box in front of the name) immediately impact the list of gang parts shown, allowing you to check the filter impact at once.

Note: There are columns showing a number of attributes. Each attributes is separated by a "/". Each attribute is filtered individually in this process.
Example: A filter "Article > Begins with > Pola" on the article "Polar bears / Bears EZ01 3447" would work the same as "Article > Begins with > Bears".

Note on the "Product Code" filter criterion: If you use the product code as a filter criterion, you can define suitable filter rules about which components will be in them and which excluded. Creating this is analog to operation of the Product Code Editor (see Product Code Editor).