Editing of Automarks Sets
Basically, you can create and edit automarks sets at various points in Prinect Signa Station:
•In the Resources with the "Automarks Set Editor".
•Directly in the job in the "Marks" step. You can then save the changes either directly to the Resources or file them as a new automarks set under a new name.
•In the Product Part Template Editor when creating or editing product part templates; in this case as well you can save the changes back to the Resources like from the job.
When creating automarks sets in the Resources, you have a good overview of the resources structure and can define several different sets fast. By way of contrast, editing in the job or the product part template has the advantage that you can visually check the impacts of changes right away. In the graphic view, you can see at once whether the mark type, placement, scaling, etc. are what you want.
A possible procedure would then be:
1.First create all the automarks sets needed in the Resources.
2.Then run a visual check in a job to see whether the settings are as you want.
3.If needed, make changes and save them back to the Resources.
Editing in the Automarks Set Editor
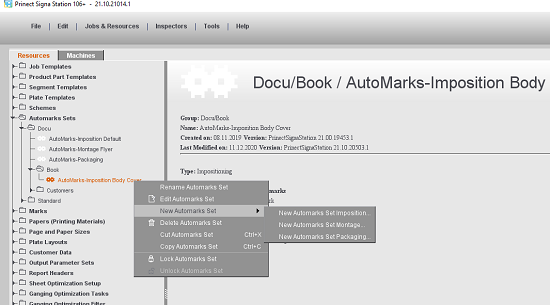
You open the "Automarks Set Editor" by clicking an automarks set in the Resources and selecting "Edit Automarks Set" or "New Automarks Set..." in the context menu (you cannot edit the automarks sets in the "Standard" folder").
This editor lets you create different configurations for automatically placed print control marks in the Resources.
At present, three different kinds of automarks sets are available:
•Automarks Set Imposition
•Automarks Set Packaging
•Automarks Set Montage
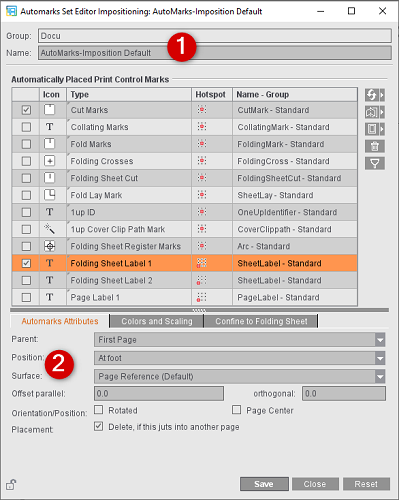
At the top, you see the resources group and can edit the name of the automarks set (1). The settings that are possible in the editor (2) are equivalent to those in the job in the "Marks" step. See Setting Options in the Editor.
The main benefit of working in the "Automarks Set Editor" is that you can reset changes at any time to the last state not saved and that all the changes are enabled only after clicking "Save".
|
|
Replace a mark by another mark from the Resources |
|
|
Add another folding sheet label in the selected automarks set |
|
|
Add another page label in the selected automarks set |
|
Note: In contrast to the other marks, any number of folding sheet and page labels can be added to the automarks. |
|
|
|
Remove a label mark from the table |
|
|
Use the filter function to confine the display of the table to the marks that are enabled in the selected automarks set. If you wish to enable further marks, you must disable the filter function by clicking the button again. All enabled marks display, even if they are not currently in use in the job. |
In the job, you can also directly edit all the automarks sets integrated into the job. Advantage: In the graphic view, you see at once the impacts your settings have because each change is applied immediately to this job. The resources are not changed in this process. The changes are then applied to the Resources only if you click the Save button (1) and confirm the query.
The settings that are possible in the job are equivalent to those in the "Automarks Set Editor". See Setting Options in the Editor.
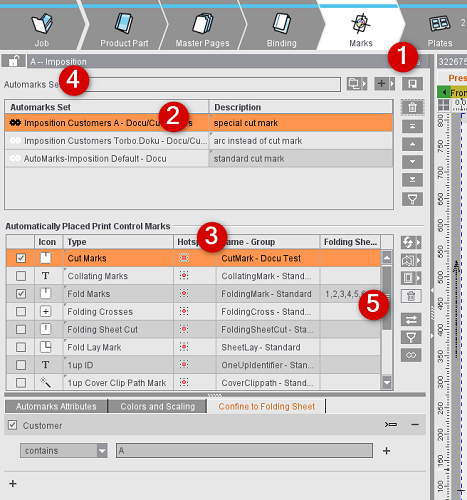
In the upper table, you see all the automarks sets integrated into the job (2), in the lower table the automatically placed print control marks of the set selected above (3). The upper table appears only if several automarks sets are integrated into the job. If only one automarks set is used, the name of this automarks set displays in the text box above (4).
If the job has several automarks sets, these are browsed one by one. If a specified detail was found for a mark, this setting is used. If no specified detail was found for a mark in the first automarks set, the detail from the next automarks set in the list is used.
In the "Automatically Placed Print Control Marks" table, you can see in the "Folding Sheet" column on which folding sheets a mark is placed in the job with the current settings (5).
Overview of the button functions
|
|
Replace the selected automarks set in the current job by another automarks set from the Resources |
|
|
Add another automarks set from the Resources |
|
|
Save the automarks sets from the job to the Resources If you save only the selected automarks set, you can select in the "Save Automarks Set as Resource" dialog whether you wish to overwrite the existing set or save the modified version as an additional resource under a new name. The existing resources are overwritten if you select "Save All Automarks Sets" in the prompt. However, an alert message is issued for each modified resource, asking you whether you really want to overwrite this. |
|
"Automarks Set" table |
|
|
|
Remove the selected automarks set from the list |
|
|
Use the arrow buttons to move the selected automarks set one position up or down in the table or to the bottom or top of the list. Because the list is processed one item after the other, this affects which mark will be used. |
|
|
When the filter function is enabled, only those automarks sets display in the table that have at least one mark placed in the current job. |
|
"Automatically Placed Print Control Marks" table |
|
|
|
Replace a mark by another mark from the Resources |
|
|
Add another folding sheet label in the selected automarks set |
|
|
Add another page label in the selected automarks set |
|
Note: In contrast to the other marks, any number of folding sheet and page labels can be added to the automarks. |
|
|
|
Remove a label mark from the table |
|
|
When this function is enabled, the selected mark has a red border in the graphic view to be able to identify it more easily. Click the button again to disable the marking. |
|
|
Use the filter function to confine the display of the table to the marks that are enabled in the selected automarks set. If you wish to enable further marks, you must disable the filter function by clicking the button again. All enabled marks display, even if they are not currently in use in the job. |
|
|
You can enable this view if you wish to see only the automarks used in the current job, irrespective of the automarks set in which they are enabled. The upper table disappears, only the "Automatically Placed Print Control Marks" table displays with all the marks used in the job. In the "Automarks Set" column you can see from which automarks set in the job the mark is used. |
|
"Confine to Folding Sheet" tab |
|
|
|
The set rule is applied to all the marks of the automarks set, irrespective of whether the mark is enabled or not. Each modification is automatically done in all marks while synchronization is active. |
|
|
Synchronization of the folding sheet restriction is removed by clicking the button. The restriction is kept only in the mark currently selected in the table, it is removed from all other marks of the set. |
|
Note: The "Synchronize/No Synchronization" button impacts only the rule in question, not other types of any folding sheet restrictions that may exist. |
|


