The same setting options are available to you, regardless of whether you are editing the automarks set in the "Automarks Set Editor" in the Resources or in the job in the "Marks" step.
•Colors and Scaling for Automatic Marks
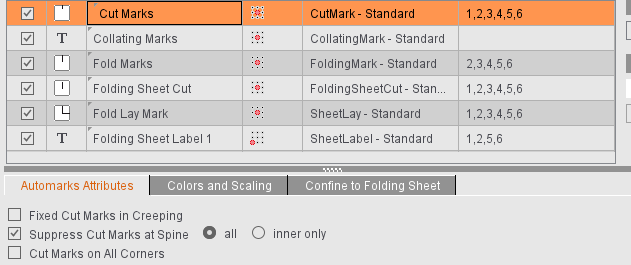
The setting options for the attributes differ, depending on the selected marks type. No changes can be made for some marks.
Fixed Cut Marks in Creeping
The cut marks are not moved in creeping. This affects the ProofColor layer, it gives you a better check of the proof.
If the cut marks in the back margin superimpose specially created fold marks or hinder further processing for other reasons, you can use this function to keep the cut marks only on the outsides. Exception: Suppression does not work if the edge on which the marks are to be suppressed is on the outer part of the folding sheet because this is probably where the sheets will be cut and cut marks are needed.
In the job you can select whether all cut marks or only the inner cut marks will be suppressed, for example, if the outer cut marks are needed, but there is the risk of "flashes" through the inner cut marks.
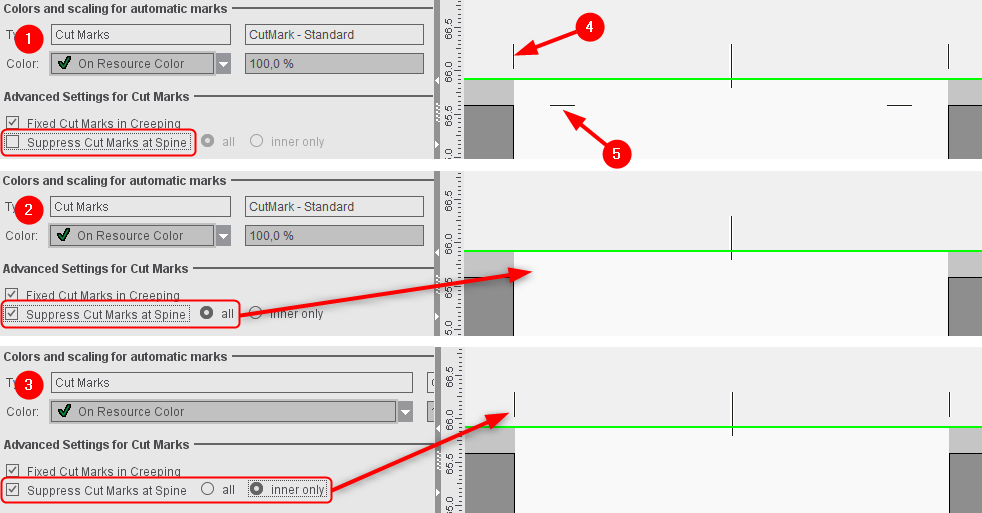
Example:
For the production of a cover, it can be a good idea to set the cut marks on all corners. This is the case, for example, when the spine of the cover is not created as an extra page but using the gaps. In this case, the cut marks are wanted above the page (these indicate the page). However, the cut marks between the pages are not wanted because they can result in flashes during cutting. For such a case, in the job in "Marks" you can enable "Suppress Cut Marks at Spine" selected with "inner only".
(1): Outer (4) and inner (5) cut marks are output.
(2): All cut marks in the back margin are suppressed.
(3): Only the inner cut marks in the back margin are suppressed to avoid flashes. The outer cut marks are kept.
Cut Marks on All Corners
For the "Imposition" and "Automatic Imposition" work modes.
Cut marks are also set on the "inner" page edges if there is enough space on a folding sheet.
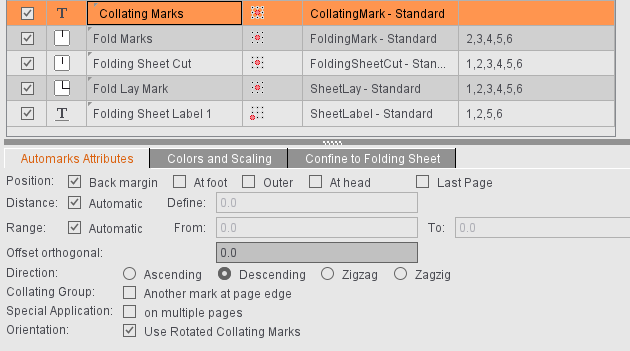
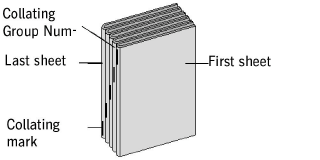
The collating mark is a control device that allows you to check whether the folding sheets have been assembled completely and in the correct order.
You can use the default CollatingMark, a line approximately 11 mm long and 1 mm wide containing the folding sheet number, if you wish to use a collating mark. You may, however, use any mark, including marks created by yourself for this purpose.
Position: Back margin - At foot - Outer - At head - Last page
This is where you select on which edge of the outermost page the collating mark will be found.
There is the added option of setting the mark to refer to the "last page" of the folding block.
"Back margin" (left edge of the first page) is set by default.
Distance: Automatic - Custom
This is where you can select the amount by which the collating mark will be shifted per sheet. Select "Automatic" for the offset to correspond to the height or width of the unscaled mark, depending on the direction and rotation. You can also define your own offset.
Range: Automatic - From: To:
This is where you can define the first and last position of a collating mark on your reference side. Select "Automatic" if you want the height or width of a page to be taken as the range, starting with "0".
Offset orthogonal:
The collating mark is positioned by default on the cut box (with 'At foot', 'At head' and 'Outer'). As a result, the collating mark may jut into the bleed.
If a positive offset is specified, the collating mark shifts vertically to the page edge outwards (away from the page). If a negative offset is specified, the collating mark shifts orthogonally inwards (towards the page).
Direction: Ascending - Descending - Zigzag - Zagzig
In general, a thick rule is printed on the fold between the first and last pages, which is then visible on the spine of the finished folded sheet. The first collating mark is at the top of the first folding sheet. For each subsequent sheet, the rule is offset by its own length, so that for a correctly and completely assembled book, even steps are obtained. This step can be ascending or descending. Collating is ascending - descending in the case of zigzag and descending - ascending for zagzig.

Note: The position must always start with "Back margin" if you select "Ascending".
Collating group: Additional mark at the edge of the page.
The number of the collating group is positioned in addition at the edge of the page. You can select the position.
Explanation:
The collating group (CollatingMarkExtension) is an extension of the normal collating mark (CollatingMark). It allows additional identification of the booklets that will be produced or additional information about them.
Note:
Remember that the collating group is not a subordinate function of a folding sheet group ("Schemes" step > "All Folding Sheets").
•Variable height
You can define a different height for the mark for each collating group (booklet).
Special Application: on multiple pages
Normally, the collating mark is set only on the first (default) or last page of a folding sheet. This option lets you set identical collating marks on all even or odd pages of a folding sheet. The "Last Page" option determines whether on even or odd pages. A collating mark is set on the last page of a folding sheet when this option is selected.
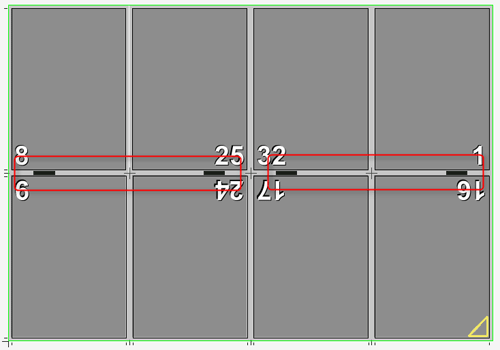
"Special Application: on multiple pages" and "Last Page", both not selected:

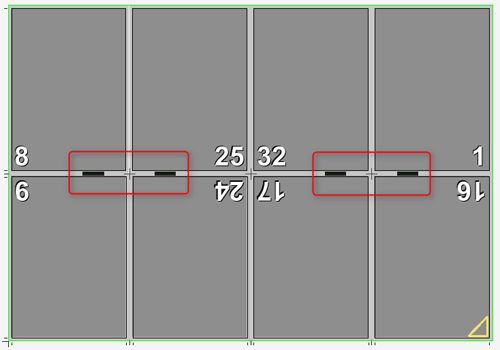
"Special Application: on multiple pages" selected, "Last Page" not selected:
"Special Application: on multiple pages" and "Last Page" selected:
Orientation: Use Rotated Collating Marks
Collating marks are positioned rotated by 180 degrees.
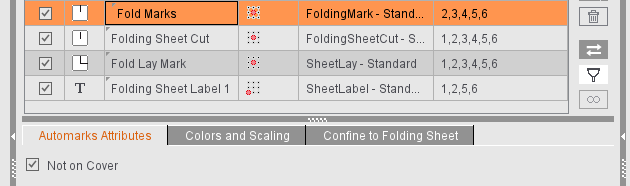
Not on Cover
If "First Folding Sheet is Cover" is enabled in the "Binding" step, you can make sure that no fold marks are placed on the folding sheet concerned by enabling this option.
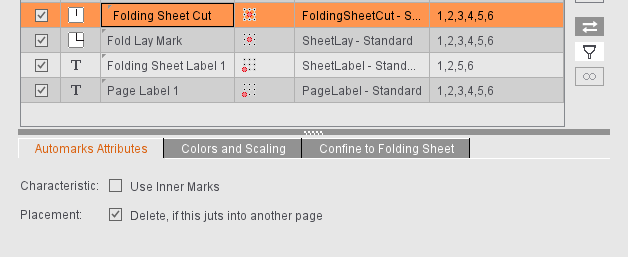
Use Inner Marks
If folding sheet cuts are defined as inner, they are placed on the margins, analog to the precutting marks.
Delete, if this juts into another page
If folding sheets are close to each other, the folding sheet cuts may jut into another page and be printed as well. When this option is set, the mark is removed when the clip path of the mark collides with the clip path of another page. The original folding sheet cuts display again when enough space is made for the mark, for example, by moving the folding sheet.
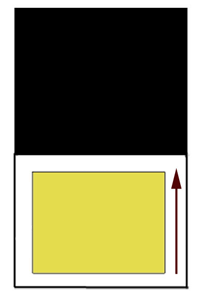
Two fold lay marks, one for the front and one for the back, have the following advantages in processing in offset printing and in bookbinding:
You see automatically after the first proof
•whether the fold lay surface is the correct one (A surface or B surface)
•and which printed page must lie on top on the printed stacks so that the stacks do not have to be turned with a lot of effort before folding.
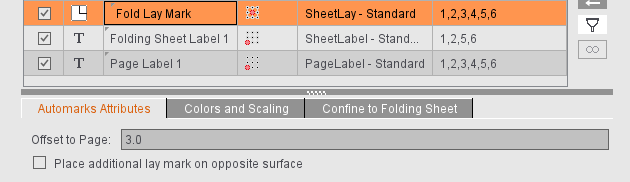
Normally, the fold lay mark is positioned always as set for the fold lay mark defined in the scheme. This is generally the back.
"Position additional lay mark on opposite surface" lets you place an additional fold lay mark on the opposite surface. This is generally the front. If "Apply Folding Procedure to Front" is selected, then the fold lay mark is positioned on the front and the additional one accordingly on the back.
The additional fold lay mark is defined when you select it.
"Offset to Page": The offset to the page is by default set as "0.3" = 3 mm. If this causes the fold lay mark to be off the paper, you can change the offset and set the fold lay mark closer to the trimmed page and, consequently, generally in the bleed.
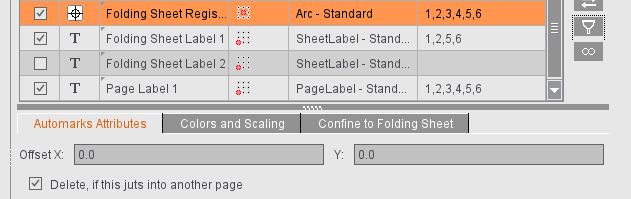
Offset X/Y
This lets you correct the offset of the folding sheet register marks manually if the mark is printed as well or is off the paper.
Delete, if this juts into another page
If folding sheets are close to each other, the folding sheet register mark may jut into another page and be printed as well. When this option is set, the mark is removed when the clip path of the mark collides with the clip path of another page. The original folding sheet register mark displays again when enough space is made for the mark, for example, by moving the folding sheet.
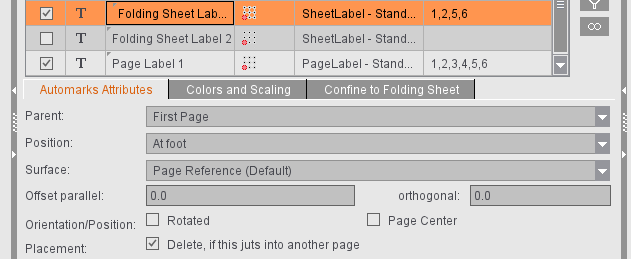
Parent
In addition to different forms of page reference, you can also set that the folding sheet label relates to the folding sheet. The page reference of the mark is enough if the data are read out only after the folding process. However, newer folding machines are equipped with barcode readers already at the feeder, making it necessary to be able to assign a related mark to the still unfolded sheet. To do this, select "Folding Sheet" as the "Parent".
Position
If "Folding Sheet" is selected as the "Parent", you can also define on which edge the mark will be placed. The reference value is either the "Lay Edge" (side of the folding sheet on the lay edge rail of the folding machine) or the "Infeed Edge" (side of the folding sheet that runs into the folding machine). You can place the mark either on the selected edge or on the opposite side. In addition, you can also place the mark centered on the folding sheet ("Center").
When you are determining the lay edge, it is assumed that the first fold in the folding machine is a buckle plate fold and, as a result, folding is in Y direction. This is generally the case. Accordingly, the lay corner and the folding rule of the used scheme determine the lay edge.
Surface
For automation, it is a good idea if you can directly set the surface on which the folding sheet label/assembly block label will be placed and not just by page reference. You can select the surface from the following four items:
•Page Reference (Default) or Folding Procedure (Default)
•to Front Only
•to Back Only
•to Front and Back
"Page Reference" is the default. The folding sheet label is then set to the surface as specified in the page reference. The surface does not have to be front or back but changes according to the scheme used. For example, if you select "Inner Page" as the page reference, the folding sheet label on page 2 is placed on the back. By selecting one of the other three options (to Front Only, to Back Only, to Front and Back), you can directly influence and specify the surface on which the folding sheet label/assembly block label will be placed.
Offset
This lets you set whether and by how much the folding sheet label will be shifted parallel to the selected edge or away from the edge or towards the edge.
Orientation/Position
The "Rotated" option rotates the folding sheet label by 180 degrees. If you select "Center" as the position, you can set an angle instead of "Rotated" for orientation. At present, the angles 0°, 90°, 180° and 270° are supported. Rotation is done in relation to the hotspot of the mark. This means that a hotspot of "Middle middle" is needed if the mark is to rotate by its center.
"Page Center" (for page reference)
The folding sheet label can be automatically placed centered to the pages in the spine if "Page Center" is enabled and the page reference and hotspot of the mark are selected skilfully. The benefit of the this is that covers with six or eight pages can also be fitted correctly with the folding sheet label.
"Folding Sheet Center" (for folding sheet reference)
The folding sheet label is centered on the selected edge. This option is not applicable if "Center" was selected as the "Position".
Placement > Delete, if this juts into another page
If folding sheets are close to each other, the folding sheet label may jut into another page and be printed as well. When this option is set, the mark is removed when the clip path of the mark collides with the clip path of another page. The original folding sheet label displays again when enough space is made for the mark, for example, by moving the folding sheet.
Page Label ("Imposition" Mode) / 1up Label ("Montage" Mode)
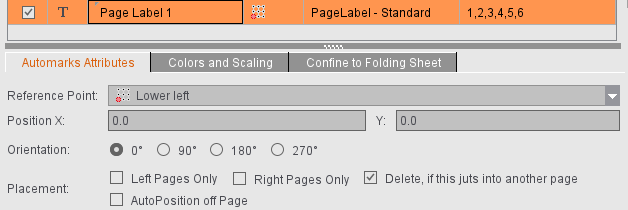
Automatically placed print control marks analog to the folding sheet label, e.g. page-specific data that are set directly onto the page in Proof Color; any number of page labels or 1up labels can be created.
When a label is selected, it is set onto every page. You can define the reference point on the page onto which the label will be set and the position of the label relative to the reference point. In addition, you can define the orientation (0°, 90°, 180°, 270°). You can restrict placement to left pages only or right pages only. The label is removed when the clip path of the mark collides with the clip path of another page if "Delete, if this juts into another page" is enabled.
Page labels can also be positioned automatically off the page. Manual correction is redundant when this option is enabled and the input boxes for the X and Y direction are dimmed. You can still set orientation individually.