
Use this editor if you wish to create/edit a folding scheme that is saved as a resource in "Schemes".
You have a list box at the top right in the "Matrix" group that you can use to create or edit a scheme for web offset. You can choose between sheetfed offset and web offset (up to 8 webs). A list box displays at the bottom of the window beside the "Save" button if you have two or more webs, allowing you to switch between the webs. To start the "Fold Assistant for Web", click the button in "Scheme Generated from Folding Rule". See Fold Assistant for Web .
For a three-dimensional view of a folding scheme, see also Folding Sheet Animation... .
"Name"
Exact name of a fold type listed in Heidelberg's fold type catalog that will be used in this scheme.
The folding scheme name is saved for automatic finishing (default at the folding machine).
The folding scheme name is defined in the standard schemes. It should only be edited if special defaults will be defined at the folding machine.
You will find details about the names of the standard schemes in: Naming Used in the Standard Schemes
"Folding Type (CIP4)"
Folding using the CIP4 fold type catalog automatically displays for the default schemes for finishing in the workflow.
"Comment"
This is where you can enter comments about the scheme. They will not be evaluated.
Normally (symmetric binding), the value is "0" (see Center Offset below). The system sets implausible values for the center offset back to "0".
"Insert at Index"
The next sheet is inserted after this number of pages (e.g. for saddlestitching).
This box and the center offset each base their calculations on the other. In addition, the pages before the insertion point are darker and the pages after it lighter.
What is center offset?
In asymmetric binding with fold-out pages, center offset defines in which fold binding will be.
The purpose of center offset is to calculate page numbering and creeping correctly. Creeping is not used on fold-out pages.
When is center offset used?
Center offset is used only with products that have the following criteria:
•The scheme is single-lined.
•There are fold-out pages. In other words, binding is asymmetric with regard to the folding scheme.
•The selected binding method is saddle-stitching or mixed binding. Creeping must be calculated correctly.
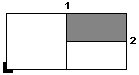
Example: A book will have the following folding sheet:
Folding scheme F04-01_ui_2x1
Pagination and orientation
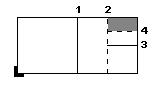
A sheet with a fold-out page shall be contained in it. The sheet has the following folding scheme:
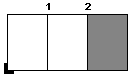
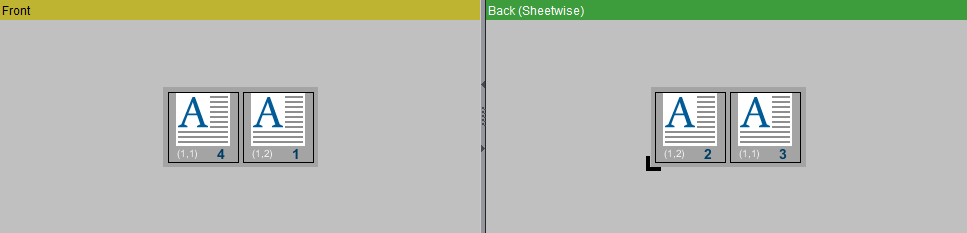
Folding scheme F06-04_ui_3x1_P (not a standard scheme)
Pagination and orientation
The left leaf can be folded out on this sheet. Binding must be in fold 2.
The "Center Offset" parameter defines in which fold binding will be.

Note: If center offset is enabled, the pages before the insert appear dark gray.
Calculation of the center offset
1.The reference point for center offset is the theoretical center of the scheme. You determine the theoretical center of the scheme by dividing the number of all the sheet pages (front and back) by two.
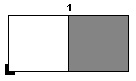
In our example, the theoretical center of the sheet with the fold-out page is "3".
2.Now count the front and back pages from left to right until you come to the fold where binding will be.
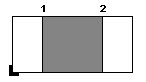
In our example binding is in fold 2. The number of front and back pages until fold 2 is "4".
3.The center offset is the difference between the number of these pages and the theoretical center.
In our example, the value is "1" (4-3). The center offset is positive in this case. This means that the fold where binding will be is to the right of the theoretical center.
•Positive center offset: The fold is to the right of the theoretical center.
•Negative center offset: The fold is to the left of the theoretical center.
"Columns"
Number of columns in the scheme
"Rows"
Number of rows in the scheme
List box for print process
Sheetfed or web offset with the number of webs.
"Back by Tumble"
The default setting is that the back is created by work-and-turn. You must check this option if you wish to create the back by work-and-tumble.
The back surfaces all have the same content (e.g. for postcards, business cards).
"Generate Back"
You generated the page numbers and orientation for the front. The page numbers and orientation for the back are generated automatically if you check "Generate Back".
"Use Prototype"
You have an imposition scheme with many identical 1ups.
•Front: With "Use Prototype", you can copy the number and orientation of the bottom left 1up that is marked "(1,1)" to all 1ups on the front.
•Back: With "Use Prototype", you can copy the number and orientation of the 1up that is marked "(1,1)" to all 1ups on the back.
Sheetwise: The prototype is the bottom right 1up.
Perfector: The prototype is the top left 1up.
"Push Together"
•This function is used if you wish to exclude positions from pagination in the folding scheme and yet keep numbering consecutive. This is required, for example, when only parts of a web are used in printing (see Push Together below).
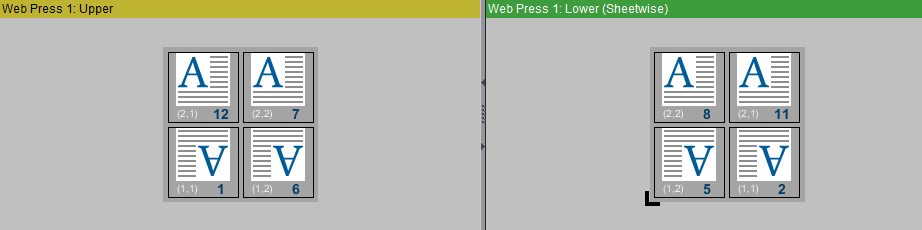
A press with two webs will now be used as an example of how you proceed with "Push Together". The second web width is half the size of the first web.
1.In the "Matrix" group, create a 2x2 scheme and select "Double Web Press".
2.Enter folding rule "X1Y1".
All other settings remain as they are. You then have the following page setup:

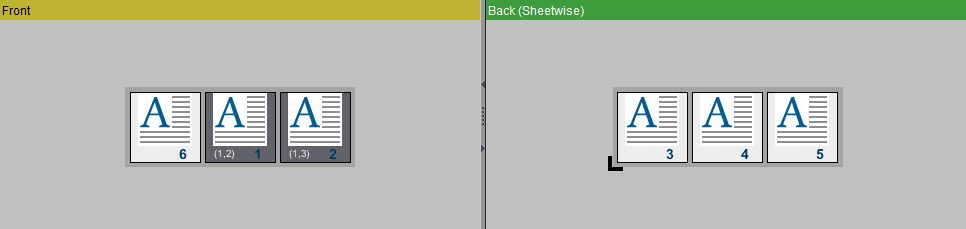
Web 1 without 'Push Together'
Web 2 without 'Push Together'
3.Web 2 is half as wide as web 1. This means that pages 14, 3, 13 and 4 would not be positioned on paper in the scheme. Set these page numbers to "0".
4.Click "Push Together". The page numbers are now corrected. The correct scheme is now as follows:
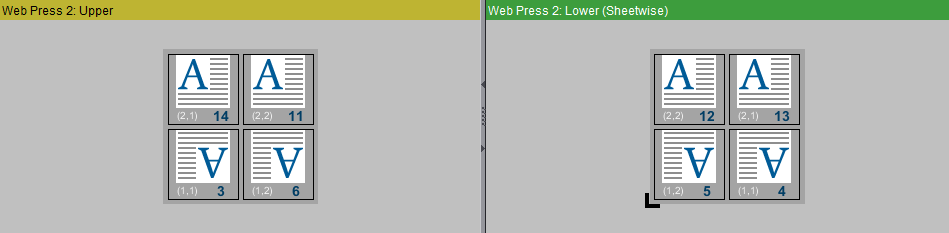
Web 1 with 'Push Together'
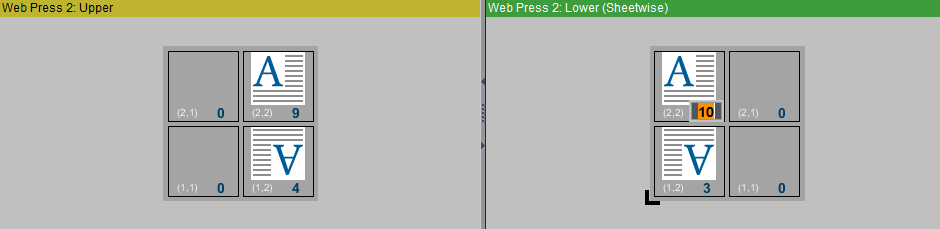
Web 2 with 'Push Together'
Scheme Generated from Folding Rule
In principle, page numbering and page orientation always depend on all the other parameters in this group.
You can type in the folding rule manually in this box (see Folding Rules below).
Start the Folding Assistant by clicking the icon on the right. The Fold Assistant is a graphic tool for creating folding rules (see the Fold Assistant / Fold Animation below).
"Pagination"
•"Normal": The pages of the product you want to fold are numbered consecutively like a book. All the pages have the same orientation.
•"Calendar": The pages of the product you want to fold are numbered consecutively like a book. Every second page has the opposite orientation.
•"Accordion Fold": This type of pagination only affects single-lined schemes. Viewed from page 1, page numbering is to the right and circular (including the back) and in ascending order. All the pages have the same orientation.
"Orientation of Top Page after Folding"
Click the middle of the side edge to change the orientation.
"Web 1 on Bottom"
On most web presses, web1 is on top. You must click this option if web 1 on your press is on the bottom.
"First Page on Back"
•This is where you set whether page 1 lies at the front or back after folding.
"Apply Folding Procedure to Front"
Some products require that the back is printed first and then the front. In such cases, the front lies on top after printing. You must then apply the folding rule to the front.
"Ignore Back"
No back.
"Creeping Headfirst, if Ambiguous"
Different creeping directions can be wanted if several 1ups are used internally in a scheme. By default, creeping of pages is 'in the back margin'. When this option is set, you can define that creeping of the pages is to be via the paper head in this folding scheme.
The folding rule elements are "X", "x", "Y", "y", "." and digits after the letter. The "-" sign is used in special cases and is placed at the start of a folding step.
The fold lay mark is always at the bottom left. Folding is always from left to right and from bottom to top.
•X: Fold in open sheet length, buckle plate on top; the left pages lie on top of the right pages after folding.
•x: Fold in open sheet length, buckle plate on bottom; the left pages lie below the right pages after folding.
•Y: Fold in open sheet width, buckle plate on top; the lower pages lie on top of the upper pages after folding.
•y: Fold in open sheet width, buckle plate on bottom; the lower pages lie below the upper pages after folding.
•".": Stands for Cut & Stack. The sheets are cut and stacked on top or to the bottom.
•Digit: Number of pages up to the fold from left to right or from bottom to top.
•"-": If there is a "-" sign in the folding rule, all folding steps after the "-" are ignored in finishing. The sheets are not actually folded after the "-". However, the steps after the "-" still run through the folding rule so that the page numbers can be calculated correctly. See also Example for folding rule "X1-Y1" and
Example for folding rule "X1X2-x1" for a double gate fold.
You cannot create the "-" sign with the Fold Assistant.
Example for folding rule "X2x1Y2y1"
The standard scheme "F32-08_li_4x4" is used:
Folding scheme F32-08_li_4x4
Show:
Fold broken line down.
Fold continuous line up.
The folding rule in this case is "X2x1Y2y1".
1.X2: Go two pages to the right. You are now at fold 1. Fold your sheet so that the two left pages lie on top of the two right pages.
2.x1: Go one page to the right. You are now at fold 2. Fold your sheet so that the left pages lie below the right pages.
3.Y2: Go two pages to the top. You are now at fold 3. Fold your sheet so that the lower pages lie on the upper pages.
4.y1: Go one page up. You are now at fold 4. Fold your sheet so that the lower pages lie below the upper pages.
Example for folding rule "X1-Y1"
In this example, we'll use standard scheme "F08-07_li_2x2". The folding rule in this case is "X1Y1".
Folding scheme F08-07_li_2x2
Change the folding rule to "X1-Y1". Folding is as shown below if you enter this folding rule. What is special about this folding rule is that step Y1 is not done after the "-" sign.
1.X1: Go one page to the right. You are now at fold 1. Fold your sheet so that the left pages lie on the right pages.
2."-": The "-" sign means that the next step "Y1" is ignored in finishing.
3.Y1: Go one page up. You are now at fold 2. You would now fold your sheet so that the lower pages lie on top of the upper pages.
Practical example for "Come & Go" binding method: Instead of folding in fold 2, the cutter is used at this point when all the sheets are stacked. The lower stack is packed on the top stack by work-and-tumble.
Example for folding rule "X1X2-x1" for a double gate fold
The standard scheme "F06-03_ui_3-4x1" is used:
Folding scheme F06-03_ui_3-4x1
The folding rule in this case is "X1X2-x1".
1.X1: Go one page to the right. You are now at fold 1. Fold your sheet so that the left pages lie on the right pages.
2.X2: Go two pages to the right. You are now at fold 2. Fold your sheet so that the left pages lie on top of the right pages.
3."-": The "-" sign means that the next step "x1" is ignored in finishing.
4.x1: Go one page to the right. There is no fold here in a double gate fold. You would now fold your sheet so that the left pages lie below the right pages.
In a double gate fold, there is no middle fold. For that reason, step "x1" is ignored in finishing.
Fold Assistant / Fold Animation
Start the Fold Assistant by clicking the icon to the right of the "Folding Rule" text box.
Depending on your input in "Matrix", you will see a simplified graphic of the scheme. The fold lay mark is at the bottom left.
Lower down in the window, you can see a three-dimensional animated graphic that simulates folding to you at the same time. Make your window bigger to view both. You can edit in a two-dimensional or three-dimensional view as suits you best. The two view options will now be described.
Both tools are linked together. Any editing you do in the Fold Assistant is shown at the same time in the fold animation and vice versa.
There are two symbols before every possible fold. They indicate whether folding is up or down. It is also possible to cut the folding sheet along the symmetrical axes into same-sized halves:

|
"X": Fold in open sheet length, buckle plate on top; the left pages lie on top of the right pages after folding. |

|
"Y": Fold in open sheet width, buckle plate on top; the lower pages lie on top of the upper pages after folding. |

|
"x": Fold in open sheet length, buckle plate on bottom; the left pages lie below the right pages after folding. |

|
"y": Fold in open sheet width, buckle plate on bottom; the lower pages lie below the upper pages after folding. |

|
"Y": Cut in open sheet width and stacked to "bottom"; the sheet to the left of the cutting edge lies below the right part, only applicable on symmetrical axes. |

|
"y": Cut in open sheet width and stacked to "top"; the sheet to the left of the cutting edge lies above the right part, only applicable on symmetrical axes. |

|
"X": Cut in open sheet length and stacked to "top"; the sheet below the cutting edge lies above the other part, only applicable on symmetrical axes. |

|
"x": Cut in open sheet length and stacked to "bottom"; the sheet below the cutting edge lies below the other part, only applicable on symmetrical axes. |
A part of the light-green scheme disappears after every fold or cut. Each fold or cut is documented as part of the folding rule in the "Folding Rule" text box and the small graphic above it. At the end, you should be left with a dark green box representing the topmost page.
•"Back One Step": Undoes the last fold.
•"Reset": Undoes all folds.
•"Apply": The current folding rule appears in the "Folding Rule" box of the Folding Scheme Editor. The Fold Assistant is exited. Any implausible folding rules are marked red.
•"Cancel": The Fold Assistant is exited. No folding rule is applied.
You cannot create the "-" sign with the Fold Assistant (see Folding Rules).
The fold animation shows you a three-dimensional graphic of the scheme on the folding sheet. Enable the edit mode with a click on the button described below.
The following functionalities are implemented:

|
Deselects the other tools. |

|
Resets a rotated folding sheet to the way it originally was. |

|
Rotates, moves and scales up/down the animation. To rotate: Click the animated graphic while holding down the mouse button and move the mouse pointer. To move: Click the animated graphic while holding down the alternative mouse button (PC: right button, Macintosh: command key) and move the mouse pointer. To scale up/down: Click the animated graphic and rotate the wheel on the mouse. |

|
To zoom up the entire graphic. A "+" appears in the magnifying glass. Hold down the "Alt" key to zoom down. A "-" appears in the magnifying glass. |

|
Enables the edit mode. |
After you enable the edit mode, two symbols appear before every possible fold (green: front, yellow: back). They indicate whether folding is up or down. It is also possible to cut the folding sheet along the symmetrical axes into same-sized halves (red, blue):

|
"X": Fold in open sheet length, buckle plate on top; the left pages lie on top of the right pages after folding. |

|
"Y": Fold in open sheet width, buckle plate on top; the lower pages lie on top of the upper pages after folding. |

|
"x": Fold in open sheet length, buckle plate on bottom; the left pages lie below the right pages after folding. |

|
"y": Fold in open sheet width, buckle plate on bottom; the lower pages lie below the upper pages after folding. |

|
"Y": Cut in open sheet width and stacked to "bottom"; the sheet to the left of the cutting edge lies below the right part, only applicable on symmetrical axes. |

|
"y": Cut in open sheet width and stacked to "top"; the sheet to the left of the cutting edge lies above the right part, only applicable on symmetrical axes. |

|
"X": Cut in open sheet length and stacked to "top"; the sheet below the cutting edge lies above the other part, only applicable on symmetrical axes. |

|
"x": Cut in open sheet length and stacked to "bottom"; the sheet below the cutting edge lies below the other part, only applicable on symmetrical axes. |
The animation shows you how a part of the scheme is folded or cut each time you define a fold or cut and how the sheets are stacked on top or to the back. Each fold or cut is documented as part of the folding rule in the "Folding Rule" text box and the small graphic above it. At the end, you should be left with one box representing the topmost page.
•"Back One Step": Undoes the last fold.
•"Reset": Undoes all folds.
•"Apply": The current folding rule appears in the "Folding Rule" box of the Folding Scheme Editor. The fold animation is exited. Any implausible folding rules are marked red.
•"Cancel": The fold animation is exited. No folding rule is applied.
You cannot create the "-" sign in the fold animation (see Folding Rules).