Prerequisites:
•You have created and saved a job (see Your First Job).
•You have an output parameter set where you defined an output folder.
Procedure:
1.Click "File > Open" in the main menu. Select the job you want to output in the "Open" dialog.
2.You have several ways of starting the Print Job dialog (see Print Job dialog ):
•Click "File > Print Job..." in the main menu.
•Click "File > Print Assistant..." in the main menu.
•Select "Print Job..." below the arrow button in the Browser window. (see Print job from the Browser window).
•Select the "Output" step in the workflow bar.
3.In "Output Parameter Set" in the Print Job dialog, check whether the default output parameter set is the correct one (see Default for the Output Parameter Sets).
If it isn't, click the folder button and load the output parameter set you want from the resources.
4.Click "Output". The job is output to the output folder.
You have already defined the output folder in the output parameter set in the "General" tab > "Output folder for PDF, JDF, JT".
You will find the "Output" folder that is created automatically in "Preferences > Paths > Output".
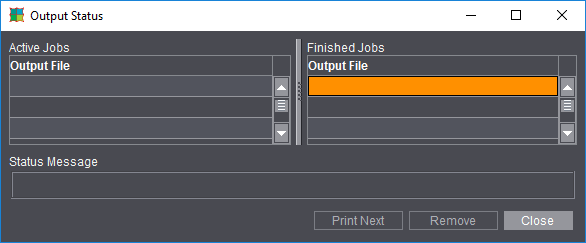
You can check the job status using "Tools > Output Status" in the menu bar (you can view JDF jobs in "Tools > JDF Jobs Status"):
More details about output of the job can be found in the Output chapter.
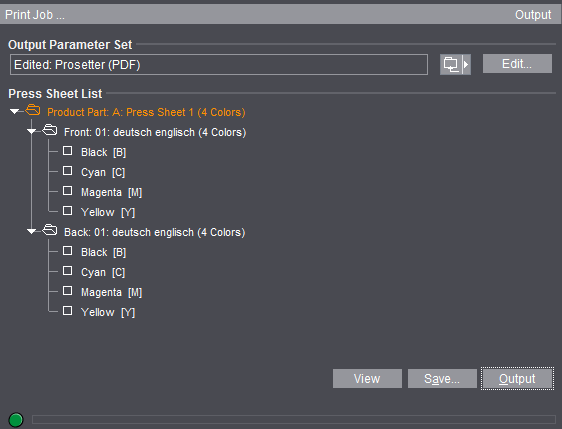
•"Output Parameter Set": Click the folder button beside this box to load an output parameter set from the resources.
Generally, this box has a default output parameter set (see the Default for the Output Parameter Sets).

Note: If you want your output to be centered, make sure that the imaging window is centered with regard to the plate template (see also Reference manual, Plate Template Editor).
•"Edit": This opens the Output Parameter Set Editor. You can modify the output parameter set specifically for this job in this editor. The modified output parameter set is saved together with the job if your job was output successfully. It displays as the default for the next job you output (see Default for the Output Parameter Sets).
•"Press Sheet List": You can select single press sheets for output. Output of all the press sheets is set by default.
You can also print the following parts of the press sheet separately:
·Surface (Front and Back)
·Separations (see the "View" item for details about displaying separated documents and composite documents on the screen).
•"Layer List": You also have a layer list when working with layers. You can select single layers for output. Output of the first layer is set by default.
•"Tile List": You also have a tile list when working with tiling. You can select single tiles for output. Output of all the tiles is set by default.
•"Select All": All the tiles in the list are selected when you click this button.
•"Deselect All": All the tiles in the list are deselected when you click this button.
•"View": Click this button to view your job as a PDF file on the screen.
You must have set the correct paths to the Adobe applications in "File > Preferences > Paths > Select External Executables" (see the Reference manual).
In the print preview, you must make a difference between composite documents and separated documents:
·Composite documents: In this case, Prinect Signa Station displays the imposed PDF press sheet in color. The single separations of the composite press sheet cannot be shown because Prinect Signa Station cannot create separations.
·Separated documents: In this case, the single separations of the press sheet are shown along with any comments in the Adobe message line. This means that the print preview shows exactly the data that will be sent to the RIP for printing. A color composite display of the separated page is not shown in this view. You can see a composite display of the separated pages in the graphic window.

Note: In some cases (e.g. if not all the colors on a surface are to be output) an empty preview displays.
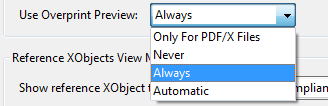
Remedy: In Acrobat Reader as of version 8, you must change the default in "Edit > Preferences > Page Display > Overprint Preview" from "Only for PDF/X Files" to "Always" or "Automatic".


•"Save...": Like with "Print", you can output your job with "Save...". The "Save" dialog provides you with more settings:
·"Save to": This box lets you set a different output folder to the one defined in the output parameter set. The input is not saved.
·"File Name": You can edit the name of the output file in this box.
•"Output": The current job is output to the output folder. You already defined the output folder in the output parameter set > "General" tab.
You will find the "Output" folder that is created automatically for the output folder in "Preferences > Paths > Output".
•The progress bar at the bottom of the dialog indicates the period of time Signa Station will be busy with output and therefore will be locked for further work steps. In some cases (e.g. JDF with report), this process can take some time while the Signa Station can be operable again in other cases although output continues in the background.
Default for the Output Parameter Sets
There are three different sources for the default. The order in which the sources are used corresponds to the details given below:
•Job-specific output parameter set (internal resource, top priority): Normally, you have an output parameter set from the resources for the output of your job. You can modify this output parameter set using "Edit" in the Print Job dialog (see "Edit" in the Print Job dialog ). This modified output parameter set is used only in conjunction with the current job.
·The current output parameter set (it doesn't matter whether it's modified or not) is saved together with the job. This output parameter set appears as the default when you display the Print Job dialog again with this job.
•Plate template (second priority): You can define an output parameter set in the plate template. The output parameter set from the plate template is used as the default if you don't have a job-specific one.
In a product part, you can define several plate templates with output parameter sets. The output parameter set assigned to the first press sheet in the press sheet list is the default one. The output parameter set of the next press sheet is used if the first press sheet was not assigned a set, and so on.
•Last output parameter set selected (third priority): Prinect Signa Station always remembers the last output parameter set used from the resources (i.e. not job-specific output parameter sets!).
This output parameter set always appears as the default if you neither have a job-specific one nor is there one defined in the plate template.
The situation the first time is an exception. You started Prinect Signa Station for the first time and want to output a job for the first time. In this case, there is no job-specific output parameter set nor is there one that was last used. You then have two options:
•You defined an output parameter set in the plate template. This is then set as the default.
•You did not define an output parameter set in the plate template. There is no default.
Print job from the Browser window
You can print a job or parts of a job from the Browser window.
Click the arrow button and select:
•For an entire job: "Print Job".
The product part names are used in the names of the output file if there are several product parts.
Click a product part and display the context-sensitive menu:
•Product part: "Print All Press Sheets of the Product Part...".
Click a press sheet and display the context-sensitive menu:
•Press sheet: "Print Press Sheet".
Print job with the Print Assistant
The Print Assistant was implemented primarily for printing parts of very complex jobs. You can print front and back sheets, versions, layers, tiles and PDF-VT files as required.
You can set up print job s for different presses. This makes it very easy to print, for example, a cover on a SM52 and the body on a XL 106 in one print run.
The Print Assistant is structured in a logical order and you are guided through all your possible output settings.
The Print tabs that display are context-sensitive. They are shown or hidden depending on the content of the job. You can also deselect single tabs. The following tabs are possible in the Assistant:
The Print Assistant starts with the "Press Sheets" tab.
In this tab, you can select the press sheets you want to print with the mouse button or entering them in the text box. You can then print the selection you make here.
If required, you can hide tabs in the tab bar with "Active Stations".
Click the right arrow button to go to the next tab.
You can view the current version by clicking the "View" button in all the tabs.
PDF-VT: When printing a PDF file with variable data, you can enter in "Records" which data sets will be printed and how many. In "Partitioning", you can set how many files will be used for printing (example: Records: 1-1000, Partitioning: 100, result: 10 files, each with 100 data sets (pages)).
This lets you exclude front or back sheets from the output by deselecting them.
Select the press sheets with the mouse button and enable or disable the sheets you want ("yellow" is for front and "green" is for back).
This is possible with a mouse click or with the "On" and "Off" buttons on the left.
Color can be ignored in the output.
You can select/deselect layers for output in jobs with several layers (e.g. language-dependent jobs).
You can select/deselect tiles for output in jobs where tiling is enabled (e.g. large-format jobs).
The "Parameters" tab is only active if you enabled "Output Parameter Set Automatic" in "File > Preferences > Defaults".
You can assign different output parameter sets to the single press sheets. You can also edit the output parameter sets.
The imagesetter planned for output displays for each sheet (in the table below "Parameters").
You can change the press by assigning a different output parameter set to the sheet.
You can edit assigned output parameters:

Note: The setting "All in one job" in "Options" in the output parameter set is ignored in this case.
You define the workflow in the output parameter set in the "General" tab > "Workflow > Device and Variant". You select the workflow in the list box in "Device". Then only the outputs possible in combination with the device are shown in the list box in "Variant".
The workflows that are available in the list box will be explained in: Workflows .
Proofing with Adobe Reader
Prinect Signa Station treats the proofer (color printer, plotter, etc.) like a third-party RIP. At present, you cannot output a PDF file directly from Prinect Signa Station to a proofer. For that reason, we are proofing a PDF file from Adobe Reader.
1.You can launch Adobe Reader in two ways:
•You click "View" in the Print Job dialog.
•You go to your output folder and right-click the PDF file you want to output. Select "Open with Adobe Reader" in the context-sensitive menu.
2.In Adobe Reader, select "File > Print" or click the Printer icon.
3.Select your proofer in the "Printer" group.
4.Start printing.

Note: In some cases (e.g. if not all the colors on a surface are to be output) an empty preview displays.
Remedy:
In Acrobat Reader as of version 8, you must change the default in "Edit > Preferences > Page Display > Overprint Preview" from "Only for PDF/X Files" to "Always" or "Automatic".
Acrobat setting for "Overprint Preview":
You can also set up your proofing internally at the RIP (even a third-party RIP).