
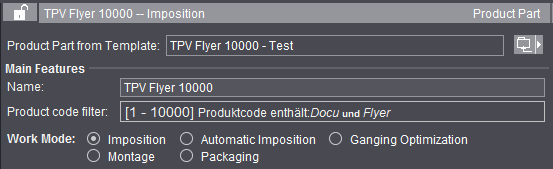
In the "Product Part" step, you define the work mode that you need for your product part or you can select a template from the resources with Product Part from Template. The following work modes are available: Imposition, Automatic Imposition, Montage, Packaging and Ganging Optimization (gang job).
Only the steps that you need for the work mode you selected display in the workflow bar.
Five more product part steps appear when you select "Imposition" or "Automatic Imposition": "Master Pages", "Binding", "Marks", "Plates" and "Schemes".
Another product part step, "Assembly Block", appears when you select "Montage".
Another two product part steps, "Packaging" and "Article", appear when you select "Packaging".
Another two product part steps, "Optimization" and "Results", appear when you select "Ganging Optimization". In addition, you can select "Sheet Optimization without Layout Default" and "Sheet Optimization with Layout Default". Select "Sheet Optimization for Packaging" for a packaging job.
Note: Individual changes you made to a product part with other inspectors (e.g. folding sheet offset with the Press Sheet Inspector) can be lost if you modify this product part in the "Product Part" step! You should give much thought to how you will create a product part, and only make changes to single objects in the product part when you are sure that you don't have to make any further inputs/changes in the "Product Part" step.
You can manually lock or unlock the currently displayed product part.
In the Preferences, you can set that the product part will be locked automatically after changes are made to an item in it. See Automatic lock for Product Part Inspector for details.
When a product part is locked, you can only make minor changes to it in the "Imposition" and "Montage" work modes (e.g. set automatic cut marks). You cannot use other functions that require the job data to be recalculated.
During a recalculation, some of the manual changes to certain items (in the Folding Sheet and Press Sheet Inspectors) are overwritten. Because this is not always wanted, customers requested that the appropriate functions in the product part are disabled by a lock.
The header of the product part steps indicates the locked status by a yellow lock.
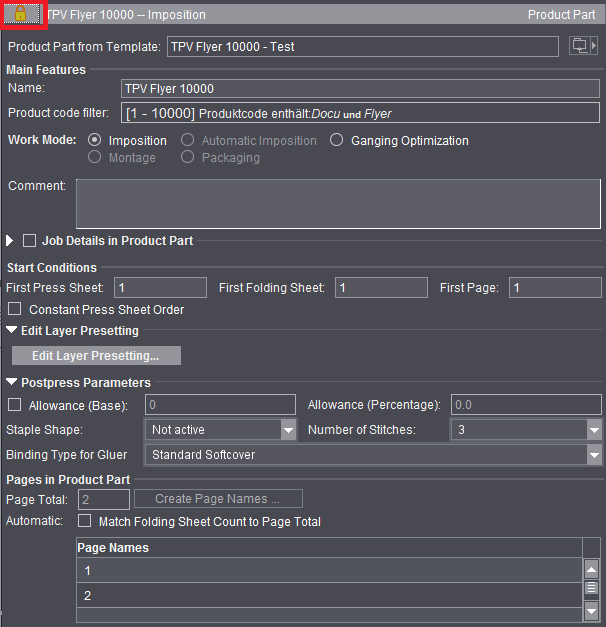
Product part status: locked
Product part status: not locked
The top screenshot shows the "locked" status. The "Product Part from Template", "Work Mode" and "Pages in Product Part" functions are disabled accordingly. Functions affected in the other steps are also disabled.
You can change the status manually at any time with a click on the lock. This lets you use all the functions again.
You can save the product part as a template. Do this in the Browser window by displaying the context-sensitive menu and selecting "Save product part as 'Resources/Product Part Templates'." You can then display this product part again as a template (by clicking the folder button on the right) or list it in "Resources > Product Part Templates". The product part template contains all the Prinect Signa Station product part data without data pages. The administrative data of the job are not part of the product part. See also the Job (Administrative Data) .
Use product part templates for MIS import
When a job in JDF format is imported (MIS import), a large part of the layout generally has to be retouched because the layout definition in the MIS JDF is not very accurate. For recurring jobs (default jobs) that only differ in the number of pages, the "Product Part from Template" function in combination with "Match Folding Sheet Count to Page Total" makes it possible for you to give such jobs the required layout fast.
Create the product part template with the Product Part Template Editor so that it contains all possible plate templates ("Plates" step) and one copy each of all possible folding sheets ("Schemes" step). The "Page Total" in the "Product Part" step results from this: For example, you must enter 4+8+16=28 if folding sheet types 4, 8 and 16 are needed. In addition, "Match Folding Sheet Count to Page Total" must be enabled in the "Product Part" step. For the rest of the product part, create it so that it is suited for the production of the default job.
When you import the default job, select the product part template created for it using "Product Part from Template". The selected product part with all its attributes is enabled and the number of pages in the MIS job is applied to it. This means that press sheets/folding sheets in the template are duplicated or removed to match the page total. All parameters in the template like folding sheet positions, cutting data, creeping, etc are retained. The header data (customer, job number, etc.) and paper data from the MIS job are retained.
You can type/change the name of the selected product part in this box.
Shows the production type (= product code) entered in the product part.
This information makes it possible for the required product part to be used automatically in the "Gang Job" and "SignaServer" workflows. More details are to be found in the description in the Types of Gang Jobs and Their Editing section.
In addition to the keywords for production type, it is also possible for you to use the delivery quantity for selection of the product part.
In the current job, the product code filter that displays is for your information only and cannot be edited. You can invoke the editor for creating the product code filter in the "Product Part" step when you are editing the product part template.
More details can be found in Product Code Filter Editor.
You can define a number of keywords for the product code, but only once the delivery quantity threshold as of which this product part will be used.
Example:
2 product part templates ("Broschure -200" and "Broschure 201-") have been created.
One of them is to be used for brochures up to a quantity of 200 for printing on the digital press.
The second product part template is to be used for brochures with a quantity of more than 200 for printing on an offset press.
An XML could look as follows:
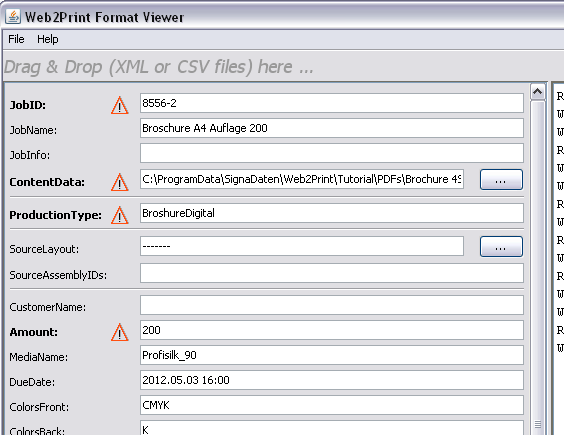
"BrochureDigital" is specified here as "Production Type". There is no such production type. But there are two types with "Brochure*".
One with a delivery quantity of up to and including 200. This type is found because the XML requires a delivery quantity of 200 in "Amount"
The second product part template is used if the delivery quantity is 201 or more.
The work mode you select defines the structure of a product part. The content of a job is shaped by what or how many work modes you selected. A job can have different work modes (product parts).
A certain number of pages are imposed based on a folding scheme you selected. You only create as many sheets as you need for the number of pages. You define the number of pages in "Page Total". In contrast to automatic imposition, no sheets are added or removed automatically.
In this mode, you can process different folding schemes and paper and plate templates in one job.
This is important, for example, if the page total cannot be processed with one folding scheme (20 pages can be imposed with a 16 folding scheme and a 4 folding scheme).

Note: Changing the page total subsequently does not mean that the number of sheets are automatically matched to this total. The user must change this manually.
You can change the number of sheets in the "Schemes" step in "Number" in the table so that the value shown in "Unplaced Pages" is "0". You can also add another, suitable scheme for the "unplaced pages" using the folder button.
You can also change the names of single pages, for example, to make it easier to tell the cover of a job from the body. This makes it much easier in some documents to place single data pages correctly on the press sheet. To do this, you must select the row with the page you want or a page range and then choose "Change Page Names" in the context-sensitive menu.
A consecutive number is automatically added to the page name you entered (I becomes I1, I2, I3, ...) if you selected several pages. If the page name you entered is a digit, consecutive numbers are generated as page names starting with this number (32 becomes 32, 33, 34, ...).
Different folding sheets can be placed on the plate template if you enabled the "Gang run form" option (in the "Plates" step).
In this work mode, an undefined number of pages are imposed automatically based on the folding scheme you selected. You do not have to define a set number of pages. The required number of press sheets is created automatically (duplicates of the first sheet) when you assign data pages later. In this mode, it's not possible to combine different folding schemes.
You can use this mode, for example, if you wish to assign documents with a large number of pages to a layout in the Prinect Prepress Manager. The processing of books in particular is a typical case for an automated workflow.
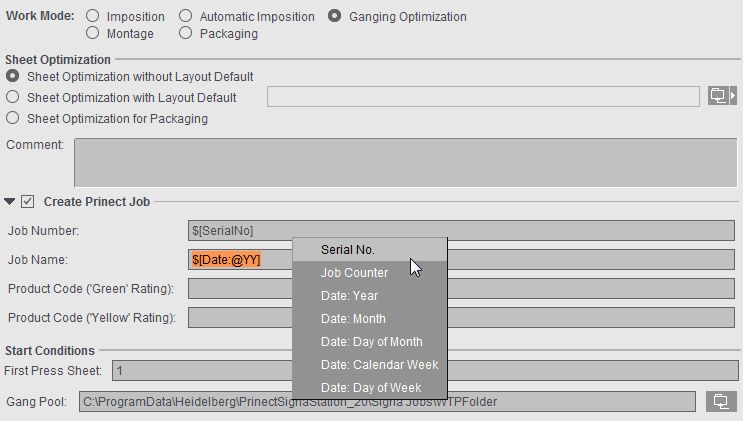
Ganging Optimization (gang job)
Enable this option to process jobs automatically with the special "Gang Job" workflow. The workflow bar changes accordingly. You can set other options in "Sheet Optimization". See Introduction to a Gang Job with Sheet Optimiza-tion for a description of working with gang jobs.
In this work mode, pages are not imposed on the basis of a selected folding scheme, but single pages, also known as 1ups, are created in assembly blocks/sheets.
In this mode, Prinect Signa Station assumes that only one sheet will be needed for the assembly. An example here would be a large-format film. You can fill this sheet with 1ups of the pages or place the pages freely on the sheet by dragging-and-dropping them there.
This work mode is very suited for the production of postcards, business cards or labels.
The option is only available if you have a license for "Packaging Pro" and/or "Label Pro". Details about packaging are found in Packaging (Packaging Pro, Label Pro).
When you create a gang job, select the "Ganging Optimization" work mode with the "Sheet Optimization for Packaging" option. See Ways of Working with Gang Jobs.
Comment
It's a good idea to comment the special features of a product part if you wish to use it as a template.
These settings are available only in the "Ganging Optimization" mode. See Introduction to a Gang Job with Sheet Optimiza-tion.
These settings are available only in the "Ganging Optimization" mode.
When manually creating a gang run form on Prinect Signa Station and also during automatic processing by the Prinect Signa Station Gang Server, you can enter product codes and create a layout directly in a Prinect job.
During automatic processing by the Prinect Signa Station Gang Server, various functions are triggered by the use of product codes in the workflow:
•Job creation with matching process network via Smart Automation
•Automatic start of processing
•Definition of the procedure instructions for the matching gang run form based on placed gang parts
In order for the layout to be sent to Prinect, a suitable output parameter set must be selected. The output folder must be accessible for the Prinect system.
The following specifications apply:
•Creation of a Prinect job "in the Business Manager" only allows output parameter sets that have "Prinect 21(via Prinect Business Manager)" set as the output variant.
This is applicable both for Prinect Signa Station (in the product part) and for the Signa Gang Server (in the task).
•Creation of a Prinect job "in the Integration Manager" does not allow any output parameter sets that have "Prinect 21(via Prinect Business Manager)" set as the output variant.
This is applicable both for Prinect Signa Station (in the product part) and for the Signa Gang Server (in the task).
•Consequently, an output parameter set with "Prinect 21(via Prinect Business Manager)" as the output variant is allowed only when "Create Prinect Job in the Business Manager" is enabled.
Before printing to the output folder, you will be asked whether the layout will be used in the Prinect job. A message displays the import folder in the Prinect system if the layout was sent error-free to the system.
|
Field Name |
Description |
|---|---|
|
In the Integration Manager/In the Business Manager |
This is where you select whether the job will be created in the Prinect Integration Manager or in the Prinect Business Manager. When your selection is used in a product part template and automatic processing via gang tasks, make sure that the settings from the product part have an impact only if "Job Data from Template" is enabled in the gang task. Note: If the job is to be created in the Prinect Business Manager, the job number is always defined in the Business Manager. As a result, the "Job Number" box is dimmed here in the settings in Prinect Signa Station. |
|
Job ID / Job Name |
Number and name of the job as will be created in the Prinect Cockpit. The following differentiation is possible with the "SerialNo" placeholder: For example, if a task processed on day X is restarted manually on the same day, the data are written to a new job with the serial number placeholder. If a serial number placeholder is not used, a second job is not created and the data of the second run are added to the existing job. The "next run" resulting from these settings then displays in the properties list and is always up-to-date for each task in the "Planned Tasks" window. You must fill out both boxes. If not, an error message will be issued when going to a different step. During the first import to the input list in "Optimization", any placeholders will be replaced and you can then no longer edit the "Job Number/Job Name" boxes. |
|
Product Code |
You can use these boxes to define product codes based on which the gang jobs will either be automatically processed further by the Prinect Cockpit ("green" rating) or stopped for manual correction ("yellow" rating). The product codes you set in these boxes are entered in the layout JDF. Nothing is entered in the layout JDF if a product code is not defined. The "'green' rating" product code is entered if the "'yellow' rating" product code is not defined. |
The data for job number and job name as well as the product codes are defined in the product part template. There are two option when processing:
•When you are working with the Prinect Signa Station Gang Server, the data are taken from the assigned product part template ("Job Data from Template" enabled in the gang task and product part template selected in "Template").
•The job data are set in the gang task ("Job Data from Task" and boxes for job number/name and, if necessary, product codes filled out). This is advisable if various gang tasks use the same template.
You can hide the function using "File > Preferences > User Interface".
When this function is enabled, you can name specific job details for each product part in a job with several product parts.
Active versions in product part (only with version cluster)
This table shows you all created versions plus a description of each if you have a version cluster (= several product parts).

The check box in the "active" column lets you assign the versions you want to the selected product part. A version that is already found in another product part of this version cluster is removed from this product part when you assign it to a selected product part.
You go to the "Product Part" step to process the version cluster using the button to the right of the list.
First Press Sheet
In automatic press sheet generation, you can change the starting number of the first press sheet manually. All following press sheets are incremented accordingly.
Defines the start of the first press sheet in a product part. Enter a five if you want the number of the first press sheet in the product part to be a five (can be seen immediately in the graphic window and is part of the sheet label in output).
First Folding Sheet
This defines the number of the first folding sheet in the product part. The folding sheet number affects calculation of the collating marks (starting position) and the folding sheet label.
First page
You can change the number of the first page. Page numbers and page name are affected by this.
Gang Pool (only in the "Ganging Optimization" mode).
This is where you set a job-specific folder from which the gang parts will be imported during a gang job. The content of this folder then displays when the "Job Import from Gang Pool" window opens. The default folder for the gang pool is the one that is set in "Ganging Optimization > Default for Gang Pool" in the "Preferences".
If a different folder is set for the job, the display is refreshed in the "Job Import from Gang Pool" window even if the window is already open. The path to the folder set in the job is saved along with the document, meaning that the job-specific folder displays again when the job is reopened.
If the default is used, this setting is also kept in the job even if the preferences should have changed when the job is next opened.

Note: You cannot change the folder in the "Job Import from Gang Pool" window; the folder set in the job always displays in this window.
To select a template, click the right folder button. You can select only product parts of the "Montage" work mode. The default templates are those that are set in "Ganging Optimization > Default for Assembly Blocks" in the "Preferences".
Default for Product Codes Search

Note: Only in the "Ganging Optimization" work mode with "Sheet Optimization without Layout Default".
When working with ganging optimization, the gang parts for this gang job are scanned for product codes in the product part template group set in this box. The default group is the one that is set in "Ganging Optimization > Default for Product Codes Search" in the "Preferences".
Like the gang pool, this setting is also saved along with the job. As a result, the original product part template group is kept when the job is reopened even if the preferences were changed in the meantime.
You can hide the function using "File > Preferences > User Interface".
You can select and edit preferences for the saddlestitcher (staple shape and number of staples).
"Allowance (Base)" and "Allowance (Percentage)" are new parameters for sheet optimization. The optimization algorithm needs details about the allowance for cutting and folding.
Allowance (Base)
Fixed portion of the allowance for automatic calculation of the allowance in sheet optimization More details can be found in Sheet Optimizations.
Allowance (Percentage)
Percentage of the allowance depending on production quantity for automatic calculation of the allowance in sheet optimization More details can be found in Sheet Optimizations.
Staple Shape
List box with different staple shapes for the saddlestitcher The parameters from the output parameter set are applicable if "not active" is set (for a schematic representation of the staple shapes, see Saddlestitcher).
Number of Stitches
List box with the number of staples for the saddlestitcher
Binding Type for Gluer
The value is written to the output JDF and can be used in postpress for machine presetting. The setting has no impact in Signa Station.
This is a workflow option for quota jobs (jobs with part shipments/versions).
A quota job is generally created in the Prinect Business Manager. A JDF file that is loaded in Prinect Signa Station is created. A product part template is used or selected by means of a default product code and is then used for creating a layout.
These are always jobs with versions. The quantity and the names of the versions are provided by the JDF file. However, this file does not have any information about the layers in the versions and their levels.
To provide this information, you can now predefine layers and levels in the product part. These will be used if you are going to create a layout for a quota job.
The editor for creating and editing layers opens.
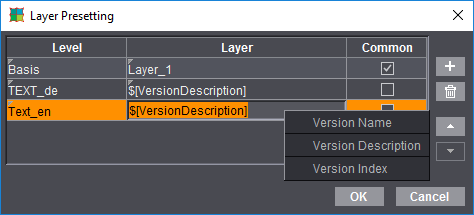
The number of rows is equivalent to the number of layers that will be in the versions you will create.
The following data are necessary:
•Level: The level the layer belongs to.
•Layer: The name of the layer you will create. A layer must have a placeholder for levels that are not to be identical for all versions. If it hasn't one, you cannot create different layer names for different versions. The following placeholders are available:
·$[VersionNameSimple] - The name of the version that is specified in the JDF
·$[VersionDescription] - The description of the version from the JDF
·$[VersionIndex] - The index of the version in the list of versions
·$[PageCount]
For layers that are shared by all versions of a specific page length. If a new product job is generated based on such a product part template with a page count-dependent layer, then the $[PageCount] placeholder is replaced by the page count that is in the version.
•Common: Indicates whether the set level is to be identical for all versions.
You can add placeholders in the layer names using the context-sensitive menu.
Prerequisites:
•All levels and layers must be defined.
•The names of levels and layers must be different.
•There must be no placeholder in a layer name if the layer is defined as a common layer. A layer must have a placeholder in its name if it is not defined as a common layer.
Pages in Product Part / Page Names (in the 'Imposition' mode only)
Input of the number of pages in the open product part.
Page Total / Create Page Names ...
You can find a general description of "Page Total" in the description of the "Imposition" work mode (see Imposition).
"Create Page Names ..."
Implemented automated mechanisms in the function facilitate the input of page names, especially if there are several language versions.
Automatic: Match Folding Sheet Count to Page Total
If this option is set, the folding sheets are matched automatically to a page total that was modified.
The following prerequisites for this function must be met:
•You must obtain the required number of pages by duplicating or deleting existing folding sheets. An error message is issued if this is not the case.
•Each folding sheet type (4, 8, 16,...) may be only once in the product part template, exception: If "First Folding Sheet is Cover" is set in the product part, then there can be two folding sheets of the same type.
•The folding sheets may not have any customized changes as changes would be lost in the Folding Sheet Inspector or Press Sheet Inspector.
Procedure without product part template
1.Start the workflow bar with "File > New". Click the "Product Part" step.
2.Specify a normal number of pages in "Page Total" and enable the "Match Folding Sheet Count to Page Total" option.
3.Select, for example, three different folding schemes in the "Schemes" step. Schemes of 4, 8 and 16 are good choices.
4.In the "Product Part" step, you can now increase or decrease the page total by the amount required. In the Browser window in "Folding Sheets" or in the graphic window > "Press Sheet List", you can view how your number of folding sheets are matched automatically.
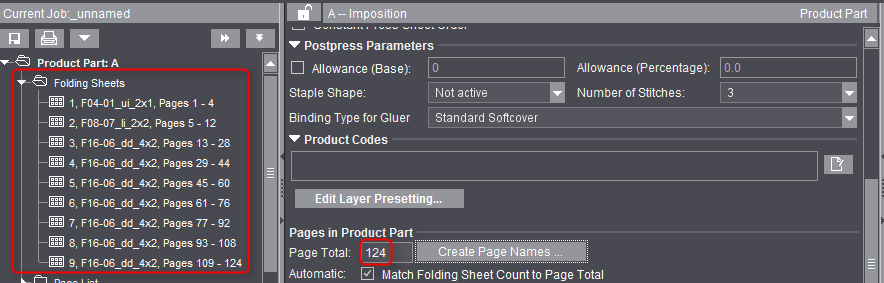
On the left, you see the number of folding sheets for a page total of 124.
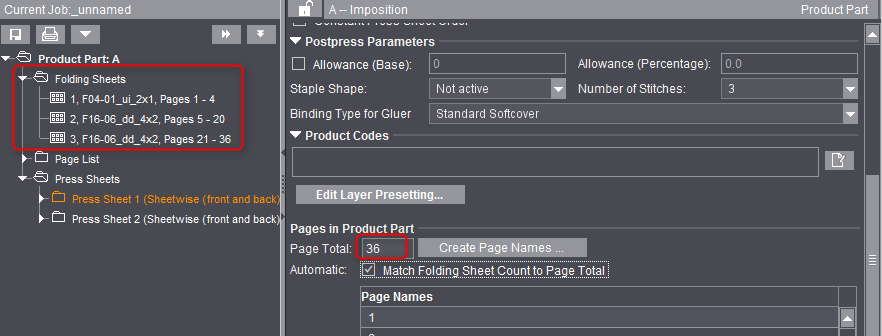
On the left, you see the number of folding sheets for a page total of 36.
Automatically placed print control marks
In the "Montage" or "Packaging" work mode, you can have print control marks placed automatically in the "Marks" step like with imposition jobs. By default, the fields are populated with those marks that were defined in "Resources" in the Preferences. You can select any mark you wish when you click the folder button. Specify a different percentage to change the scale factor of the mark. With the list box, you can specify the color layers to which the mark is to be applied.
•Cut Marks (enabled by default only in the "Montage" mode)
•1up ID
The automatic mark was designed mainly to identify 1ups on a gang job. The mark shows the job ID and sheet number on the "ProofColor" layer and knocks out the background.
You can also use the function in the "Montage" and "Packaging" modes.