
"Master Pages" contain data about the page formats for the "Imposition" or "Automatic Imposition" work modes.
This is where you can define the trimmed size, the trim, the page size for special master pages and the position of the page content for every master page. You can also define whether just one master page, two master pages or special master pages will be used in the product part. The values apply to all the pages of the product part.
Master Page Types and Trimmed Size
Types
In this list box, you can select whether you need one or more master pages in the product part. You will only need one page type if all the pages in the job have the same trimmed size and if the user data (PDF pages) that will be assigned later have a similar structure. In other words, that they can be handled the same when they are being positioned within the master page. In this case, the "Current Type" list box is dimmed.
Select "Left pages" if the user data (PDF pages) can have different positions for the right and left pages. You now can specify the values for this page. Now select "Right Pages". Except for the placement rule, the values for the left page also apply to the right page.
This may be necessary, for example, if different positions for a left and right page were assigned and there is no trim box in the PDF document.
Note: Only one page type must be created if the PDF document has a trim box because contents/pages with different positions are automatically aligned using the trim box. You can view the trim box of the PDF documents in the Document Inspector and, if necessary, correct it there.
Select "Custom" if a folding scheme has different formats, e.g. a letterfold with shorter pages. The display/input options below are then enabled. You can also define any number of special master pages. This allows you to use different formats in a scheme. You can assign a special master page to a page in the scheme either in the Folding Sheet Inspector > Scheme display or in the "Schemes" step > Gaps and Master Pages. The page then has a green page number.
A case where you would use a special master page is with a larger page in an advertising leaflet or with fold-out pages in a magazine.
To override the automatic bleed:
There are special cases where a bleed must jut into the adjacent page. You can allow this by creating a special master page with a custom bleed because the automatic bleed cannot be applied to special master pages.
In addition, you can disable "AutoReduce Bleed" in the Page/1up Inspector.
Setup of a special master page
Click the "+" icon to display a dialog where you can enter a name for the special master page. The values shown or modified below it then apply to the special master page with this name.
You can click the folder button and select an existing format from the resources. The name is then automatically used for the special master page.
You can delete the displayed special master page and its values from the list by clicking the trashcan icon.
Width/Height
You can select DIN formats and other standard sizes directly using the folder button on the right in the "Choose Page or Paper Size" dialog. You can generate and/or call up other non-standard formats in this dialog. You can also create or modify page sizes in the "Jobs & Resources > Resources & Machines" menu in "Page and Paper Sizes", see also Page and Paper Sizes.
You can change the values of a page manually in the text boxes.
You use page-related bleed to define the area with user data that will be seen in the output.
The value you enter in this box refers to the trimmed size. A value of 0 mm means that only the area of user data within the trimmed size can be seen. A value of 3 mm makes sure that the visible area projects beyond the trimmed size by 3 mm on all sides.
This step is required to avoid white flashes when the motifs of the data pages only go as far as the edge of the trimmed size.
Prinect Signa Station automatically makes sure that the bleed doesn't jut into an adjacent page, i.e. the value entered is applied (e.g. 3 mm) everywhere where there is enough space. At other edges, the value is reduced until both bleeds meet in the middle between the pages concerned.
The text box has a default value taken from "Preferences > Defaults > Bleed Default".
To fit the PDF page to the trimmed size, you can select the "Placement rule for assigned pages > Automatic" option if there is a trim box (applicable only to "Imposition / Automatic Imposition").
If you selected "Use custom values" in "Custom Bleed and Trim Allowance", only the values shown there are used and the bleed specified here is ignored.
The bleed for the pages at the back margin is set to the value defined in "Preferences > Defaults > Bleed ... in routing margin" if you use a binding method that includes a routing margin. Normally, the routing margin should not have any print data.
Custom Bleed and Trim Allowance
You can hide the function using "File > Preferences > User Interface".
"Inner" and "Outer" always refer to two-page spreads. For a left page, "Outer" is a bleed on the left, for a right page the bleed is on the right. For a left page, "Inner" is a bleed on the right, for a right page the bleed is on the left.
These values are used if "Use custom values" is enabled. The value defined in "Page-related Bleed" is then ignored.
In a few rare cases, you must define a custom bleed for certain margins. For example, a bleed may have to be reduced at an edge because a print control mark would be covered otherwise.
This option lets you assign the pages in a large PDF document to a multiple-page folding scheme. Based on the number of pages on the folding sheet, folding marks are then set automatically, the required folding calculated and CIP3/CIP4 data can be passed on to finishing.
This function makes the production of, for example, tri-folds, poster folds, book/publication covers, fold-out pages and package inserts much simpler and automated.
This function can be used only if "Use custom values" is enabled. The value defined in "Page-related Bleed" is then ignored.
Example of a cover page:
There is a cover page 1, for which we will use a scheme with three page positions plus spine (two A4 pages 2 and 3, a 5 mm spine inbetween, a flap 4).
We will only use page position C_1, i.e. the flap (special master page), for positioning of the cover page.
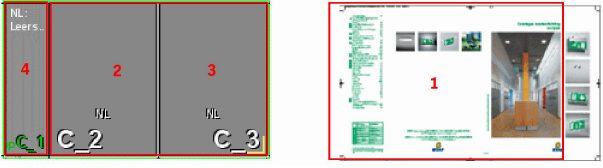
The flap is defined as a "Single Page for Folding Sheet". The page is automatically dimensioned to fit perfectly when it overlaps the other two page positions including bleed.
The page is made bigger by the values specified in these boxes. In other words, material/paper is added for a larger trim. This changes the position of the page on the press sheet. The trimmed size, however, doesn't change.

Note: The values specified in these boxes affect the gap width that you can define in the Folding Sheet Inspector or in the "Schemes" step. You can think of these values as a minimum gap width that are always kept even if you enter a smaller value for the gap in the inspectors or place the pages on the sheet automatically ("Automatic Gaps").
You can hide the function using "File > Preferences > User Interface".
Makes a simple and automated production of small formats possible, e.g. small-format, square books or calendars. Several different single segments (e.g. small-format, square books) are grouped together to one large production folding sheet using the "Layers" function so that the single segments lie side by side. Cutting is done only after the last fold.
Folding sheets with special master pages can also be segmented.
The automated function calculates the target size (trimmed size), the bleeds and outer edges of the single segments on the sheet from the sizes and data you entered, it shows the 1ups in different colors and sets the cut marks.
To set a mark for each segment, select a mark with the "Segment" placeholder in the "Marks" step > "Folding Sheet Label".
Folding sheets are segmented
"Automatic" segmenting of the folding sheets starts.
Size of Single Segment/Page after Separating Cut
Enter the target size you want (trimmed size) of the single segment (e.g. size of the small-format, square book).
The trimmed size changes automatically in "Master Page Types".
Segment Order on Folding Sheet
Copies X, Y: Enter the number of segments that are to be side by side (X) or one below the other (Y).
A layer is created automatically for each segment (copy) in "Job Inspector > Number of Layers". The layers can then be filled later several times with the quantity you want.
Copying is possible in one direction only. A value is automatically reset to "1" if your input is wrong.
The trimmed size changes automatically in "Master Page Types", the copies are added up corresponding to the trimmed size.
Distance ? - ?: The list box lets you select segments side by side or one below the other. In the box beside this, you enter the gap required. This means that you can have different gaps.
Placement rule for assigned pages
This is where you set how the PDF page content will be placed within the trimmed size.
Automatic
"From Trim Box" is the factory default in the "Imposition/Automatic Imposition" modes.
In "Packaging" and "Montage", the automatic default for "Placement rule for assigned 1ups" is "Center" (scaling 100%, orientation 0 °, no mirroring).
When you select "Automatic", the default set in "Preferences > Defaults..." displays in parentheses. The optional settings cannot be seen.
See Defaults for Master Pages (Placement Rule).
By user (view options)
When this option is set, custom options are added to the group.
Possible Placement Rules
•"From Trim Box": In this option, the trim box is fit to the trimmed size. The bottom left corners are the reference points (equivalent to "Automatic" in "Imposition/Automatic Imposition").
The trim box at Prinect Signa Station is defined as follows:
·Case 1: The PDF page has a trim box. The trim box at Prinect Signa Station is then fit to the PDF trim box.
·Case 2: The PDF page doesn't have a trim box but a crop box. The trim box at Prinect Signa Station is then fit to the PDF crop box.
·Case 3: The PDF page has neither a trim box nor a crop box. The trim box at Prinect Signa Station is then fit to the PDF media box.
•"Center": The page content is centered on the trimmed size if you select this option. This option is helpful if the user data are centered on the PDF pages (equivalent to "Automatic" in "Montage" and "Packaging").
•"Custom": This option lets you define your own offset for the data page in relation to the trimmed size in X/Y direction.
You can define settings for scaling, orientation and mirroring for all three offset types.
For more details about the bounding boxes, see the "Glossary".

Note: All settings that you define in "Placement rules for assigned pages" overwrite any settings made in the Page/1up Inspector.