
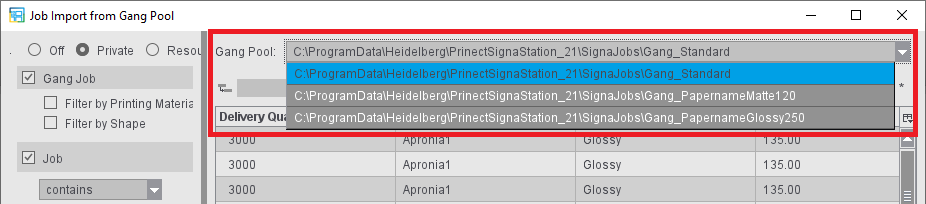
You can use the "Ganging..." button to import customer jobs at any time from the gang pool. The window "Job Import from Gang Pool" opens (for a detailed description, see: Job Import from Gang Pool).
This window displays all jobs in the gang pool that have not yet been processed, possibly restricted by the filter criteria set on the left-hand side.
Note: Jobs that were removed from the press sheet in the grouping table (see above) automatically display again in the gang pool.
Select the jobs you want and click "Import" to add the jobs to the ganging optimization job. If jobs could not be imported, this is displayed in the log with details of the cause.
Working with multiple gang pools
When the "Job Import from Gang Pool" window opens, the contents of the gang pool are read and all individual jobs are displayed in the list. If the gang pool contains several thousand individual jobs, reading can take several minutes under unfavorable circumstances.
To remedy the issue, you can specify multiple gang pools. You can use these gang pools to pre-sort the jobs, for example by paper type.
When you open the window, only the jobs in the gang pool that is set in the respective job are displayed or, if no gang pool is currently open, only the jobs in the default gang pool.
1.Open the Preferences with "File > Preferences"
2.Go to "Ganging Optimization".
3.In "Gang Pool", click "New", to add more gang pools to the default gang pool list.
4.If necessary, change the order of gang pools in the list. The first gang pool in the list is important here, as this is used as the default setting when creating ganging optimization jobs.
5.When the "Job Import from Gang Pool" window opens, it displays only the contents of the default gang pool or the gang pool used last. You now have the option of setting one of the other defined gang pools under "Gang Pool".
Prerequisite: There is no open ganging optimization job. The gang pool set in this job would then be displayed and could not be edited here in the window.
6.If the gang pool into which you want to import the individual jobs has already been created and opened, you can edit the desired gang pool in the job in the "Product Part" step under "Start conditions > Gang pool". The "Job Import from Gang Pool" display refreshes automatically; there is no need to close the window for this purpose.
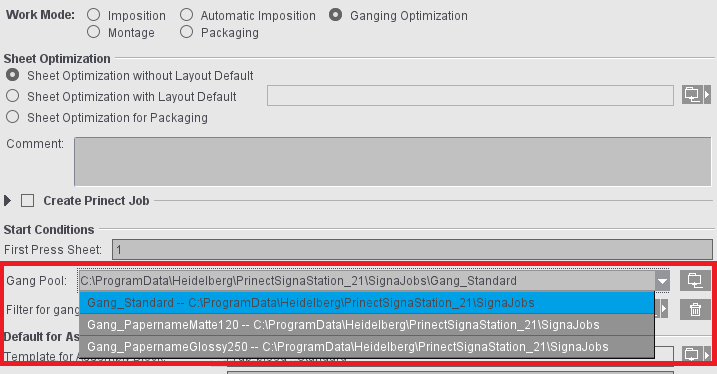

Note: In the product part, you can simply select one of the gang pools defined in the default settings or set the desired gang pool by entering its path or selecting it via the file browser.
The first time a gang pool is opened, the files and structure are read in. Automatic monitoring is then normally active, i.e. the display is automatically updated when changes are made in the gang pool. If too many monitoring processes are running on a computer, it is possible that not all the gang pools are updated automatically. In this case, you can press the F5 key to read in the contents of this gang pool again and update it manually.
Meaning of the status icons:
|
No icon |
The gang pool has not yet been read. |

|
The gang pool is being read. |

|
The gang pool has been read. Automatic monitoring is active. Changes to the file system of the gang pool such as the filing of new individual jobs are displayed automatically. |

|
The gang pool has been read. Automatic monitoring is not active. If changes are made to the file system of the gang pool, you must press F5 to read the contents in again. |
Naming the folders of gang jobs
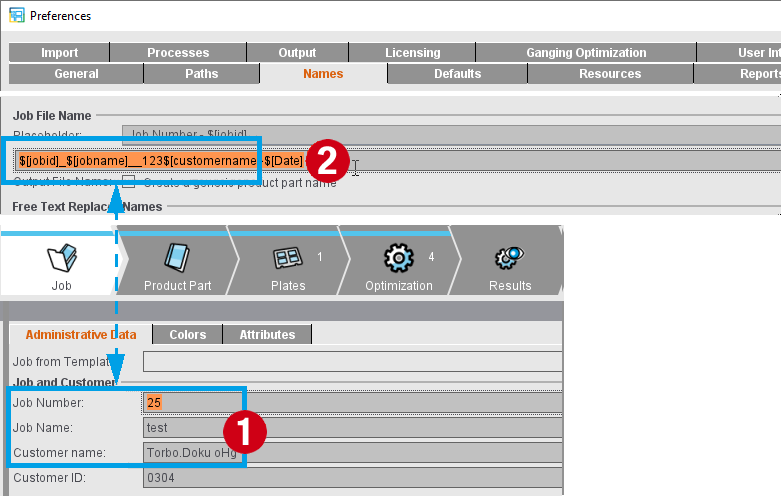
Jobs are automatically named in the way that you set this in the Preferences. In the "Names" tab, you can insert placeholders for this in "Job File Name" that are then filled with the data of the job for each job. The default entry is "$[jobid]_$[jobname]", this means that the job name is made up of the entries for job number and job name in the "Job" step (1). However, you can also set invariable data ("123") or insert other placeholders like the selected customer name or the current date (2).
During ganging, a subfolder is created for each gang job in the pool for gang jobs in "Work&Done". The components of the job (3) are pooled in this subfolder and a report in XML format that can be evaluated on a machine is generated (4). This is valid for all forms of gang jobs except manual ganging using the "Import PDF" function.
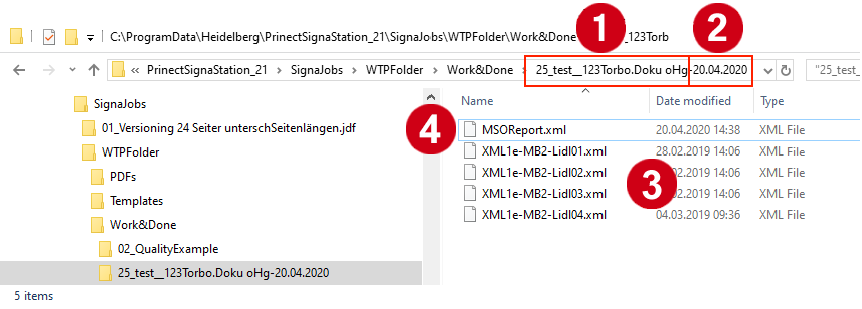
This subfolder generated for every gang job is named automatically based on the same rules that you defined for the naming of jobs.
When creating a gang job manually using the "Ganging..." function, you set these data as usual in the "Job" step. When a job is generated automatically (when manually creating a gang run form and also during the automatic processing of gang tasks by the Signa Station Gang Server), the data for job number and job name are generated via the placeholders that you entered in the gang task in "Create Prinect Job" in the "Product Part" step.
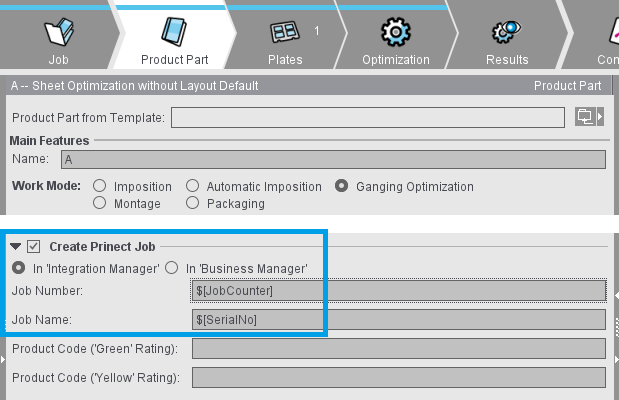
The data generated in this way are then copied to the boxes in the "Job" step at the start of processing and used in the same way for naming the subfolder in "Work&Done".
Combi button: To import PDF/CSV/XML/CAD...
As an alternative to ganging with the gang pool, you can import files of different formats from other folders into the gang pool using the combination button.
Select this option if you want to import PDF files to a gang job.
Select this option if you want to import cutting dies to a gang job.
Job description files as CSV or XML files and content files (PDF files) in defined structures must be available in order to work with a hotfolder.
Normally, these data are generated and made available by the "MIS" or the Integration Manager.
Notes on CSV files
The CSV format offers a simplified form for the import of jobs. A subset of the attributes of the ganging XML data format is offered. The format is as follows:
•In the first row, the attribute names like in the ganging XML data format are specified. If a value in the first row cannot be assigned to any attribute, it is registered as a replacer.
•The second row defines a gang part with the values relating to the attribute in the first column.
•The header and data rows must have the same length.
•If a PDF is not defined, the "FinalDimension" must be set to be able to determine the trimmed size.
Supported attributes (if not specified, the values are written like in the XML format):
|
JobID |
JobName |
CustomerName |
|
Amount |
MediaName |
Weight |
|
ProductionType |
ProductCode |
FinalDimension: in the form [value1 unit of measure blank value2 unit of measure] e.g.: 21cm 29.7cm |
|
DueDate |
PrintDueDate |
ContentData: Data of the PDFs like in the XML format |
|
ColorsFront |
ColorsBack |
Overproduction |
|
GrainRestriction |
ShapeOrientation |
ProductionJobID |
|
SheetsInProductionJob |
JobInfo |
SheetSelection |
|
nPages |
SourceLayout |
AssemblyIDs |
|
Allowance |
ArticleName |
ArticleID |
|
ShapeID |
ShapeData |
FoldingMode |
All other strings are rated as replacers.
Example of a valid CSV:

Define a new assembly block for the PDF import and import it.