Editing Automarks in the Graphic View
In the graphic view, you can manually reposition marks of certain automarks types that are already placed, that is you can do it with visual control.
For example, this is important because with the press sheet automarks sets there is an increasing number of marks manually placed beforehand that are used as automarks.
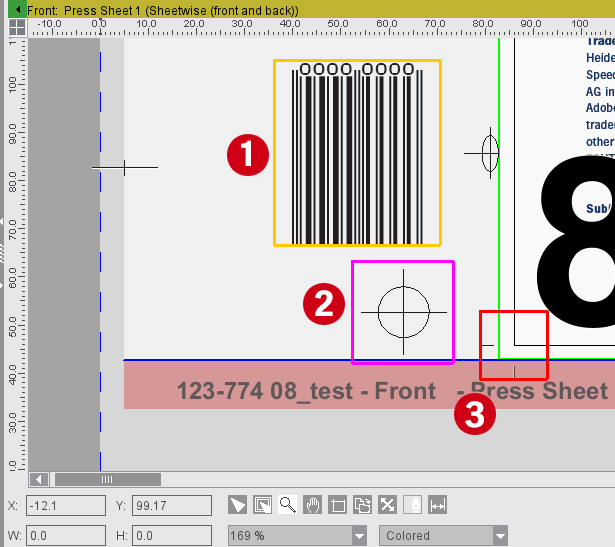
Automarks that you can edit in the graphic view have a magenta-colored frame when you click them to make it easier to tell them apart from the manually placed marks (orange frame) and uneditable automarks (red frame).
1: manually placed mark (can be moved)
2. automark can be moved
3. automark cannot be moved
You can move these editable automarks in the graphic view in the same way as with manually placed marks.
The mouse pointer changes to a cross arrow while you are doing this and you can move the mark on the graphic view, holding down the left mouse button.
When you let go of the mouse button, and by doing so finishing the offset of the mark, you will see a message, telling you that an automatically placed mark was moved. This is to avoid unwanted changes to the automarks.
You have the option of applying the changed to the automark or discarding the change. You can suppress the message permanently after if appears the first time.
When the change is applied to the automark, the new position impacts all placed marks of this automark type. For better visual control, all the marks impacted then have a magenta frame in the graphic view. The new position resulting from the offset in the graphic view is applied to the parameters of the automark.
Not all automarks types are suited for an offset in the graphic view. For example, this is not wanted for cut marks and, for that reason, not supported by the program. You can move the following automarks types in the graphic view using the mouse:
|
Automarks relating to pages and folding sheets |
Page Label Folding Sheet Label Folding Sheet Register Marks |
|
Automarks relating to press sheets |
Press Sheet Mark Color Control Bar (without AutoPositioning) Press Sheet Register Marks |

Note: It is also possible to edit automarks in the graphic view in the Plate Template Editor and in the Product Part Editor.
Convert manually set marks to automarks
To use a manually set mark as an automark in the resources in the future, you can convert the mark directly in the graphic view.
To do so, select the mark to convert and choose "Convert mark to automark". The context menu is available in the Press Sheets view and the Folding Sheet/Assembly Block/Cutting Die view.
Remember the following items in your choice:
•You cannot undo the conversion. In such a case, you would have to delete the automark and manually place the mark (or several marks of the same type if applicable) again.
•Mark placed in relation to page/1up: A page/1up label is created.
The parameter setup resembles that of the Marks Inspector. This 1up label also contains the scheme rule (Imposition) or the shape rule (Packaging) bearing the name of the scheme or shape used.
•All marks of this type are converted to automarks if the manually placed 1up label is placed alike on several 1ups. The following also applies: if the same mark is placed in a different location on a 1up of the same type, this 1up may have two marks after conversion (a converted automark and the manually placed mark).
•Mark related to folding sheet/assembly block/cutting die: a folding sheet/assembly block/cutting die label is generated.
The parameter setup resembles that of the Marks Inspector. The folding sheet/assembly block/cutting die label is set only on the surface (front/back) where it was placed manually.
It also contains the scheme rule (Imposition) or the cutting die rule (Packaging) bearing the name of the scheme or shape used.
Conversion always makes the bottom left corner the reference point.
•Press sheet-related mark: They are converted only if a press sheet automarks set is already used. Conversion uses the parameters as set in the Marks Inspector. The press sheet label is set on the surface (front/back) where it was placed manually.
•Automarks are always placed on all objects of the same type - restricted by rules. A page-related mark is placed on all pages, for example. If the manually placed mark was on one page of the folding sheet in the first place, it will be on all pages after conversion.

Important: To convert a mark set in relation to the press sheet into an automark, the pertaining plate template must contain an active automarks set. An error message with an appropriate hint appears if you try to convert such a mark to an automark without an active automarks set being present in the pertaining plate template.

Note: We recommend to check the marks in the "Marks" and/or "Plates" step and in the graphic view for all press sheets after conversion.