Auto marks sets for imposition (setting options in the editor)
The same setting options are available to you, regardless of whether you are editing the automarks set in the "Automarks Set Editor" in the Resources or in the job in the "Marks" step.
•Colors and Scaling for Automatic Marks
The setting options for the attributes differ, depending on the selected marks type. No changes can be made for some marks.
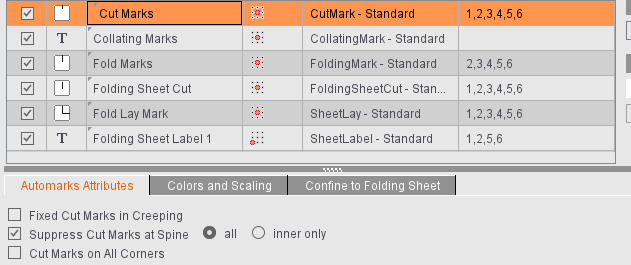
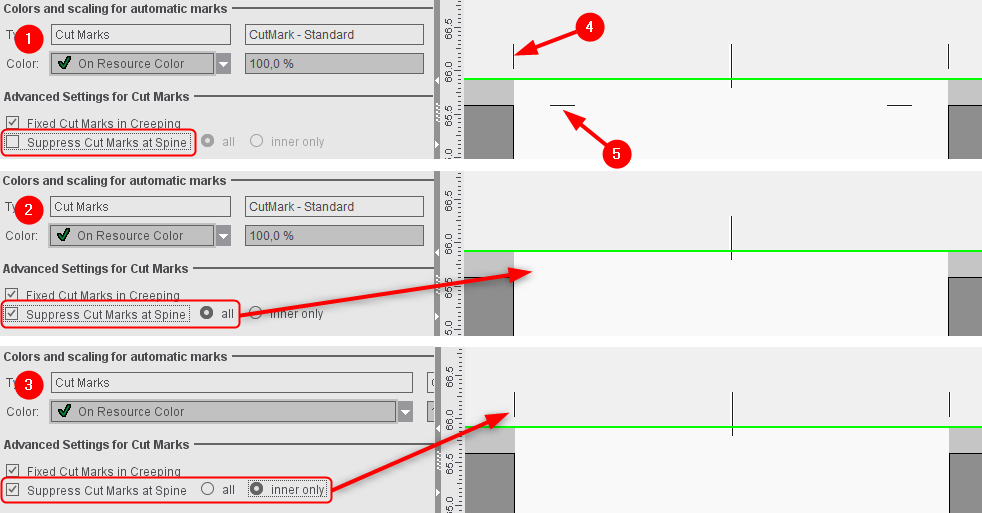
Fixed Cut Marks in Creeping
The cut marks are not moved in creeping. This affects the ProofColor layer, it gives you a better check of the proof.
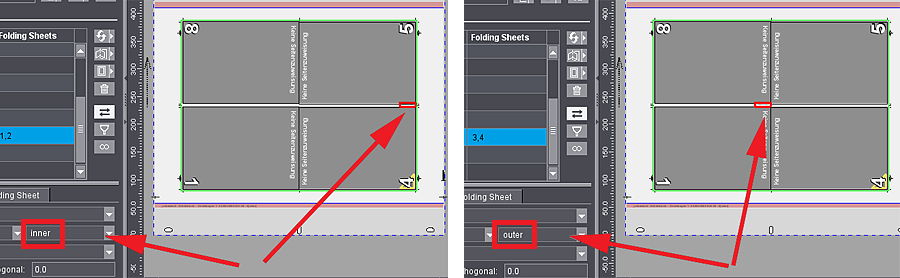
If the cut marks in the back margin superimpose specially created fold marks or hinder further processing for other reasons, you can use this function to keep the cut marks only on the outsides. Exception: Suppression does not work if the edge on which the marks are to be suppressed is on the outer part of the folding sheet because this is probably where the sheets will be cut and cut marks are needed.
In the job you can select whether all cut marks or only the inner cut marks will be suppressed, for example, if the outer cut marks are needed, but there is the risk of "flashes" through the inner cut marks.
Example:
For the production of a cover, it can be a good idea to set the cut marks on all corners. This is the case, for example, when the spine of the cover is not created as an extra page but using the gaps. In this case, the cut marks are wanted above the page (these indicate the page). However, the cut marks between the pages are not wanted because they can result in flashes during cutting. For such a case, in the job in "Marks" you can enable "Suppress Cut Marks at Spine" selected with "inner only".
(1): Outer (4) and inner (5) cut marks are output.
(2): All cut marks in the back margin are suppressed.
(3): Only the inner cut marks in the back margin are suppressed to avoid flashes. The outer cut marks are kept.
Cut Marks on All Corners
For the "Imposition" and "Automatic Imposition" work modes.
Cut marks are also set on the "inner" page edges if there is enough space on a folding sheet.
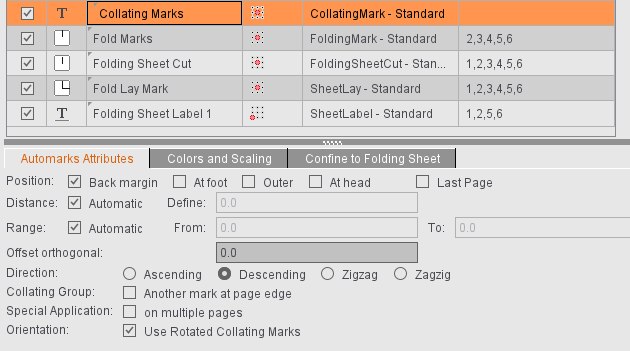
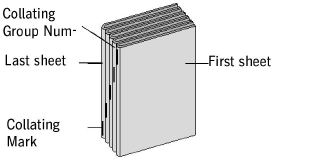
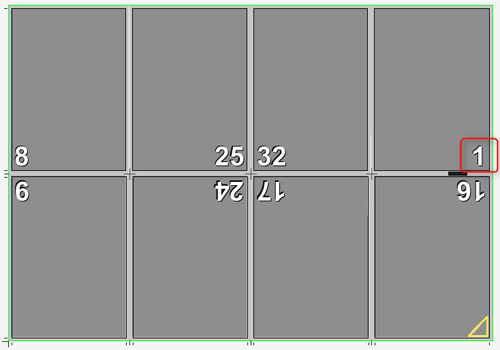
The collating mark is a control device that allows you to check whether the folding sheets have been assembled completely and in the correct order.
You can use the default CollatingMark, a line approximately 11 mm long and 1 mm wide containing the folding sheet number, if you wish to use a collating mark. You may, however, use any mark, including marks created by yourself for this purpose.
Position: Back margin - At foot - Outer - At head - Last page
This is where you select on which edge of the outermost page the collating mark will be found.
There is the added option of setting the mark to refer to the "last page" of the folding block.
"Back margin" (left edge of the first page) is set by default.
Distance: Automatic - Custom
This is where you can select the amount by which the collating mark will be shifted per sheet. Select "Automatic" for the offset to correspond to the height or width of the unscaled mark, depending on the direction and rotation. You can also define your own offset.
Range: Automatic - From: To:
This is where you can define the first and last position of a collating mark on your reference side. Select "Automatic" if you want the height or width of a page to be taken as the range, starting with "0".
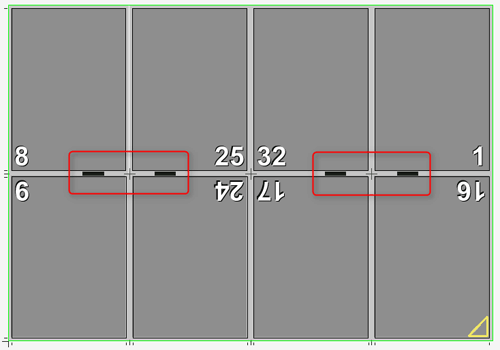
Offset orthogonal
The collating mark is positioned by default on the cut box (with 'At foot', 'At head' and 'Outer'). As a result, the collating mark may jut into the bleed.
If a positive offset is specified, the collating mark shifts vertically to the page edge outwards (away from the page). If a negative offset is specified, the collating mark shifts orthogonally inwards (towards the page).
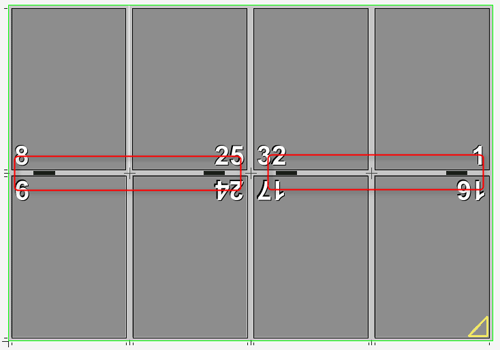
Direction: Ascending - Descending - Zigzag - Zagzig
In general, a thick rule is printed on the fold between the first and last pages, which is then visible on the spine of the finished folded sheet. The first collating mark is at the top of the first folding sheet. For each subsequent sheet, the rule is offset by its own length, so that for a correctly and completely assembled book, even steps are obtained. This step can be ascending or descending. Collating is ascending - descending in the case of zigzag and descending - ascending for zagzig.

Note: The position must always start with "Back margin" if you select "Ascending".
Collating Group: Additional mark at the edge of the page.
The number of the collating group is positioned in addition at the edge of the page. You can select the position.
Explanation:
The collating group (CollatingMarkExtension) is an extension of the normal collating mark (CollatingMark). It allows additional identification of the booklets that will be produced or additional information about them.
Note:
Remember that the collating group is not a subordinate function of a folding sheet group ("Schemes" step > "All Folding Sheets").
•variable height
You can define a different height for the mark for each collating group (booklet).
Special Application: on multiple pages
Normally, the collating mark is set only on the first (default) or last page of a folding sheet. This option lets you set identical collating marks on all even or odd pages of a folding sheet. The "Last Page" option determines whether on even or odd pages. A collating mark is set on the last page of a folding sheet when this option is selected.
"Special Application: on multiple pages" and "Last Page", both not selected:
"Special Application: on multiple pages" selected, "Last Page" not selected:
"Special Application: on multiple pages" and "Last Page" selected:
Orientation: Use Rotated Collating Marks
Collating marks are positioned rotated by 180 degrees.
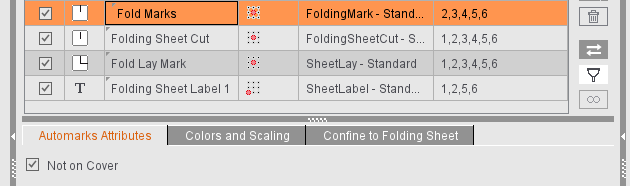
Not on Cover
If "First Folding Sheet is Cover" is enabled in the "Binding" step, you can make sure that no fold marks are placed on the folding sheet concerned by enabling this option.
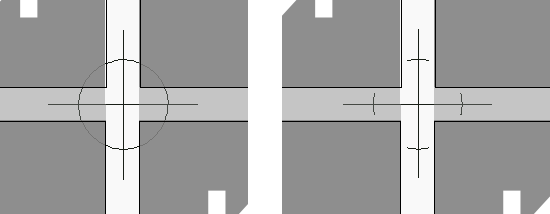
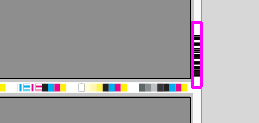
For folding crosses, you can only set if automatic trimming is to be performed in case the folding crosses jut into the content. With this option disabled, the complete mark is visible (to the left in the screenshot); but if the option is enabled, the mark will be trimmed accordingly (shown to the right).
Use Inner Marks
If folding sheet cuts are defined as inner, they are placed on the margins, in the same way as for the precutting marks.
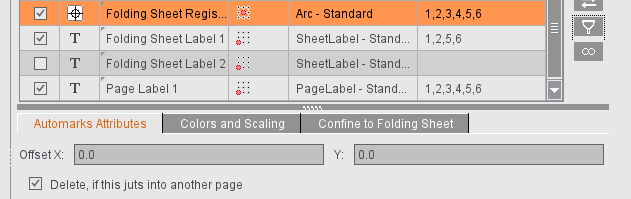
Delete, if this juts into another page
If folding sheets are close to each other, the folding sheet cuts may jut into another page and be printed as well. When this option is set, the mark is removed when the clip path of the mark collides with the clip path of another page. The original folding sheet cuts display again when enough space is made for the mark, for example, by moving the folding sheet.
Two fold lay marks, one for the front and one for the back, have the following advantages in processing in offset printing and in bookbinding:
You see automatically after the first proof
•whether the fold lay surface is the correct one (A surface or B surface)
•and which printed page must lie on top on the printed stacks so that the stacks do not have to be turned with a lot of effort before folding.
Normally, the fold lay mark is positioned always as set for the fold lay mark defined in the scheme. This is generally the back.
"Position additional lay mark on opposite surface" lets you place an additional fold lay mark on the opposite surface. This is generally the front. If "Apply Folding Procedure to Front" is selected, then the fold lay mark is positioned on the front and the additional one accordingly on the back.
The additional fold lay mark is defined when you select it.
"Offset to Page": The offset to the page is by default set as "0.3" = 3 mm. If this causes the fold lay mark to be off the paper, you can change the offset and set the fold lay mark closer to the trimmed page and, consequently, generally in the bleed.
Offset X/Y
This lets you correct the offset of the folding sheet register marks manually if the mark is printed as well or is off the paper.
Delete, if this juts into another page
If folding sheets are close to each other, the folding sheet register mark may jut into another page and be printed as well. When this option is set, the mark is removed when the clip path of the mark collides with the clip path of another page. The original folding sheet register mark displays again when enough space is made for the mark, for example, by moving the folding sheet.
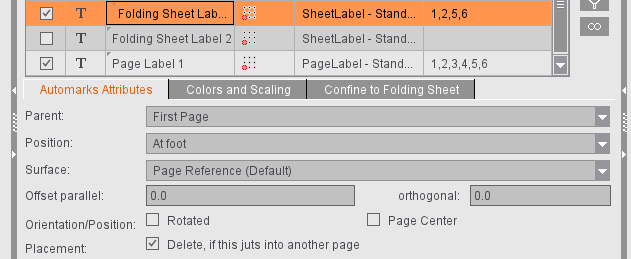
Parent
In addition to different forms of page reference, you can also set that the folding sheet label relates to the folding sheet. The page reference of the mark is enough if the data are read out only after the folding process. However, newer folding machines are equipped with barcode readers already at the feeder, making it necessary to be able to assign a related mark to the still unfolded sheet. To do this, select "Folding Sheet" as the "Parent".
Position
Other settings are possible for placement if "Folding Sheet" is selected as the "Parent":
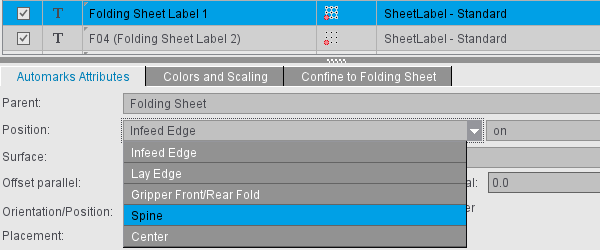
"Infeed Edge"/"Lay Edge"
You can use this to define on which edge the mark will be placed. The reference value is either the "Lay Edge" (side of the folding sheet on the lay edge rail of the folding machine) or the "Infeed Edge" (side of the folding sheet that runs into the folding machine). You can place the mark either on the selected edge or on the opposite side.
When you are determining the lay edge, it is assumed that the first fold in the folding machine is a buckle plate fold and, as a result, folding is in Y direction. This is generally the case. Accordingly, the lay corner and the folding rule of the used scheme determine the lay edge.
"Gripper Front/Rear Fold" or "Spine"
You can decide for each of these positions whether the labels are to be placed on the inner or outer margin.
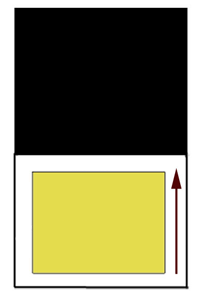
With the "Spine" setting, the folding sheet label is placed in the spine of the folding sheet. In the left diagram below, the folding sheet label is placed in the spine on the inside. This means for the selected F08-07 scheme that the folding sheet label is between page 4 and page 5. On the other hand, if the folding sheet label is set on the spine on the outside, it will be placed between pages 1 and 8 (in the diagram on the right).
The setting in the "Binding" step is decisive for the "Gripper Front/Rear Fold" position. If a front fold is set there, it is placed in the example above with reference to page 4 for "inner" and for "outer" with reference to page 1. With a rear fold, accordingly to page 5 ("inner") or page 8 ("outer"). The mark behaves like in the front fold if no gripper margin is defined.
"Center"
The mark is centered on the folding sheet.
Surface
For automation, it is a good idea if you can also directly set the surface on which the folding sheet label will be placed and not just by page reference. You can select the surface from the following four items:
•Page Reference (Default) or Folding Procedure (Default)
•to Front Only
•to Back Only
•to Front and Back
"Page Reference" is the default. The folding sheet label is then set to the surface as specified in the page reference. The surface does not have to be front or back but changes according to the scheme used. For example, if you select "Inner Page" as the page reference, the folding sheet label on page 2 is placed on the back. By selecting one of the other three options (to Front Only, to Back Only, to Front and Back), you can directly influence and specify the surface on which the folding sheet label will be placed.
Offset
This lets you set whether and by how much the folding sheet label will be shifted parallel to the selected edge or away from the edge or towards the edge.
Orientation/Position
The "Rotated" option rotates the folding sheet label by 180 degrees. Rotation is done in relation to the reference point of the mark.
"Page Center" (for page reference)
The folding sheet label can be automatically placed centered to the pages in the spine if "Page Center" is enabled and the page reference and hotspot of the mark are selected skillfully. The benefit of this method is that covers with six or eight pages can also be fitted correctly with the folding sheet label.
"Folding Sheet Center" (for folding sheet reference)
The folding sheet label is centered on the selected edge. This option is not applicable if "Center" was selected as the "Position".
Placement > Delete, if this juts into another page
If folding sheets are close to each other, the folding sheet label may jut into another page and be printed as well. When this option is set, the mark is removed when the clip path of the mark collides with the clip path of another page. The original folding sheet label displays again when enough space is made for the mark, for example, by moving the folding sheet.
"To the inner folding sheet margin"
If the "Folding Sheet" is the "Reference", you can enable the option "To the inner folding sheet margin" for all positions except "Center". It is enabled by default for all new jobs or automarks sets you create.
With this function, the folding sheet labels are automatically positioned inside the folding sheet.
When this option is set, the mark is positioned with its upper edge flush to the folding sheet trim. The mark is positioned as far as to the page if there is not enough space. The mark is then positioned directly at the page trim.
In this way, the behavior differs with the option enabled and the option disabled: While negative orthogonal values can also move the mark into the page with the option disabled, this cannot happen with the option enabled. The mark is moved as far as to the page trim. This ensures that the mark cannot jut into the page in case of default parameters.
Points to note for "Gripper Front/Rear Fold": With this option disabled, the folding sheet labels are positioned next to the page when this position is chosen. The folding sheet label is positioned at the folding sheet margin if this option is enabled. The folding sheet label is positioned in the middle with the upper mark margin exactly in the middle if this option is enabled and the gripper is included in the scheme.
|
Option is disabled |
Option is enabled |
Option is disabled |
Option is enabled |

|
|

|

|
Differences in case of "Folding Sheet (custom position)" parent
If "Folding Sheet (custom position)" is selected as "Parent", it is possible to set the label according to a given reference point including the offset in the X and/or Y direction. You can set an angle instead of "Rotated" for Orientation. Currently, the angles 0°, 90°, 180° and 270° are supported, as well as a custom angle (counter-clockwise rotation). When you specify a custom angle, you cannot select "Delete, if this juts into another page". Rotation is done in relation to the reference point of the mark.
Assembly block label ("Montage" mode)
For these labels, the lay edge or infeed edge is not relevant as the reference point for the "Position" because of further processing. For that reason, you can simply position the label Above, Below, Right, Left or Center. In addition, the offsets to the reference point can be set parallel and perpendicular to the 1up edge.
The "Rotated" option rotates the label so that the foot of the mark points to the 1up.
The "1Up Center" option moves the hotspot of the mark to the center of the 1up.
Custom Position: With the 1up reference "Assembly Block/Cutting Die (custom position)", it is possible to set the label according to a given reference point including displacement in the X and/or Y direction. You can specify an angle for Orientation. Currently, the angles 0°, 90°, 180° and 270° are supported, as well as a custom angle (counter-clockwise rotation). When you specify a custom angle, you cannot select "Delete, if this juts into another page". Rotation is done in relation to the reference point of the mark.
Page Label ("Imposition" Mode)/1up Label ("Montage" Mode)

Automatically placed print control marks analog to the folding sheet label, e.g. page-specific data that are set directly onto the page in Proof Color; any number of page labels or 1up labels can be created.
When a label is selected, it is set onto every page. You can define the reference point on the page onto which the label will be set and the position of the label relative to the reference point. In addition, you can define the orientation (0°, 90°, 180°, 270° and custom). You can restrict placement to left pages only or right pages only.
The label is removed when the clip path of the mark collides with the clip path of another page if "Delete, if this juts into another page" is enabled. This option is not available if you specified a custom angle because the trim path is formed from the surrounding rectangle.
Page/1up labels can also be positioned automatically outside the page. Manual correction is redundant when this option is enabled and the input boxes for the X and Y direction are dimmed. You can still set orientation individually.
Surface
For automation, it is a good idea if you can directly set the surface on which the label will be placed. You can select the surface from the following items:
•to Front Only*
•to Back Only*
•to Front and Back
* related to the folding sheet, not the press sheet
Because each automarks set can have multiple labels, it can be a good idea to customize their names, for example, with regard to a rule you will use. To do this, simply click the "Type" box and enter a name. The original type name is added to the end in parentheses.
For labels in the "Packaging" mode, see Automarks sets for packaging

Colors and Scaling for Automatic Marks
This is where you can select which separations will be printed with marks. This is easy to do with the list box that appears as its use is self-explanatory.
Marks layer
You can place cut, fold or collating marks in the background to prevent them from covering color control bars, for example.
You can select whether the mark will be printed in the foreground or background or whether it will be placed on the layer that was defined in the marks resources.
Scaling
This lets you correct the size of the marks. Normally, scaling is proportional based on the percent for width. If scaling is to be unproportional, for example, to compress the text of a text mark for reasons of space, click the button to the right of the box for height. This removes the fixed link between height and width and you can enter different values for scaling.

Set print control marks on banners (digital printing)
This requires that there is a plate template for a digital web. Can be operated using the "Banner" list box.
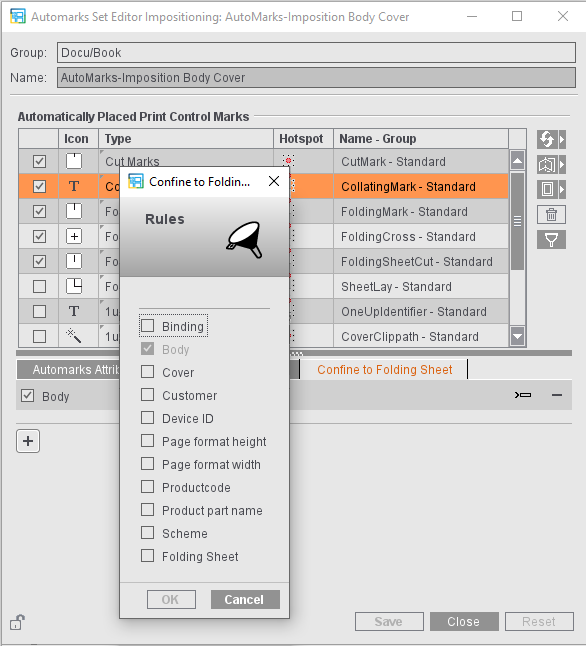
Using rules, you can use different automarks within a job depending on the folding sheet (for example, different marks and parameters for the cover than for the body or different settings for certain customers).
As a general rule:
•You can insert each rule type only once per selected automark.
•If there are several rules for an automark, this configuration is used if all the rules are applicable (And operation).
•In the case of several criteria within a rule, this rule is applicable if one of the criteria is met (Or operation).
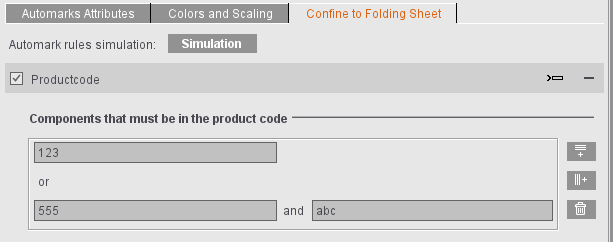
Product Code
With a product code, you can specify several components within a rule. Use the buttons on the right to add a new row or a new column in the selected row or to delete the selected item.
The rows use OR operation, i.e. one of the text strings must be in the product code. The columns use AND operations, i.e. both text strings must be in the product code for the rule to apply.
See also Example 2: Placement of the Assembly Block Label Depend-ing on the Product Code
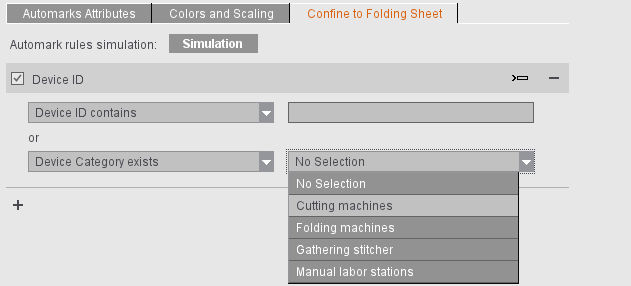
Device ID
Special marks are needed for certain finishing steps. For example, the PushToStop folding machines need barcodes at certain positions to be able to process the folding sheets automatically. You can use the "Device ID" rule to control the folding sheet-specific and device-specific placement of such marks.

Note: The Device ID refers to postpress finishing such as cutters and folding machines, saddlestitchers and manual work stations. You usually use the "Press" rule for press-specific control (see Press).
With Device ID, you can define not only a text string but also a device category. This means that the marks are placed only as follows:
•The mark is set if any device category is contained in the JDF: "Device Category exists" and "No Selection"
•The mark is set only if a certain device category is contained in the JDF: "Device Category exists" and, for example, "Folding machines" are selected
•Vice versa, if "Device Category does not exist" and "Folding machines" are selected, the mark is set for all other device categories or if no device category is contained in the JDF.
You can also enter several device IDs by separating the items by commas.

Note: If a device ID changes or if finishing machines are to be added, it is important to make this change for all marks that have the "Device ID" rule. Within an automarks set, you can customize this fast and reliably using synchronization (see Overview of the button functions).
Device ID/Product Code - Simulation of Automarks Rules
For the "Product Code" and "Device ID" rules, the values in the rule are available only for a full job run including MIS. This means that if you wish to build up automarks sets with visual control, in other words based on a dummy job where the impact of the rules on the marks can be checked in the graphic view, these dummy jobs ought to be set up first in the Business Manager, for example, for all the product codes and device IDs to be tested, something which means a lot of time and effort. To make this easier, the product codes and device IDs can be simulated in Signa Station.
You can start simulation whenever a "Product Code" or "Device ID" rule is created for one of the marks:

When you click "Simulation", a dialog displays where you can specify values for the product code and the device ID for each folding sheet. To do this, mark a row, enter a value in the text boxes below and click the row again. In this way, you can assign different values to each folding sheet. When the simulation dialog opens, simulation also starts and is active while the simulation dialog stays open. Simulation ends when the simulation dialog closes.
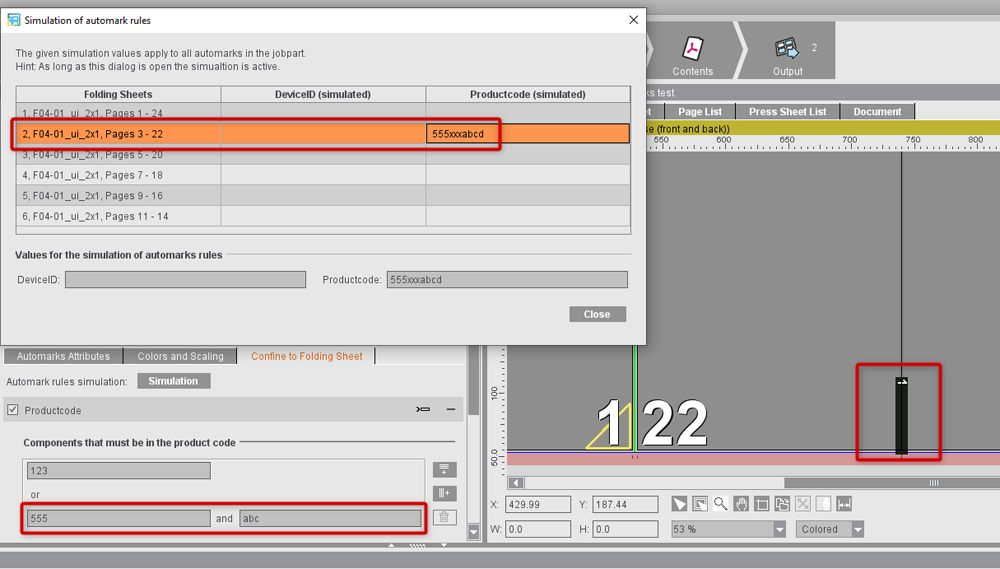
If simulation is active, the values set in the simulation dialog are used in the current job. In the example shown, placement of the collating mark is to depend on whether the product code has "123" as the text string or "555" and "abc" as text strings. In the simulation dialog, a product code "555xxxabcd" is simulated for the folding sheet of pages 3-22, meaning that the second row with the rule is applicable. This means that the collating mark is placed on this folding sheet but not on the others.

Note: Values for the product code and the device ID that in the job can originally come from the MIS, for example, are ignored during simulation.
You can continue to work with Signa Station while the simulation dialog is open. Changes to the setup of the job can still be made. This is helpful to be able to set the attributes of the marks.
An active simulation is indicated by a flashing exclamation point in the tile of the "Marks step:

Output is not possible when simulation is active because the marks situation in the graphic view can be significantly different to the actual marks situation. An appropriate warning appears if the "Output" step is invoked when automarks simulation is active. Output is possible only after simulation was disabled by closing the simulation dialog.
Simulation is automatically disabled when the job is saved. This means in particular that automarks simulation is always disabled after loading the job. This prevents an incorrect marks situation from being displayed in the graphic view. The simulation values entered for the device ID and the product code are saved along with the job.

Note: Simulation is available in the "Marks" step in the job and also when creating product part templates.
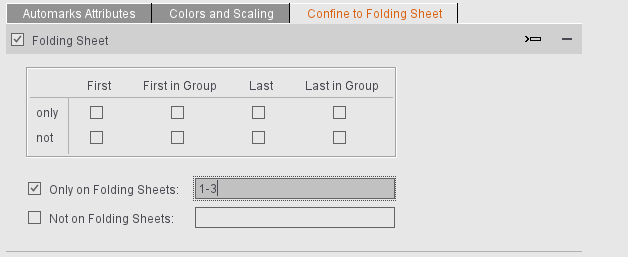
If the mark is not to be set on all folding sheets, you can set this to suit your needs using this option. You can set the data either related to a group by selecting options in the table or by specifying the folding sheets directly in one of the two text boxes, "Only on Folding Sheet/Not on Folding Sheet". In this case, you can either confine output to certain folding sheets or exclude certain folding sheets. You can also specify several folding sheets (separated by a semicolon or comma, e.g. "1;3") or a range (e.g. "1-3").
Examples:
•"Only on Folding Sheet" enabled, input "1": The mark appears only on the first folding sheet, not on any of the other sheets.
•"Only on Folding Sheet" enabled, input "1;3": The mark appears only on the first and third folding sheet, not on any of the other sheets.
•"Only on Folding Sheet" enabled, text box is blank: The mark does not appear on any folding sheet.
•"Not on Folding Sheet" enabled, input "1": The mark does not appear on the first folding sheet but on folding sheet 2, 3, 4, etc.
•"Not on Folding Sheet" enabled, text box is blank: The mark appears on all folding sheets.
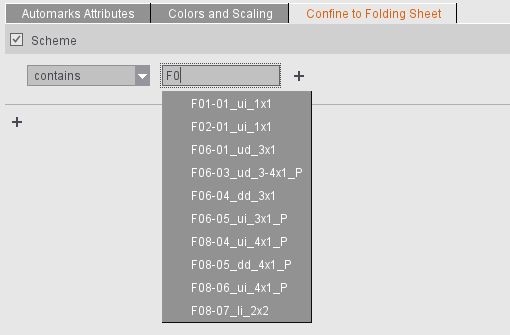
List boxes for "Scheme" and "Customer"
To make it easier to fill the boxes, a list of suitable items from the Resources is shown to you during input (max. 10 suggestions). This means that you only have to enter the first part of an item and can then simply select the variant you want by clicking it in the list. You can also enter only part of a string if the rule is to be used in several cases (for example, "contains" "F02" if the mark is to appear on all F02 folding sheets).
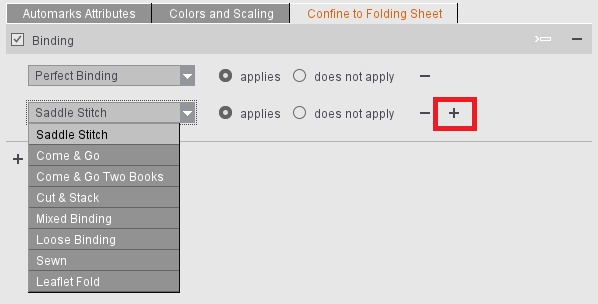
Binding Methods
This rule lets you control the placement of marks on folding sheets depending on the selected binding method. Because binding is set for the product part, different placement for the automarks is not possible within the product part in this case.
For control of the automarks, you must select the binding method from the list so that different notations or language settings will have no impact.
After you select the binding method, you can set whether the automark is to be placed with exactly this binding type ("applies") or only not with this binding type ("does not apply").
If the rule is to apply to several types of binding, simply add other types of binding using the plus sign to the right.
You can confine the placement of folding sheet-related marks to certain presses by entering the name of a press. You can specify a text and a condition describing how the text is to be part of the press name. In this case, the reference is the press name as specified in the applied plate template.
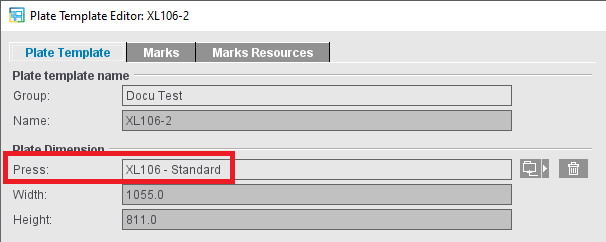
You can use an exact name or part of the name depending on the selection in the list. The list displays all items defined in the system that match the input part.
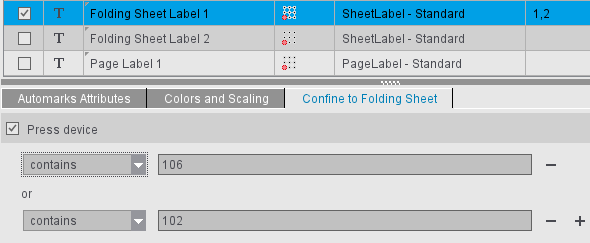
You could, for example, set different automarks in this way if cover and inner pages are printed on different presses. In the example shown, folding sheet label 1 would also be output if the folding sheet is printed on an XL106 or SM102, but not if it is printed on an SM 52, SM74 or an XL145.
Please remember: The "Press" rule for folding-sheet related automarks cannot be used if the same folding sheet is placed on two different press sheets that are printed on different presses. In this case, the "Press" rule can no longer be evaluated correctly for this folding sheet. The "Marks" step displays a flashing exclamation mark, and an additional message displays in the "Confine to Folding Sheet" tab of the automark in question.