Automarks sets for press sheets
Marks relating to press sheets can be set in the plate template. If such a place template is used in the job, the marks in it are applied to the generated press sheet. In this process, however, it is not possible to specify which marks depending on certain parameters are really to be placed and which are not. All the marks are always applied to the press sheet.
This results in different plate templates having to be created and used for different setups (e.g. schemes used).
If "Use Automarks Set" is selected in the "Marks" tab in the plate template, either the automarks set that was set in the Preferences in "Resources" is applied to the job when you use this plate template or you manually select a different automarks set for this plate template.
If there are already manually placed marks, you can select whether these are to be applied when switching to automarks sets and be converted to press sheet labels. The settings already made for these marks are applied and the marks can be given rules in addition to that.
As a result, the press sheet-related marks are placed in the way that they are set in the press sheet automarks set. This means that these marks are not always placed but depending on rules, for example, for certain customers or in different positions depending on the product part.
Information regarding possible settings for Automarks Set Press Sheet:
Colors and Scaling for Automatic Marks
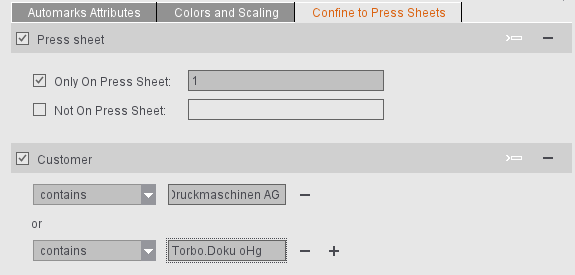
Confine to Press Sheets (Controlling with Rules)
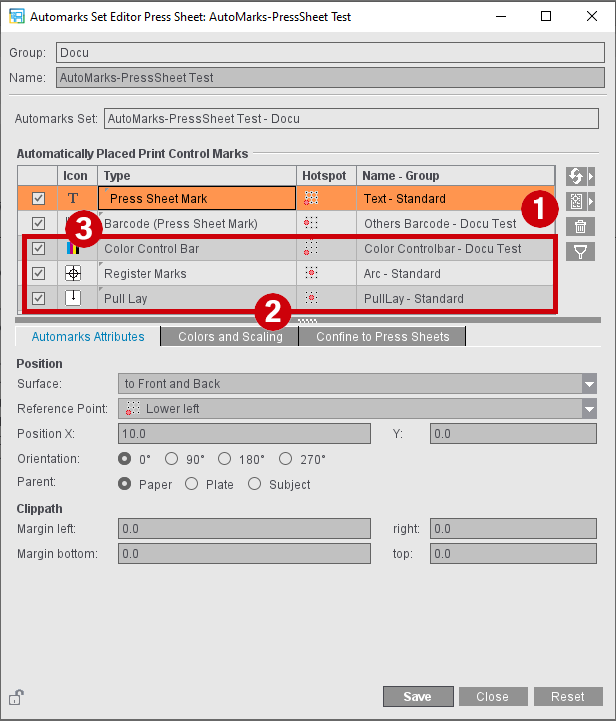
Automatically Placed Print Control Marks
In addition to any number of press sheet labels (1), the "Automarks Set Press Sheet" can also contain the color control bar, register marks and the pull lay (2).

|
Replace the selected automarks set in the current plate template by another automarks set from the Resources |

|
Replace the selected mark by another one. The selected mark is overwritten. |

|
Insert another press sheet label |

|
Remove the selected mark from the list |

|
Filter the list: only the enabled marks display. |
You can confine automarks for press sheets to front or back by selecting this in the "Surface" box. This applies to press sheet marks, register marks and color control bars, but not to pull lays. For pull lays, you can set the paper position according to the work style of the plate:

For color control bars, you can set margins for the "Clippath" like for press sheet marks. These are included during placement of the mark. This trim avoids the mark from possibly jutting into the content after placement.
Register Mark
The "Register Marks" automark simplifies the placement of the register marks. The register marks are placed subject-related to the four outer corners of the subject. You can only specify the offset to the corner. An offset of, for example, 15 mm in x sets the register marks on the left 15 mm further to the left and on the right 15 mm further to the right. The "Arc" mark from the "Standard" group is set by default.
Pull Lay
The pull lay mark is set between paper and plate so that the printer can recognize whether or not the paper is positioned correctly.
In some circumstances, you must position the pull lay mark on the left or right on the paper for production reasons depending on the given work style. This can be done using several press sheet labels with appropriate rules. Because this is relatively complex, the "Pull Lay" automark offers you a simplified setup.
By default, the "Pull Lay" automark is placed related to the paper. As a reference point, you select either Lower Left or Lower Right depending on what is selected in "Position on paper".

Note: When the pull lay was introduced as an automark, the reference point "Middle" was used. As the position reference is usually the paper edge in practice, the reference point was changed to "Bottom". For existing automarks sets, the pull lays are therefore converted to the reference point "Bottom" with a "position Y" of 120 mm.
Color control bar
The color control bar is placed related to the subject. You can specify a reference point of the subject as the reference point of the mark.
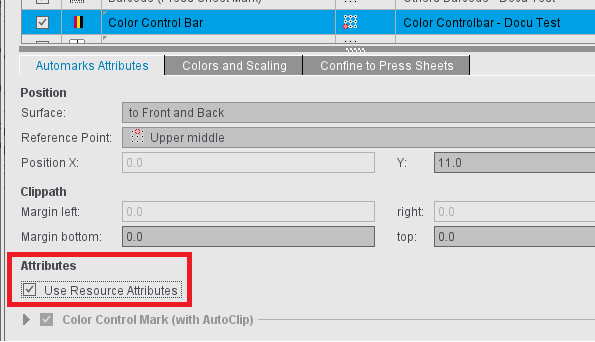
In the automarks set, you can select whether the attributes from the marks defined for the color control bar used are to be applied or whether you want to specify your own data in the automarks set.
The settings possible for the color control bar are described in: Color Control Bar Editor .
Press Sheet Mark
Using the "Add Press Sheet Label" button, you can insert any number of press sheet marks into the automarks set and give them different settings. It is possible to tell the press sheets labels of the automarks set apart by entering custom names for them.
The print quality control strip specifies a content-free area in which downstream procedures can perform print quality tests (for example Nozzle test on digital ink presses) and can also be used as an automark.
You can specify the surface on which this area is to be kept free, the size of the mark and therefore the free area and the direction in which a suitable area is to be searched for (for more information, see Print Quality Control Strip).
Colors and Scaling for Automatic Marks
Marks layer
This is where you can select on which separations the placed marks are to be printed (exception: color control bar).
You can place cut, fold or collating marks in the background to prevent them from covering color control bars, for example.
You can select whether the mark will be printed in the foreground or background or whether it will be placed on the layer that was defined in the marks resources.
Scaling
This lets you correct the size of the marks. Normally, scaling is proportional based on the percent for width. If scaling is to be unproportional, for example, to compress the text of a text mark for reasons of space, click the button to the right of the box for height. This removes the fixed link between height and width and you can enter different values for scaling.
Using rules, you can use different automarks within a job, depending on the press sheet (for example, different settings for certain customers).
In this way, you can for example insert a number of different press sheet labels and control placement specifically for each customer.
As a general rule:
•You can insert each rule type only once per selected automark.
•If there are several rules for an automark, this configuration is used if all the rules are applicable (And operation).
•In the case of several criteria within a rule, this rule is applicable if one of the criteria is met (Or operation).
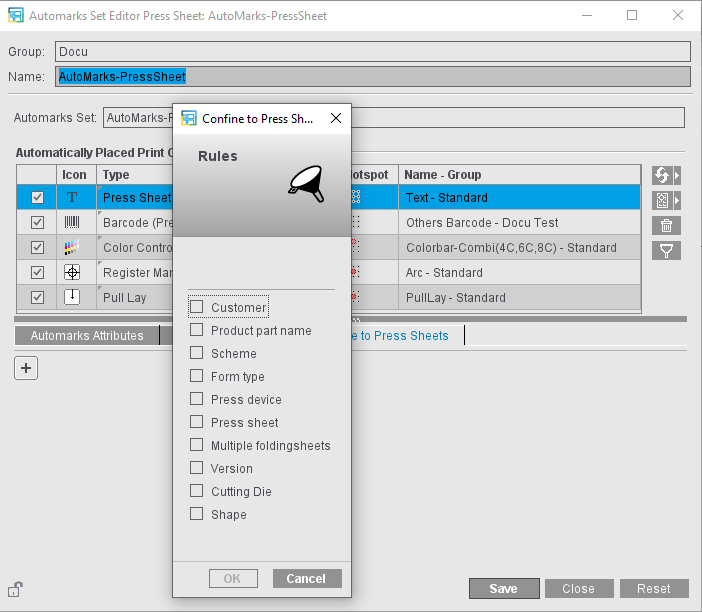
1.By clicking the Plus button, you open the rules dialog to add a new rule.
2.Select the rule you want and click "OK" in the dialog.
3.Define the restrictions that you want:
•Customer: Enter the customer name. All suitable items display for selection in a list. Typing errors can be avoided in this way. Then you select whether the currently selected mark is to be placed for this customer or not. You can use the plus sign to the right of the name box to add other customers for whom this mark will be placed.
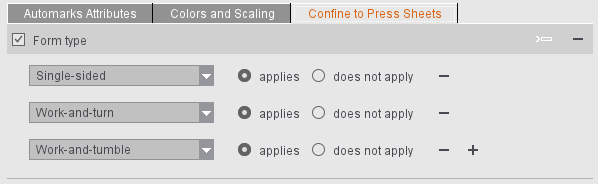
•Work Style: By selecting a work style from the list, you can define on which surfaces the automark is to be placed or not. For example, you can define that the mark will be placed only on single-sided surfaces.
•Multiple Folding Sheets: The "Multiple Folding Sheets" rule makes it possible for a press sheet automark to be placed only when all folding sheets on the press sheet, regardless of the scheme used, have an identical page list. This is needed, for example, in the Push2Stop workflow. The rule name is related to the term "Multiple 1ups".
When the rule is selected, the page lists for all folding sheets on the press sheet must have the same indices (the number of pages per folding sheet is identical and the pages each have the same index, irrespective of the position in the scheme). The schemes used are irrelevant in this case. The automark is not placed if different folding sheets with different page lists are on the press sheet.
•Press/Product Part Name: You can confine placement of the mark to certain presses or product parts by entering the name of a press or product part. You can use an exact name or part of the name depending on the selection in the list. The list displays all items defined in the system that match the input part.
•Press Sheets: You can confine placement of the automark to certain press sheets or exclude certain press sheets. When entering the press sheets, you can also specify several press sheets (separated by a semicolon, e.g. "1;3") or a range of press sheets (e.g. "5-8").
•Version: In versioned jobs, it can be a good idea to place certain marks depending on the version that is on a press sheet. In this way, for example, additional or different text marks to the press can make it easier to recognize the various versions. The "equals" settings lets marks be placed on homogeneous press sheets: the automark is placed only on press sheets that have this version only. The "contains" setting makes sure that the automark is placed on all press sheets that have this version at least once. "doesn't contain" makes sure that the mark is placed on all press sheets that do not have the specified version.
•Scheme: Marks must be placed relating to the press sheet depending on the used scheme (analogous to automarks sets relating to a folding sheet) for Push2Stop machines and also if the pull lay mark is used.
If the rule is selected, all the schemes on the press sheets must be identical and match the scheme name specified in the rule. The schemes on the press sheet must be homogeneous. The automark is not placed if different schemes are on the press sheet or if the scheme name does not match the scheme name specified in the rule.
•Cutting Die/Shape: Enter the name or part of the name of the cutting die or shape where the mark is to be placed or not placed.
All cutting dies and shapes must be identical (homogeneous) on the press sheet if cutting die and shape rules are evaluated in relation to a press sheet. All cutting die shapes must be identical if the shape rule is evaluated in relation to a cutting die (if a cutting die label is used, for example).
•"Subject Width/Height" and "Paper Width/Height"
It must be possible to place color control bars, in particular, according to the subject or paper size; for example, when using Dipco Micro-DCB: Dipco DCB-L for formats of at least 720 mm and DCB-S for smaller formats. These rules allow the desired version of the color control bar to be automatically assigned.

Note: Since the program converts to points, rounding errors may occur in the decimal places.