Labelfire Primefire
In "Output Conditions" you can view and edit output conditions that are already created. This is also where you start to create a new output condition with the plus button [8].
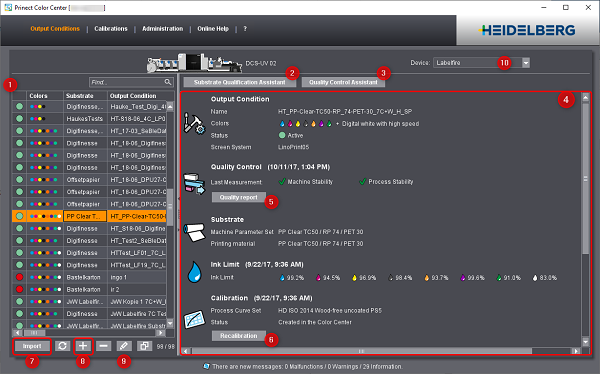
Several presses of the same type or different type can be connected to the Prinect system. For that reason, first select the press from the "Device" list box [10].
All existing output conditions are listed in the table [1]. You can view details about the currently selected output condition in the pane on the right [4]. You can use the "Substrate Qualification Assistant" button [2] to go to the single steps in substrate qualification and edit them. The "Recalibration" button [6] brings you directly to the "Calibration" step.
Click the "Quality Control Assistant" button [3] to check the output condition. With this function, you can print, measure and evaluate different test charts. See Quality control. Use the "Quality report" button [5] to go directly to a report on all quality measurements for this output condition.
A more detailed description of each of the functions now follows:
Table of existing output conditions
All existing output conditions display in a table [1] with the following columns:
•Status information
In the first column, symbols indicate the current status of the output condition.
You can change the status in "Edit Output Condition" [9].
•Colors
This shows you whether the output condition was created for four colors (CMYK) or for seven colors (multicolor: CMYK+orange+green+violet) and perhaps white.
•Substrate
This shows you which substrate is affected by the output condition.
•Output condition
Name of the output condition
•Machine Parameter Set
Name of the machine parameter set
•Calibration
Name of the calibration
•Profile
Name and file location of the ICC profile used for this output condition
•Screen System
Screen used, e.g. LinoPrint05
•Comment
Content of the comment
To sort the whole table by a particular column, click the header concerned. Two buttons then display that you can use to sort the table in ascending or descending order.
You will find the following buttons below the table:
|
|
|
|
|
|
|
Refresh the list |
|
|
|
Create Output Condition Substrate Check starts with this button. See Create Output Condition. |
|
|
|
|
|
|
|
Edit the output condition A new view opens where you can also edit the status of the output condition. |
|
|
|
Copy the output condition Use this to create a copy of the output condition. After you click the button, a window opens where you can assign a name. You can only copy output conditions that are complete and, as a result, whose status is "Active". |