Administration - Paper Stretch Compensation
In sheetfed printing and web printing, paper may stretch as it passes through the press from one printing unit to the next. The result of this is that the register between the single separations is no longer accurate. "Paper Stretch Compensation" compensates this stretch through a digital distortion of the bitmap of the output sheet by the same factor that the paper stretched when reaching the printing unit concerned. In this process, not only does the motif shrink but also the screened bitmap is made smaller so that the rosette appears neatly again as it should in the overprint. As a result, this function increases the print quality.
You can create a template for every press involved and for different paper qualities as well as for different print jobs (different color distribution). This template describes the compensation required for each printing unit in the press.
The compensation parameters are determined by comparing the dimensions of a press proof with the nominal dimensions (absolute print accuracy) or actual dimensions of the first printing unit (only register compensation). This is done by positioning special measuring marks on a reference sheet at the Prinect Signa Station. After printing, these special measuring marks allow you to measure the deviations caused by paper stretch. The measuring marks consist of a scale (the "reference") that is normally printed on the darkest color separation and single line marks that are printed in the other colors beside the scale. The line marks deviate from the reference line of the scale according to the extent the paper stretches. These deviations are read off the printed sheet and entered in the relevant table in the "Compensation Values" tab. In the "Reference Points" tab, you also have to specify where the single measuring marks are located on the press sheet.
After you entered the compensation values, you can save the measured data as a template giving it a name of your choice. To print with paper stretch compensation, you set the template in the "PageOutput" or "ImpositionOutput" sequence template in "Rendering" in "Print > Paper Stretch Compensation".
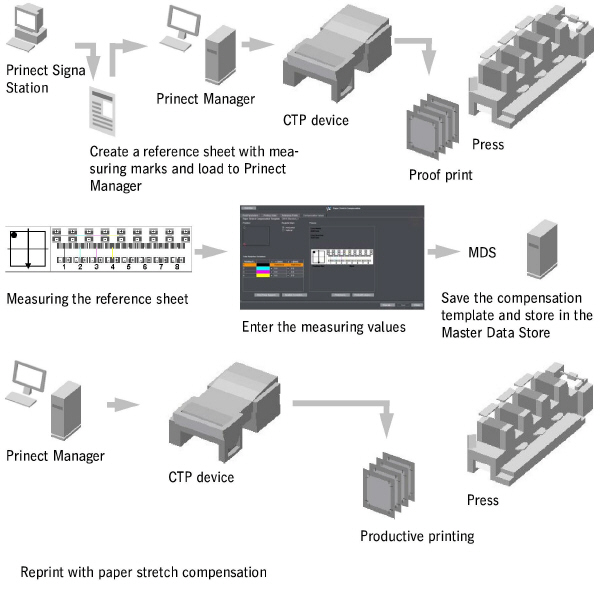
The procedure for determining the compensation values and for setting up paper stretch compensation in the Prinect workflow comprises the following steps:
1.Create a reference sheet at the Prinect Signa Station. The reference sheet must contain the special measuring marks for paper stretch compensation. The measuring marks must be aligned horizontally and vertically to each other. It is not absolutely necessary that the reference sheet has the original content of the job that will be printed with compensation. However, the sheet must be the same size as the sheet of the print job and should have the colors that will also be used later in printing. In addition, the process colors on the reference sheet should each have a dot percentage that is comparable to the one in the original print job. Each deviation in dot percentage between the reference sheet and the original print job impairs the results of your measured data.
You can achieve even greater accuracy if you insert the measuring marks onto the signatures of the original print job so that paper stretch compensation is measured based on the original data.
2.If a print job with spot colors will be printed to determine the paper stretch, the order of colors in the job settings of the print job and in the paper stretch settings must be identical to the order of colors at the press.
In the open print job, you can change the order of the process colors in the "Job Settings" tab > "Colors".
3.Create a job of the reference sheet or of the original document with the measuring marks and image the plate. Make sure that paper stretch compensation is not set in the "PageOutput" or "ImpositionOutput" sequence template in "Rendering > Print".
4.Print the reference sheet or the original document with the measuring marks on the designated press. The production sheets must be running through the press before the sheet can be removed for measuring.
5.In the Prinect Cockpit, go to " Administration > Resources > Paper Stretch Compensation". Click "New" in the "Print Parameters" Tab and enter the size of the plate template (the dimensions of the plates used). You can now use the other tabs to set up paper stretch compensation.
6.Go to "Printing Order" Tab and match the order of colors to the order that is on the press. With "Reference" set the process color in which the scale for measuring paper stretch will be printed (defined at Prinect Signa Station). The reference color is generally the darkest process color (e.g. black in CMYK).
7.In the "Reference Points" Tab enter the reference points, i.e. the positions on the sheet where the measuring marks will be printed.
8.Go to the "Compensation Values" Tab. At each measuring mark, now measure the deviations of the process colors from the reference line in the reference scale and enter the data measured for each reference point into the "Total Register Deviation" table. If necessary, you can print an empty table for each reference point and enter the measured data manually. Afterwards, you must transfer these handwritten values to the "Total Register Deviation" table.
9.Save the paper stretch compensation template you just produced. To apply the paper stretch compensation template later to a job, enable "Paper Stretch Compensation" in "Rendering > Print" in the "PageOutput" or "ImpositionOutput" sequence and select the paper stretch compensation template in "Front" or "Back".
10.You can repeat imaging and printing of the reference sheet to increase the accuracy of paper stretch compensation. This time use the compensation parameters that were determined. Open the compensation template you just saved. In the "Compensation Values" tab, you can now add the deviations of the second measurement to the existing deviations with the Iterative Correction button.

Note: Paper stretch compensation templates are also automatically filed to the Master Data Store (MDS) if one is used in your system environment.
Calculation of paper stretch compensation is on-the-fly during imaging (if a Prinect Shooter is used). Alternatively, you can write the compensation parameters to TIFF-B files when you are exporting TIFF-B bitmaps.