Import "Cost centers" (Devices, Cost Centers and Actions)
You do not have to set up devices again in the Prinect Manager if they are already set up in the Prinect Business Manager. Instead, you can import the devices and their cost centers from the Prinect Business Manager to the Master Data Store (MDS).
What data are copied?
When a device is imported, the following data are copied to the Prinect Integration Manager:
•Device name
•DeviceID
•Device class (sheetfed press, folder, digital press, etc.)
•Cost center
The cost center is created automatically from the DeviceID. The Business Manager does not know variants. For that reason, after import you must check and, if necessary, match the cost centers.
•Actions
In the Prinect Business Manager actions are called "activities". Assignment is done manually during the import process. It is also possible to create missing actions manually.
•Connection type
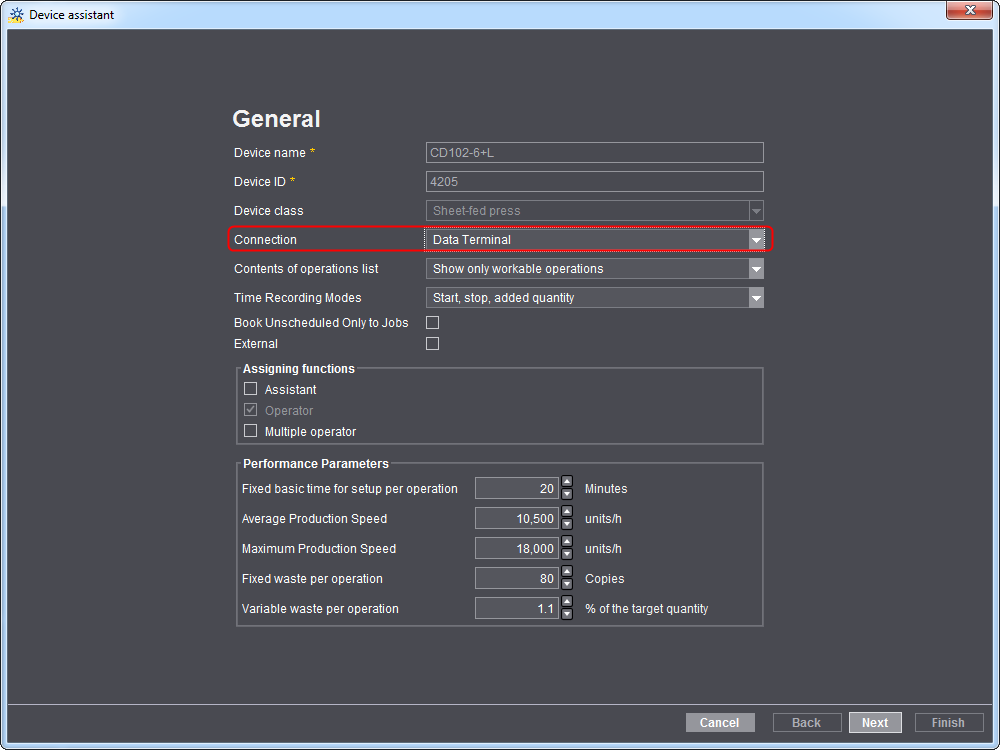
All devices are imported by default as "Data Terminal" devices to the Prinect Integration Manager. You must match the connection type if need be.
•Other machine parameters
Besides the data named above, there are other device parameters like machine type (XL105, Labelfire, Primefire, etc.), number of printing units, etc. You can set these parameters in the Device Assistant of the Prinect Integration Manager but must check each device manually and, if necessary, correct the setting.
Notes on the import
•No updating of data is possible.
Changes will not be adopted during reimport when a Prinect Business Manager device has already been imported into MDS. In this case, you must make these changes manually in Prinect Cockpit.
•Master data import is possible for one device at a time only, not for several devices.
Procedure
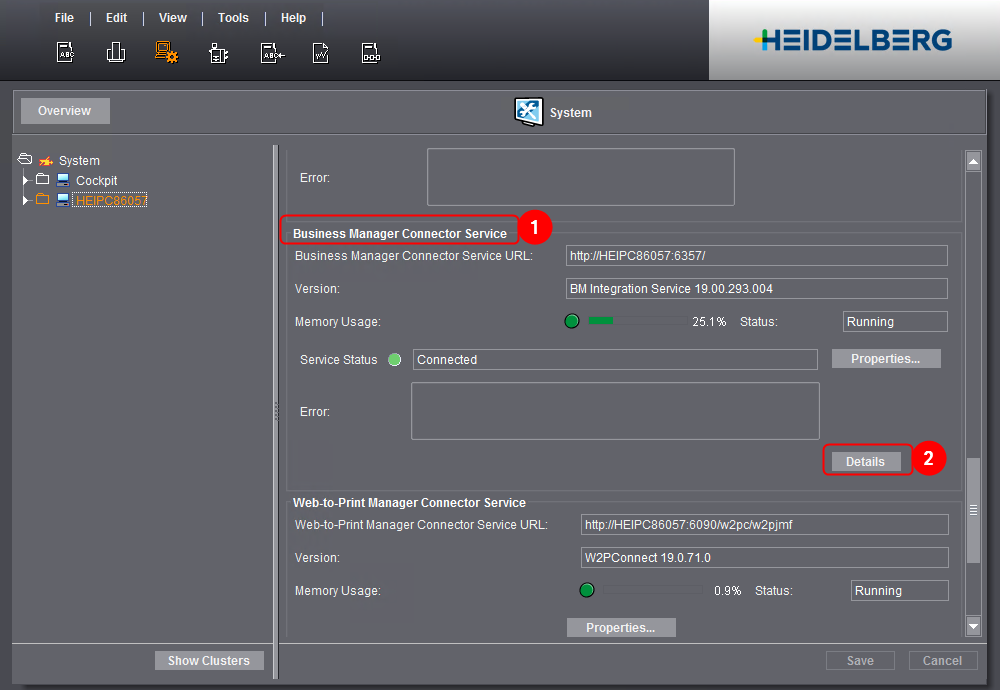
1.In Prinect Cockpit, go to "Administration > System".
2.Click the Prinect server in the left column.

3.Scroll to "Business Manager Connector Service" (1) on the right side.
4.Click "Details" (2).
The "Configuration Status" window opens in the Internet browser.
5.Go to "Synchronization > From Business Manager > Cost centers" (1).
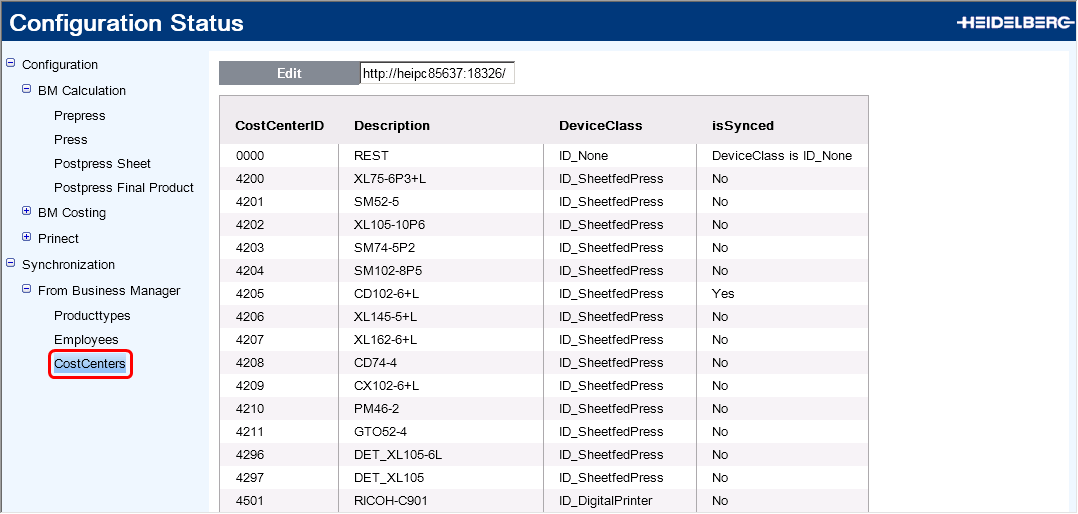
The list displays all devices set up in Prinect Business Manager.
The "Yes" attribute of the "isSynced" column identifies the devices already imported into the MDS. These data records must not be altered later. If you edit data in Prinect Business Manager, you must make the respective changes manually in Prinect Cockpit.
6.Select the device you wish to import in the list.
7.Click "Edit".
A new page opens where you can configure the selected device.
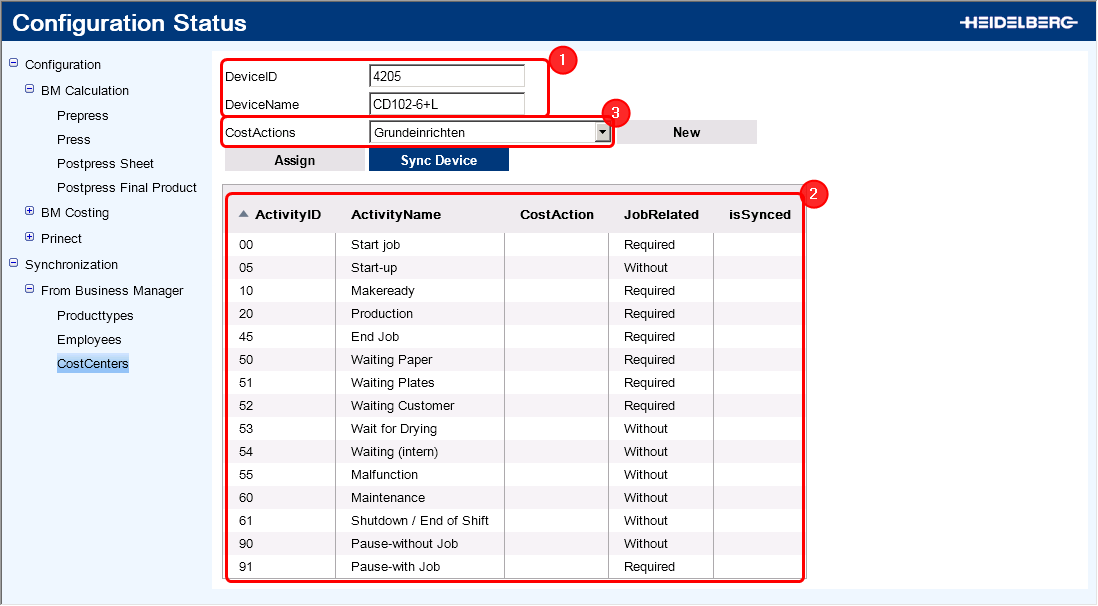
The entries for "DeviceID" and "DeviceName" come from the Business Manager (1). Do not change these.
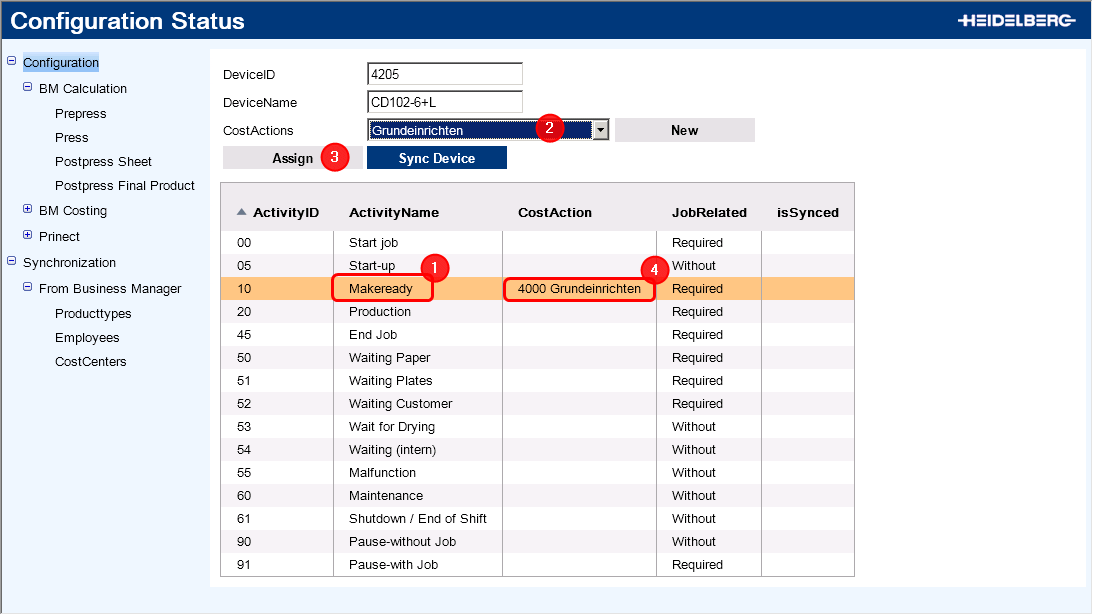
The list shows all "activities" (in the Prinect Integration Manager "actions") that are set up in the Business Manager. You must assign each of the "activities" to be used for job costing for this device to an action in the Prinect Integration Manager.
8.To do this, select the activity in the list (2).
9.Select the related action in the Prinect Integration Manager (3).
If the action does not exist, you can create a new one with the plus sign "+". See Defining a New Action.
10.Click "Assign" (4).
11.Repeat assignment for further activities.
The activity is now assigned to the action.
12.Click "Sync Device" (5) when you have finished assigning the data.
Import can take a few seconds. You automatically return to the "CostCenters" list as soon as import is finished. "Yes" displays in the "isSynced" column.
13.Go to the Prinect Cockpit to check your settings.
14.Check the cost center. To do so, go to "Administration > Device configuration > Cost centers".
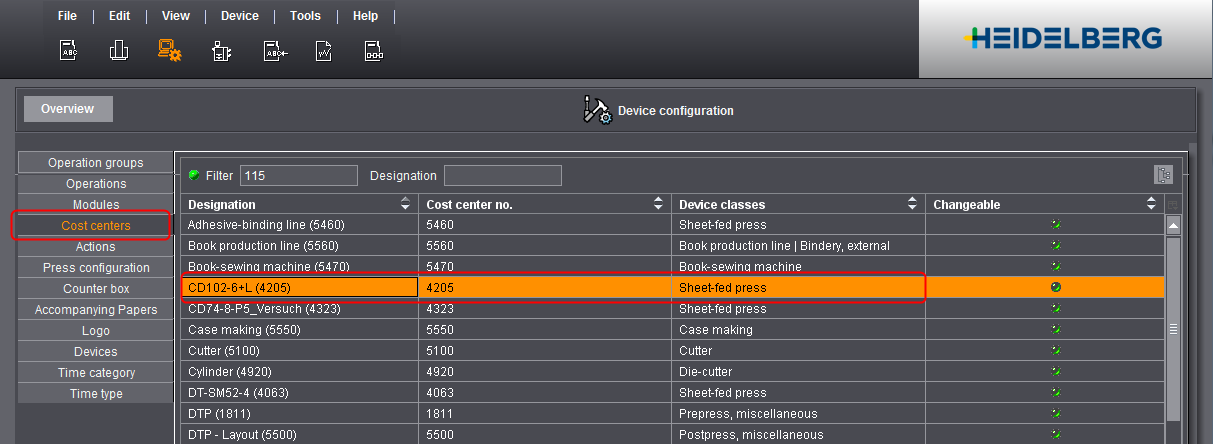
In this section, a cost center was created automatically from the device name and the device ID. You must correct this depending on the configuration in the Prinect Business Manager.
15.Check the other device settings. To do so, go to "Administration
< System > <name of Prinect server> > CMD". The imported device was set up here automatically.
16.Click "Edit" in the context menu.
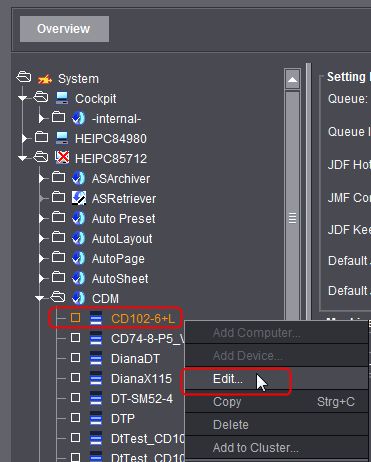
The "Device assistant" opens.
17.Check the connection type. The device was set up automatically as a Data Terminal device and, for that reason, you may have to correct it.
18.Click "Next".
19.Check the machine settings in the other dialogs and, if necessary, match them to your needs.
20.In particular, check the variants.
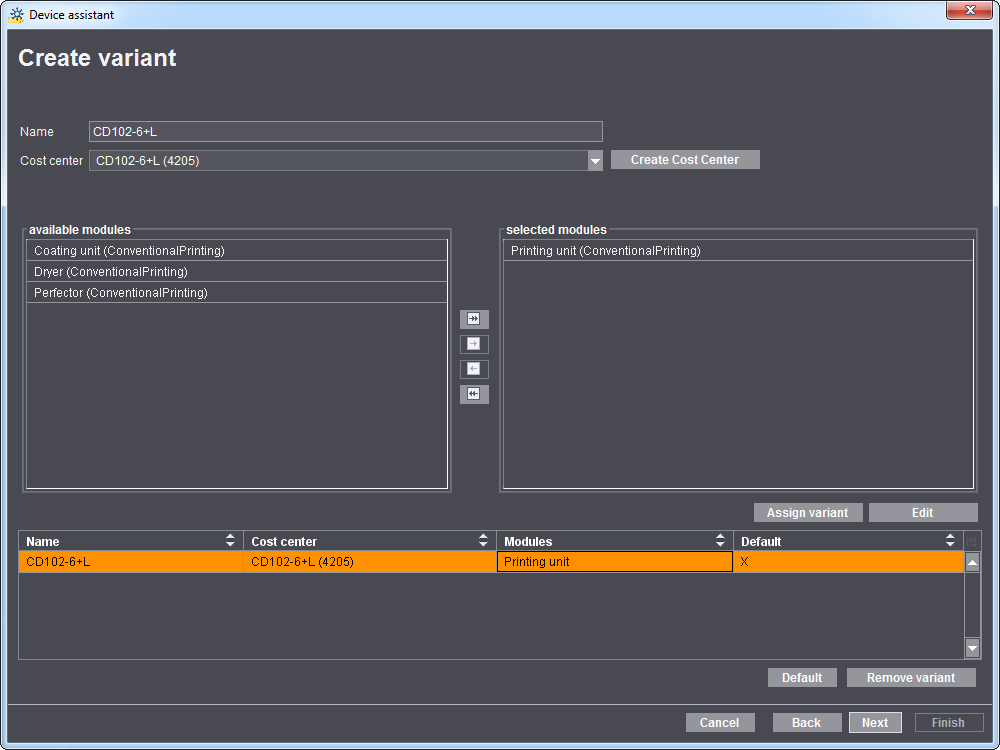
The Prinect Business Manager does not support variants. It only recognizes cost centers that are assigned to a machine. This means that several cost centers can be assigned to a machine. In the Prinect Integration Manager, these cost centers must be created as variants.
21.Click "Next".
22.If necessary, enable "Enable Extended Job Ticket" and "Enable Print". See also Enable Extended Job Ticket and Enable Print.
23.Click "Finish".
This concludes the import and manual changes.
When importing a device from the Prinect Business Manager, you must manually assign Prinect Integration Manager actions to the "activities". You can create the action directly when importing if the required action does not yet exist in the Prinect Integration Manager.

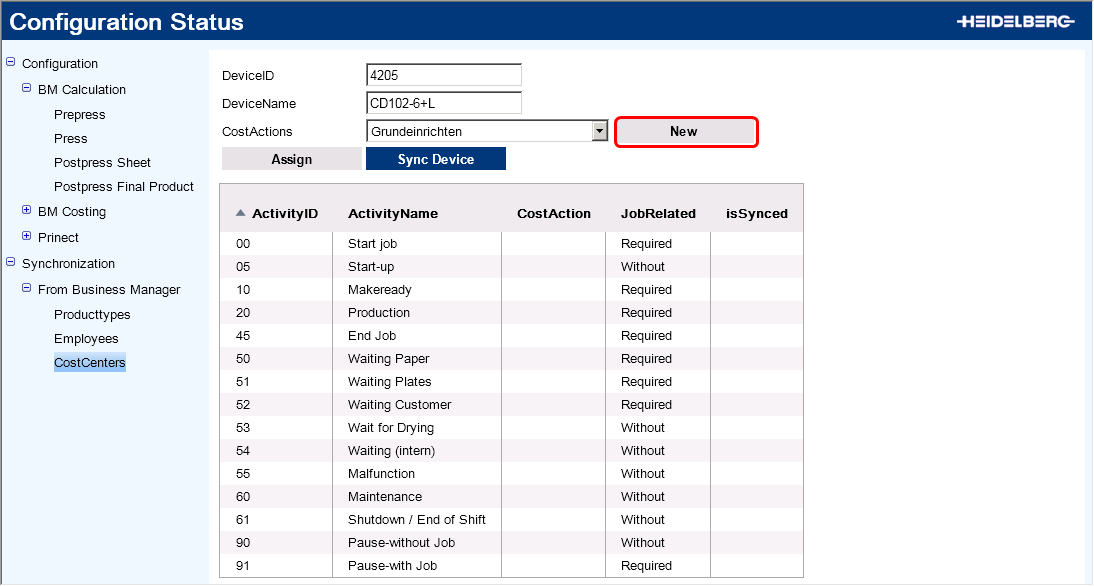
1.Click "New".
A dialog opens where you can set up a new action.

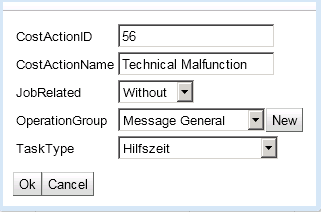
"CostActionID": Enter an ID for the action in this box. This ID need not be identical with the "ActivityID" of Prinect Business Manager. It is vital that this ID is not used for another action in the Prinect Integration Manager.
"CostActionName": Enter the name of the action here. We recommend using the same name as the one you used for the pertaining "activity" ("ActivityName").
"JobRelated": When you set up the action, an operation (PDC message) with the same name is created in the Prinect Integration Manager at the same time.
Choose "Required" if the operation may be reported with relation to a job only.
Choose "Without" if the operation must be reported without relation to a job only.
"OperationGroup": Assign an operation group to the action. Operation groups structure operations (PDC messages) at the machine into groups to facilitate the selection.
By default, there are four operation groups. You can set up more operation groups with "New".
"TaskType": Assign a time type to an action.
Explanation of each of the time types, see Time Type.
2.Click "OK".
The action is created and appears in the "CostActions" list box. You can now assign the new action to an "activity".
The new action also appears in Prinect Cockpit, "Administration > Device Configuration > Actions". Along with the action, an operation (PDC message) assigned to the action was set up automatically.