Configuration of the "Plate Pilot" Administration area
This is where you define settings that impact the general functionality of the Plate Pilot and not a particular CTP device.
Text box "Time required between last platemaking and start of printing"
This is where you enter the typical period of time required to transport the plate trolley to the press and to mount the plates into the print units. You may have to consider waiting periods that cannot be excluded at all times.
Text box "Maximum time between platemaking and planned start of printing"
This is where you enter the maximum period of time that may elapse between the end of platemaking and the print start (transport of plate stacks, waiting period, mounting of plates in the press).
These times are used for Plate Pilot scheduling and for calculating the order of plates in the plate stack.
Option "The plate stack will be put together automatically by the Plate Pilot"
Use this option to enable that plate stacks will be put together automatically. In this context, the plates belonging to a print job are arranged automatically in the correct sequence. At the press, the plates need only be taken off the stack and mounted in the respective print unit one by one.
 Note: A warning is issued if this option is disabled and/or the times are inconsistent. Saving the settings is still possible.
"Optical Signaling of Imagesetter Status" group
 Prerequisite: A network signal lamp must be present and accessible in the network system environment of the Prinect Server to be able to configure this area.
Although Plate Pilot is capable of automatically putting together and exposing plate stacks, you cannot always identify a full plate trolley that must be replaced by an empty one in the press room right away. Software-controlled signal lamps can be connected to Prinect Production to indicate such a situation and also any errors from a greater distance. Signal lamps controllable via a network link (WLAN and/or LAN) are, for example, Philips Hue lamps, connected via a Philips Bridge. Depending on the input, these lamps can indicate various signals, e.g. red flashing in case of errors, or indicate that a plate trolley is full and needs to be replaced with an empty one. This must be done in due time to ensure the automatic workflow continues without jeopardizing scheduled deadlines.
Meaning of lamp signals:
Signal lamp | Imagesetter | Plate Carts | Plate Stacks | Message | |
|---|---|---|---|---|---|
Flashing red | Error | – | – | Imaging interrupted – action required | |
Flashing yellow | Warning | – | – | Needs attention! | |
Flashing blue | Waiting | Full | Waiting | Replace plate trolley! | |
Flashing blue | Waiting | Empty | Waiting | Send plate stack to imagesetter for exposure | |
Permanent blue | Idle | – | Empty | No plate stack to image | |
| Permanent green | Imaging | – | – | CTP device busy imaging |
| Switched off | Offline | – | – | CTP device is switched off |


"Use Optical Signaling" option
Enable this option to use network lamps. This will enable the controls in this area.
Set up optical signaling
The "Set up Optical Signaling for Imaging Status" assistant opens when you use this button. There are three steps in this assistant:
•Select Connection Type
In the first step, you should try to have the lamp detected automatically in the network (option "Automatic Search in Network"). Usually, network lamps have specific properties by which they can be identified.
Note: You can prevent the automatic connection by blocking the respective port 1900 in Windows. In this case you can establish the connection manually. Determine the IP address required for Philips Hue lamps as follows:
aRun a Windows command line (CMD).
bType "ping philips-hue".
cThe pertaining IP address will be displayed if the Bridge of the lamp can be accessed.
dYou can now use the address to establish the connection manually (option "Connect via IP Address"). For more information, please refer to the documentation of the lamp, or contact your system administrator.
Click "Next".
•Connect
This step will establish the connection of Prinect Production and the lamp if it was detected. You can select the lamp you want if several lamps are available.
Click "Next" if the connection was established successfully.
•Connection Confirmation
This step will confirm the connection with the lamp and close the assistant.
Section "Configuration of Platesetters and Presses for Use with Plate Pilot"
"Platesetters" table
A separate item displays for each CTP device connected to Prinect Production (connected locally or via Prinect Shooter) in the table. This is why the number of these items is variable, depending on the Prinect Production configuration. When you click an imagesetter item, this displays on an blue background. Use the "Edit" button to open a dialog where you can edit the platesetter in question.
Edit Dialog
This is where you define the settings for the imagesetter selected beforehand.
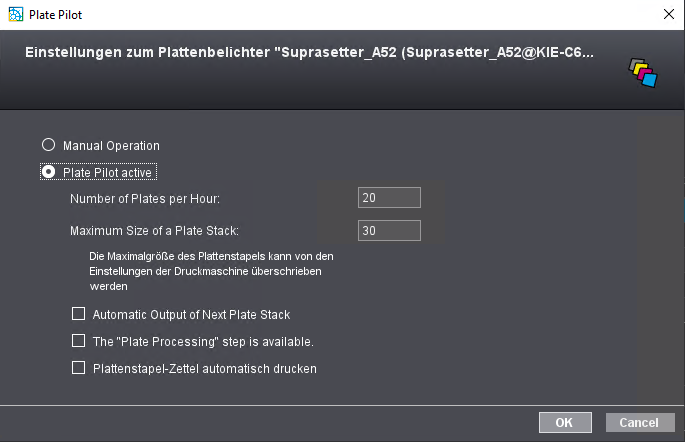
"Manual Operation" option
Enable this option if you wish to switch off the Plate Pilot for the selected imagesetter.
"Plate Pilot" option
The Plate Pilot is enabled for the selected imagesetter when you enable this option.
Number of Plates per Hour:
This is where you specify the number of plates the CTP device can expose per hour. We recommend specifying the maximum number of possible plates that, according to your experience, can be produced in the most adverse case (complex content) because imaging can vary depending on the content and this number is used for precise scheduling.
Note: When you are setting up an "external platesetter" in "Administration > System", the speed of platemaking is already defined. See Add External CTP Device. This value for the number of plates per hour is used as the default. You can change this value for special purposes related to the Plate Pilot.
Maximum Size of a Plate Stack
This is where you specify the maximum number of plates the CTP device or plate trolley can handle for a plate stack.
Option "Automatic Output of Next Plate Stack"
A new plate stack will be created automatically as soon as a plate stack is ready if this option is enabled. This option considers the Plate Pilot scheduling times.
Option "The ’Plate Processing’ step is available"
With this option, you set up the Plate Pilot management for the respective CTP device or CTP cluster.
When this option is enabled and when "Plate Processing" is enabled in the ImpositionOutput sequence of the CTP device involved, the imaged plates will be marked as "finished" only when the "Plate Processing" process is finished. See "Plate Processing" Option.
Submission with "Late State" marks replacement
If a plate stack is filled in Plate Pilot, Plate Pilot can insert certain mark information into predefined placeholders within the TIFF-B files ("Late State Marks Replacer") immediately before imaging the printing plates. If such a mark replacement is defined, Plate Pilot performs the mark replacement and then submits the Tiff-B data for imaging after all mark replacements of a plate stack have been completed.
"Press" table
This table lists all offset presses connected to Prinect Production. The "Edit " button can be used if you select a press item in the table. Use the button to open a dialog where you can edit the press in question.
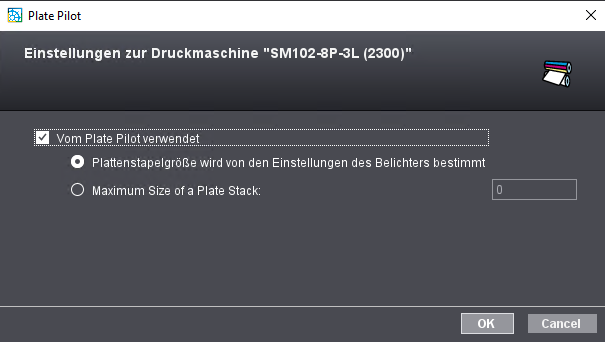
"Used by Plate Pilot" option
When you enable this option, Plate Pilot will use the press you selected beforehand for plate stack creation.
Option "Plate stack size depends on platesetter settings"
When you enable this option, the plate stack size for this press is defined by the setting that was set for the platesetter used. The properties of the press are not taken into account.
Option "Maximum Size of a Plate Stack"
When you enable this option, you can define the maximum number of printing plates that may be contained in a plate stack for this press. The settings of the platesetter are not taken into account.
Privacy Policy | Imprint | Prinect Know How | Prinect Release Notes