Privacy Policy | Imprint | Prinect Know How | Prinect Release Notes ![]()
Binding, gluing folding cartons
These operations shown are sorted by sheets or, after binding, by product or product part. For each of the sheets, the operations shown are sorted by their order in the production run. Each product part/version is listed at least once even if no operation is assigned to it (the "Operation" element is crossed out).
You can add and delete operations in the Planning Assistant.
 Note: If there is no license for the Postpress option, the Planning Assistant cannot not schedule any finishing operations, especially cutting operations. For that reason, when calculating the quantity for the print operations, multiple 1ups and allowances from postprocessing are ignored, but the quantities that are planned for printing in the layout are taken into account. These quantities include the allowances and 1up distributions calculated by Signa Station.
If the delivery quantity for a product is changed in the Planning Assistant so that it no longer matches the original delivery quantity, the quantities defined in Signa Station are not adopted for the print operations.
Functions in the "Binding" planning step
In this planning step, you can call up or execute editing functions in a context menu or with buttons:
Context menu
To invoke the context menu, select a binding operation and click right. The context menu has the following functions:
Context menu command | Function |
|---|---|
New Operation Before | A new operation is inserted in the production process before the currently selected operation. See "New Operation Before" / "New Operation After". |
New Operation After | A new operation is inserted in the production run after the currently selected operation. See "New Operation Before" / "New Operation After". |
Split Amounts | The selected operation is split into two equal operations. As a result, the total amount of print products can be split and produced in parallel on several machines. Note: If you want to print on several offset presses at the same time, you must ensure that several sets of printing plates are produced accordingly. |
Merge Amounts | Multiple split operations are merged into one operation, and the amounts are produced with the merged operation. To do this, select the operations in question and invoke this context menu command. |
Add Stock Quantity | This function lets you create a new operation for adding a production volume to stock. As a result, you can use available free capacities, for example, and produce in advance for a later repeat job. See "Add Stock Quantity" and "Remove Quantity from Stock". Remember there is no automatic feedback to stock management in such a case. |
Merge Operations | If, for example in a gang run job, one sheet contains several different print product or versions that are to be processed in a common operation (e.g. binding or "stripping" of precut boxes), such products/versions can be merged for a common operation. To do this, select several products/versions and invoke this context menu command. This will create a new operation commonly processing all selected products or versions. The quantities and the production times are added. Only similar operations can be merged. You cannot invoke this context menu command if you select different operations at the same time. This also displays if only a operation is selected. |
Split Merged Operations | You can split merged operations again by selecting the merged operation and invoking the above context menu command. |
Production > delegate | The selected operation is removed from the planning for processing the current job and executed in another job, i.e. the operation is "delegated" to another job. This can be useful for processing gang jobs, for example. Delegated operations are dimmed. Please note that delegated operations are not automatically assigned to another job, but must be assigned manually. |
Production > execute | An operation set to "delegate" is reset to "execute " again and is included in the job planning again. |
Remove | The selected operation is removed from planning and deleted ultimately. |
Binding | If you apply this command to a versioned operation, all the versions of this operation will be bound in the same way. |
Buttons
Below the list of operations, there are buttons for the following functions:
Button | Function |
|---|---|
New Operation Before | A new operation is inserted in the production process before the currently selected operation. See "New Operation Before" / "New Operation After". |
New Operation After | A new operation is inserted in the production run after the currently selected operation. See "New Operation Before" / "New Operation After". |
Merge Amounts | Multiple split operations are merged into one operation, and the amounts are produced with the merged operation. To do so, select the operations in question and click this button. |
Split Amounts | The selected operation is split into two equal operations. As a result, the total amount of print products can be split and produced in parallel on several machines. Note: If you want to print on several offset presses at the same time, you must ensure that several sets of printing plates are produced accordingly. |
"Quantity" box:
In the Planning Assistant, all the quantities are calculated based on the delivery quantity entered in the "Delivery" planning step. The quantities in the other planning steps should be calculated and, if possible, not edited. This is why the box for the quantity usually cannot be edited. But it might be necessary to edit the quantities in exceptional cases. You can then unlock this box for editing with the key shortcut "Ctrl + Shift + E".
For the selected operation, the quantity produced with this operation is calculated from the displayed quantity plus allowance. This quantity is the output variable for calculation of the amount(s) in the next operation.
Example: A "Delivery quantity" of 1000 is entered in the "Delivery" planning step. This quantity will be adopted in the "Binding" step without any changes. Enter an "Allowance" of 15 for binding. The resulting quantity for binding is 1015. In the next planning step ("Sheet finishing"), a quantity of 1015 is the output variable for calculating the folding sheet quantities.
"Waste" box
The waste is different for each individual machine and is determined by the machine parameters defined in the CDM. As a result, the waste is transmitted by the MDS, but you can change this value if necessary.
"Machine" / "Variant" list boxes
Select the machine and/or a variant of this machine for planning here. If allowance, setup time and production time are set up for the selected machine in CDM, then these data are set by default in the input boxes. The "SheetFinishing" and "StitchFinishing" sequences are set up automatically based on the selected machines and/or variants.
Note: For information about the machine setup in the Device Assistant, go to "Administration" > "System" > "[name of Prinect server]" > "CDM" > "selected machine" > Edit" in the context menu.
Duration
If processing times are taken from the MIS, setup time and production times are calculated using the setup and processing times stored in the MIS.
If times are not taken from the MIS, setup time and processing times are calculated using the machine-related parameters filed in the Central Device Manager.
"New Operation Before" / "New Operation After"
Sometimes it is necessary to manually set up the process network for binding operations or match the existing process network. What's more, these process networks can be very complex and binding operations have to be based on the results of preceding binding operations, for example, if a gathered and sewn book block is glued with front/back end sheets.
Using "New Operation Before" and "New Operation After" it is possible to set up such a process network manually in the Planning Assistant. Proceed as follows:
1.Delete all suggested binding operations.
2.Set up the process network starting with the last operation (e.g. tumbling the protective cover) by selecting the machine and the variant.
3.Create the preceding operation (e.g. inserting book block and cover) using "New Operation Before".
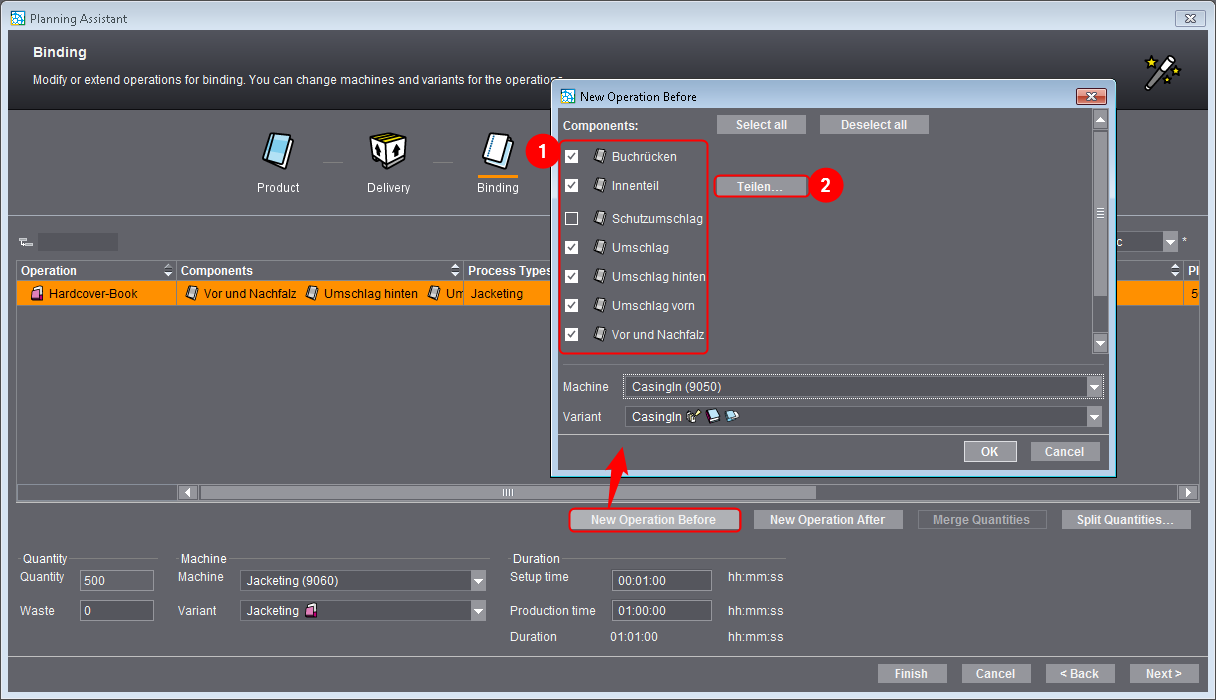
4.In the "New Operation Before" dialog, select the components to be processed with the operation (1). You can split several sheets and distribute them across several operations with "Split" (2).

Note on splitting:
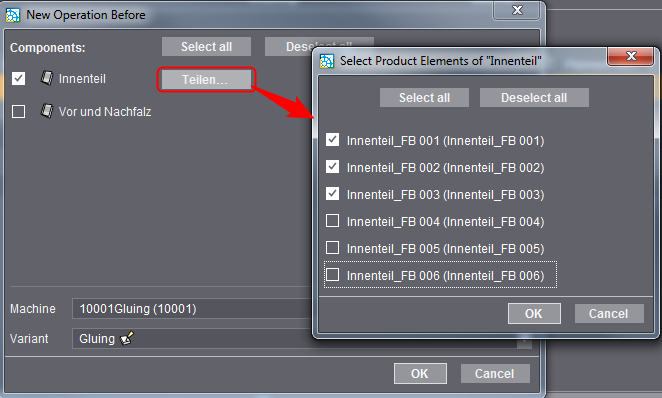
Sometimes it is possible to only process some sheets of a large product part (e.g. during preliminary gathering). When creating a new binding operation, you can also select a subset instead of the whole product part.
To do this, select "Split" and select the sheets that are to be processed in the operation concerned. After that, confirm with "OK".
5.Using "New Operation Before", create all other operations until you have completed the process network.
Privacy Policy | Imprint | Prinect Know How | Prinect Release Notes