Privacy Policy | Imprint | Prinect Know How | Prinect Release Notes ![]()
Adding documents to a job and setting them up
In this step, you are adding the PDF documents containing the contents to a job. These documents are prepared in the Prinect Workflow and finally output.
 Note: When creating a new job, you must first add new documents. This is why new jobs always open with this step.
There are different ways to add documents to a job:
•Add documents with the "Add Files" button.
•Add documents using drag-and-drop.
Add documents with the "Add Files" button
To add PDF files to a job, proceed as follows:
1.Click the "Add Files" button. An appropriate warning appears if the job is not yet started. Confirm the dialog and the job starts. The "Add Files" dialog first displays the content of the "PTDocs" folder on the Prinect server.
2.Go to the folder where the appropriate PDF files data are located, if necessary to a different drive.
3.Mark all required PDF files and click "OK".
A dialog first displays, asking you whether the file is to be copied or a link created. Click "Copy".
You can find details about the "Add Files" dialog in: "Add Files" Window.
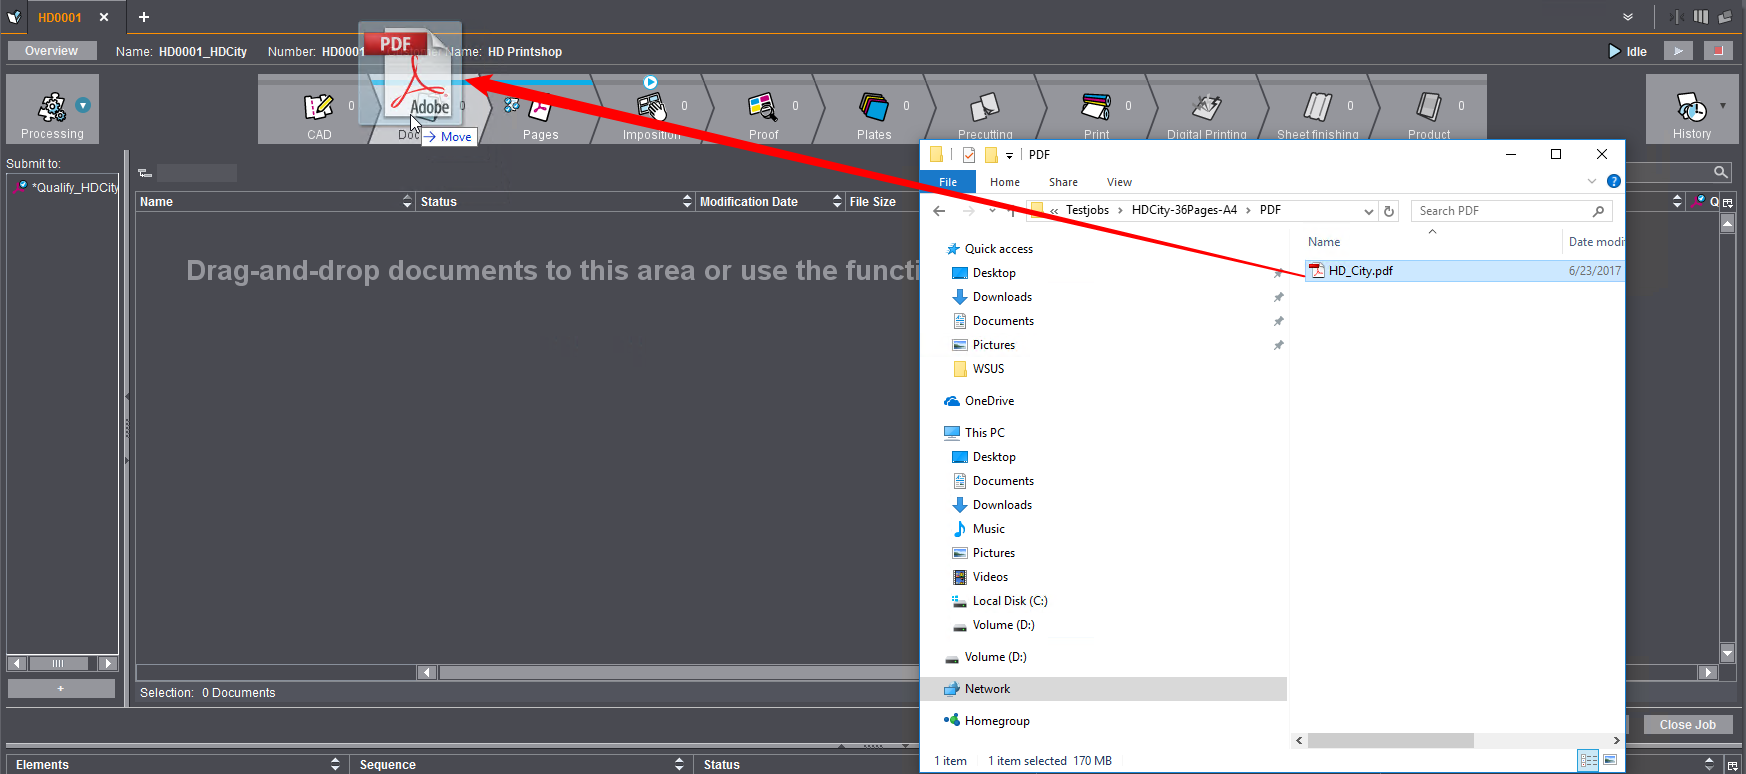
Add documents using drag-and-drop
As an alternative to using the "Add" button, you can also add PDF documents to the "Documents" step by dragging-and-dropping them from a Windows Explorer window (or Macintosh Finder window):
1.In addition to Prinect Cockpit, open the Windows Explorer and go to the folder where the job files are located.


2.Mark the job file(s) (multiple selection is possible) and drag it/them, holding down the left mouse button, to the "Documents" area in the open job or to the "Documents" step icon in the workflow bar and let go of the mouse button. Adding documents using drag-and-drop to the step icon in the workflow bar works even if the step is not open at that moment.
This is where you can find details about the grouping of columns: Structured view.
This is where you can find details about the search function: Search function.
This displays sequences to which you can submit existing documents. To do this, drag-and-drop the document to the sequence concerned. See also the "Submit" button in the Button bar at bottom.
This button opens the "Add Templates" dialog. In this window, you can add other sequence templates to "Submit to".
"Submit to" in context menu
Menu command | Function |
|---|---|
Open Sequence | Opens the enabled sequence for checking or editing. |
Add Sequence | Opens the "Select Templates to Add" window. See also "+" button. |
Delete Sequence | Deletes the enabled sequence from the "Submit to" group. |
Reassign Template | The "Reassign a new template for ..." dialog opens. This is where you can select a different sequence template that will be assigned to the job instead of the existing one. Only sequences that match the current step are suggested. After that, the data are processed again with the new sequence. |
Show Suppressed Sequences | Sequences that cannot be run are usually hidden. With this option enabled, sequences that cannot be run are shown if there are any and a checkmark next to the menu command indicates that the function is enabled. When the function is invoked again, the sequences that cannot be run are hidden again, and the checkmark disappears. |
This list box allows you to create and save your own column sets for different uses or to select the desired column set from existing ones. For information on adapting, creating or deleting column sets, refer to:
•Define a custom column set,
•Change the order of columns in a column set and
Columns available in the "Documents" step
Column | Display |
|---|---|
Name | File name of the document. |
Modification Date | Date and time of the last change to the document. |
Path | The document file path. See also Structured view. |
File Size | File size of the document. |
Extension | File extension of the document (e.g. PDF). |
Product | Product Name |
Version | Designation of the versions contained in the documents. |
Status | Status of document processing. You have the following options in this case: •Processing
The progress of document processing is displayed by a progress bar and a percentage. •Warning
A warning appears if there was a problem during processing but processing of the document was still continued. Refer to the "History" section in this case or double-click this item in the "Status" column to view details. •Aborted
Document processing was aborted. The "History" section will provide you with more details or double-click this item in the "Status" column to view details. •Needs Attention
A user intervention is required to continue processing. •Complete
Processing was completed without an error. |
Comment | This is where the comment displays that was entered in the "Comment" window . See also "Comment" in Context menu "Documents". Note: This column is present in all steps. |
Dynamic Columns | A column with status information is shown for every sequence processing documents (e.g. Qualify). |
Button | Function |
|---|---|
Add files | The "Add files" window opens. See "Add Files" Window. Note: You can also open the "Add files" window with the respective context menu command in the "Documents" window or with the key shortcut "Command + T". |
Submit | The "Submit Elements to" window opens. See "Submit" window. This button is only enabled if at least one document is selected. Note: You can also open the "Submit" window with the respective context menu command in the "Documents" window or with the key shortcut "Command + F12". Note: "Submit" is also possible using drag-&-drop. The following options are available: •You can drag-and-drop the document to the relevant sequence in the "Documents" view ("Submit to"). •You can drag-and-drop the document on a work step icon in the workflow bar. You can only submit the document to sequences that are offered for the relevant work step in a tool tip window using this method. |
Close Job | The job closes. |
Note: Double clicking a single document will open the PDF file in Acrobat. At the same time, the toolbar "Print production" opens.
Right-clicking in the list of documents will open a context menu.
Note: Some of the functions in the context menu can also be operated with buttons. See Button bar at bottom.
Menu command | Function |
|---|---|
Open | The selected PDF file opens for inspection in Adobe Acrobat. Key shortcut: Command key + O. |
Add files | Add document files to the job. See also Add documents with the "Add Files" button. |
Browse | A Browse window for selecting documents in the system environment of the Prinect Production server opens. Key shortcut: Command key + B. |
Submit | The "Submit Elements to" window opens. See "Submit" window. This button is enabled only if at least one document is selected. Note: You can also open the "Submit" window with the respective button in the "Documents" window or with the key shortcut "Command + F12". Note: "Submit" is also possible using drag-and-drop. The following options are available: •You can drag-and-drop the document to the relevant sequence in the "Documents" view ("Submit to"). •You can drag-and-drop the document on a work step icon in the workflow bar. You can submit the document only to sequences that are offered for this purpose in a tool tip window using this method. |
Properties | The dynamic window is split vertically. The properties display in the "Properties" and "History" tabs on the right. You can toggle between the tabs by clicking the relevant tab. See also Properties of Documents. Key shortcut: Command key + I. |
Paste | Document files that were previously copied to the clipboard are pasted into the open job. Key shortcut: Command key + V. |
Copy | Selected document files are copied to the clipboard. Key shortcut: Command key + C. |
Delete | The selected files are deleted after you confirm a security prompt. Key shortcut: Command key + Del. |
Comment | You can type a comment for the selected document. These comments display in the "Comment" column of the documents list. |
Expand All | All lower levels of the selected element is shown if there are any lower levels. |
Collapse All | All lower levels are hidden. |
Privacy Policy | Imprint | Prinect Know How | Prinect Release Notes


