Privacy Policy | Imprint | Prinect Know How | Prinect Release Notes ![]()
 Note: Before starting a product update, heed the Checklist Before Starting an Update. See Checklist Before Starting an Update.
A product update is an update where the base and target version(s) of one or several products have the same master version. Compared to a system upgrade or cumulative update, a product update is a less complex process that updates a smaller number of products than a system upgrade or cumulative update.
Unlike a system upgrade or cumulative update, product updates are not installed with an assistant; instead, the installation process is controlled directly in the detail area of the "Software Update" view.
Note: Often, a system upgrade and/or a cumulative update is available in addition to product updates. See Install system upgrade and product updates together.
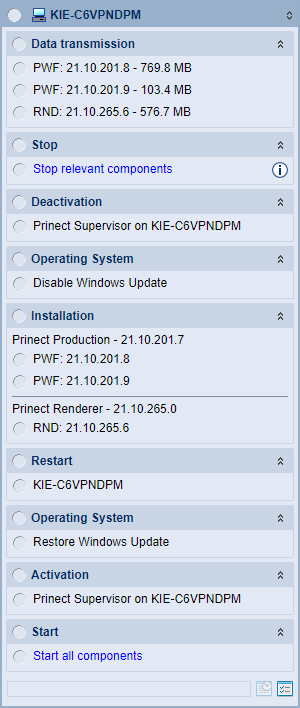
When you click a computer, system, subsystem, or custom group in the navigation pane, a check whether updates are available for the selected item (computer, system, subsystem, group) takes place. This may take a (short) while. Wait for the check to complete. If a product update is available, the following is displayed in the detail area:
If product updates are available, a tile displays for each computer for which updates are pending, showing the computer name and steps of the update process.
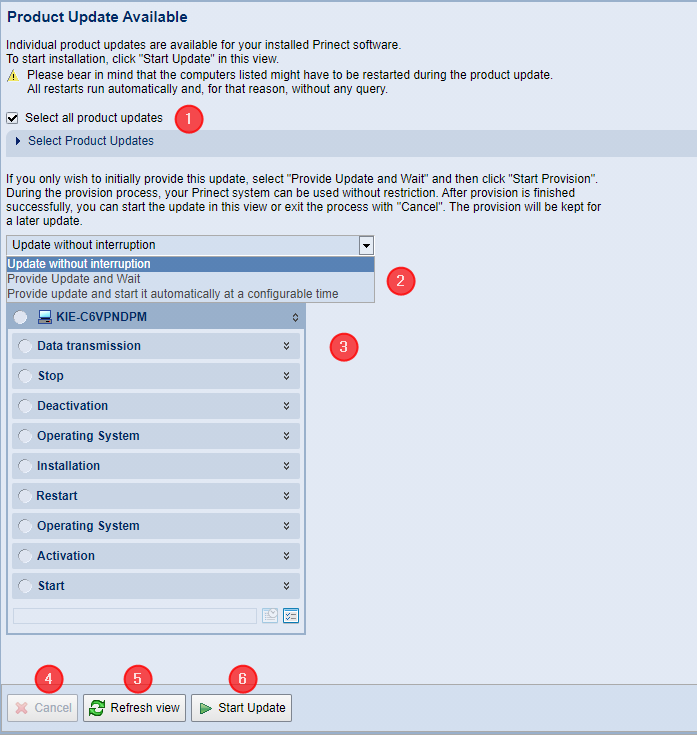
(1) Select all product updates | Normally, the "Select all product updates" option is enabled, which means that all product updates are installed in a single upgrade process. If necessary, you can disable this option and make your own selection before starting the product update. To do this, click on the small triangle in front of the entry "Select Product Updates". The list of available product updates appears. If the "Select all product updates" option is disabled, you can select individual update collections to install. In this case, you can select/deselect only those updates that do not require installation with the product update. |
(2) Drop-down list for update options | Use the drop-down list above the computer updates screen to control how the product update is performed: •Update without interruption (default) Click "Start Update" to start the update; it will continue to run without interruption until all update processes are complete. •Provide Update and Wait The individual update packages are provided for installation on the participating computers, i.e. the update packages are transferred from the PMC Repository to the computers in question after all necessary validations (verify certificate and disk space). Background installations are also carried out and started immediately. The (non-background) updates will start at a later time and must be triggered manually. For this purpose, a corresponding start button is displayed when the package is fully available. This option allows you to continue working on the Prinect computers while the installation data is being transferred and background installations are running. •Provide update and start it automatically at a configurable time The individual update packages are provided for installation on the participating computers, and background installations are performed. Below this drop-down list, boxes appear where you can set the date and the time. This is where you specify when installation is to start automatically. |
(3) Computer tiles and associated installation steps | This is where a tile listing the pending installation steps displays for every computer affected by the product update. Click the double arrows pointing down to see details of the installation step:
|
(4) "Cancel" button | A running installation is canceled. |
(5) "Refresh view" button | Clicking this button will start a PMC Repository search for new update packages and trigger a request for new software at the PSC. This will cause the list of available updates to be recompiled and supplemented where necessary. Note: If there are new updates in the PSC, they will be downloaded from the PSC into the PMC Repository. These update packages are only available for installation when they are completely downloaded. See also Search for New Software. |
(6) "Start Update" button | The update process starts. |
Information about the components that will be stopped during an update installation
Before starting an update installation, you can check which Prinect components will be stopped during installation. To do this, click the double arrow pointing down in the "Stop" installation step to open the detail view:

An information icon is displayed here. Clicking this icon opens an information window:
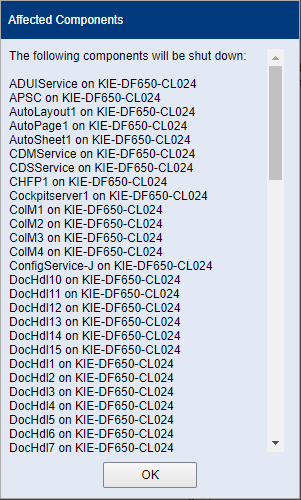
All components that will be stopped during the update process are displayed here. Click "OK" to close the window again.
When the desired product updates are selected, you can start the update.
1.Click the "Start Update" button.
The first step is to check whether an operating system update is pending or whether the operating system update is complete (this is normally the case after a reboot) and if reboots are required. If an incomplete operating system update is found, the following message appears:

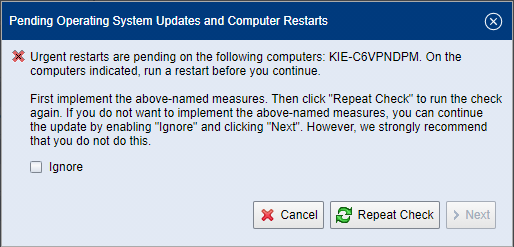
It is recommended that you complete the operating system update before proceeding with the update installation. Click "Cancel".
If a running operating system update has just been terminated or if it is terminated during the software update, it may happen that the PMC has not yet received this information. Then click "Repeat Check". If the operating system update is found to be complete, the "Next" button becomes operable.
If, due to time constraints, it is necessary to perform the update installation without completing the operating system update, enable the "Ignore" option. Then the "Next" button becomes operable, and you can start the installation.
2.Click "Next".
The "License Agreement" window appears.

Read the License Agreement carefully. To be able to continue the setup, you must accept the agreement by enabling the "I accept the terms of the license agreement" option. Then click "Next".
3.Depending on the type of update packages, a dialog with hints may appear:
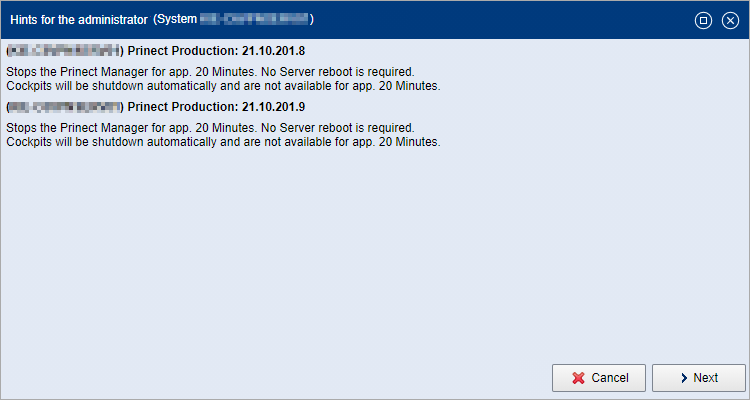
Confirm with "Next".
Where applicable, more windows with notes on the individual update packages display. This depends on the type of the update packages. Confirm these notes with "Next".
4.An authentication is needed now:
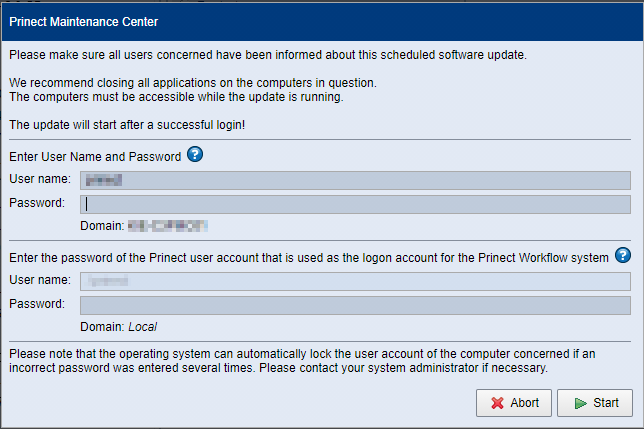
•Enter username and password in the fields above to log in to the Prinect Maintenance Center.
•If you are updating a Prinect Production Server (a Prinect workflow system) or a Prinect Digital Server, as in the example, enter the login data for the Prinect (Windows) user account specified during initial installation of the Prinect Production software in the fields below. The Prinect user account is not a user account set up in the Prinect user management (Cockpit > Administration > Users)! Normally, the username is preset, i.e. you then only need to enter the password.
Note: In exceptional cases, the name of the Prinect user account on the target computer is unknown to the PMC. In this case, the "User name" box can be edited, and you have to specify the name of the Prinect user account here.
5.Click "Start". The update installation begins.
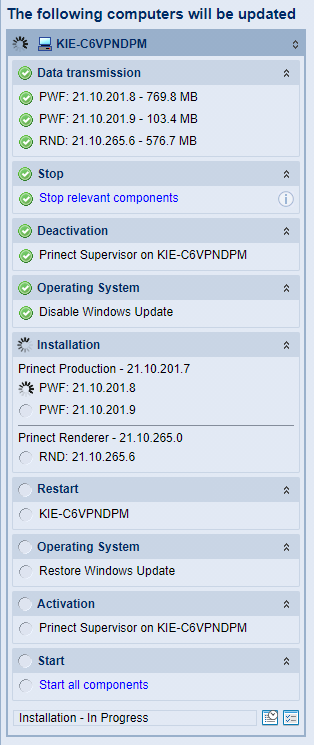
Successful installation phases are indicated by a green icon.
Note: Heed the information on the installation phases. See Installation phases. In contrast to product upgrade installations, update installations do not include an obligatory reboot prior to the installation phase(s). For example, the reboot shown in the screenshot above was explicitly requested by the previous installation phase.
At the same time, information about the running installation phases is displayed in the message area of the PMC. See The Message Area.
6.At the bottom of the list of installation phases, there are two buttons that provide detailed information about the installation process:
•Update History:

The "Update History" window opens:
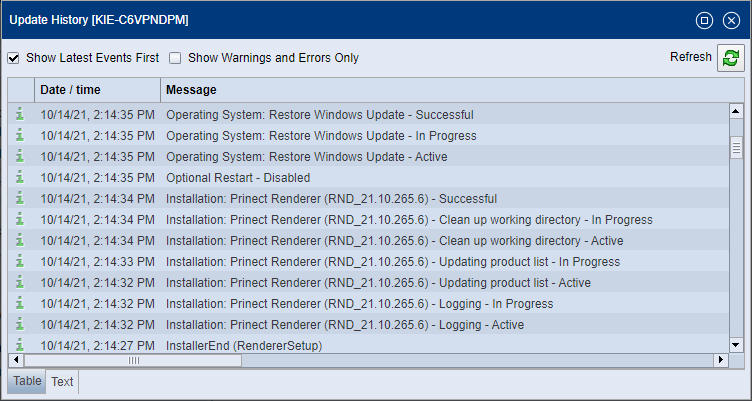
This is where you can view the history of each of the update phases for the respective computer. This information can be helpful, especially if errors occurred during installation.
•Hints for the administrator

The "Hints for the administrator" window opens:
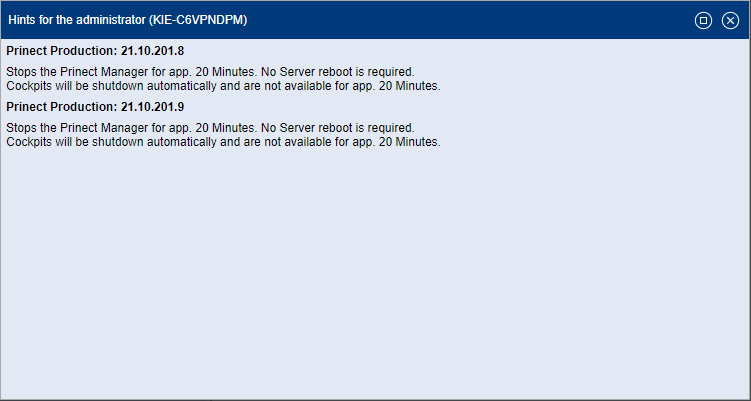
This window provides additional information about the installation process peculiarities of individual products and the impact on the computers involved.
7.Click the "Finish procedure" button when all installation phases are finished.

Note: Important! The computers involved will be released for future installations again only when the installation process is complete. If an installation process has not been completed, the computer is in the state "running installation" and is blocked for further updates.
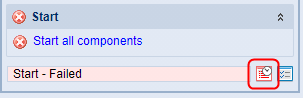
If one or more component(s) could not be started during installation, a message is displayed:
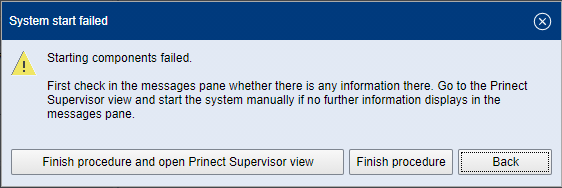
You can now do the following:
•Finish procedure and open Prinect Supervisor view:
The Supervisor view of the respective computer appears. Here you can check the state of all components and, if necessary, in the component list select the component(s) that have not been started and try to start them with the context menu command "Start Component".
•Finish procedure:
The procedure is finished even though at least one component is not started.
•Back:
The window closes, but the installation process is not finished! For example, you can now reboot the affected computer if the stopped component does not start in Supervisor view.
The product updates will no longer appear in the detail area of the Software Update view only after installation is finished.
Privacy Policy | Imprint | Prinect Know How | Prinect Release Notes