"Rectangular array"
"Part Connection array"
|
|
"Rectangular array" |
|
|
"Part Connection array" |
With the two modes "Rectangular Array" and "Part Connection array", you can place several 1ups on the canvas at the same time. To toggle between the modes, keep the mouse button pressed over the button currently displayed in the toolbar. Then release the mouse button when the pointer is on the desired button.
|
|
|
"Rectangular array" |
With this tool, you can draw a rectangular area that is filled with 1ups automatically.
1.Click the "Rectangular array" button. The edit bar shown below appears:

2.Click the mouse on the canvas and draw a rectangle. This rectangle is filled with 1ups automatically.

|
Controls in the Mode "Rectangular array" |
|
|---|---|
|
1up |
In the listbox, choose the 1up that you want to fill the array with. |
|
Pattern |
You can select the pattern here. You can choose from 1x1, 2 rows, 2 columns, or custom templates created in the "Layout Wizard" - Create New Layout Template. |
|
|
Edit Pattern With this button, you start the "Layout Wizard" - Create New Layout Template where you can create a new pattern. Once completed, the new layout is available in the Pattern listbox. |
|
|
Use Bleed Enable this option before placing 1ups if you want to align the 1ups not by their cutting knives but by their bleed. In this way, the bleed lines of the 1ups will not overlap. |
|
|
Ignore material-irrelevant styles |
|
H Gap: V Gap: |
You can set the vertical and horizontal gaps between adjacent 1ups here. To do so, proceed as follows: 1.Choose the pattern you want in the "Pattern" listbox. 2.Type the desired gaps in the text boxes and confirm each entry with the "Enter" key. 3.Draw the rectangle on the canvas only now. |
Back to Mode "Create array".
|
|
|
"Part Connection array" |
With this tool, you can fill an area with 1up copies.
1.Click "Part Connection array" . The edit bar shown below appears:

2.Select a 1up and move the mouse in horizontal and/or vertical direction. A preview shows how the 1ups will be distributed evenly over the area. You can set the layout properties in the edit bar.
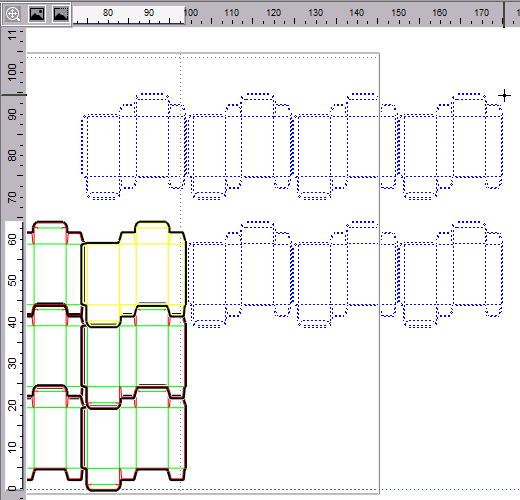
3.Click on the canvas to confirm the suggestion and to place the 1ups.
|
Controls in the "Part Connection array" Mode |
|
|---|---|
|
Row Count |
Maximum number of rows to create. If this number is reached, only the gap between the 1ups is increased. |
|
Min H Gap: |
Minimum horizontal gap to be left between the 1ups. |
|
Col Count: |
Maximum number of columns to create. If this number is reached, only the gap between the 1ups is increased. |
|
Min V Gap: |
Minimum vertical gap to be left between the 1ups. |
|
Align Type: |
This is where you can select what the 1ups will be aligned to: •Choose "Cutting align" if the cutting lines are to be the reference. •Choose "Bleed align" if the bleed lines are to be the reference. •Choose "Bound box align" if any outer line is to be the reference, regardless of the style. |
Back to Mode "Create array".
Back to Tool Bar in the "Layout" tab.