"New Layout"
"Layout Wizard" - Create New Layout Template
|
|
"New Layout"
|
The Layout Wizard lets you create new layout templates. You place four 1ups in succession. For each 1up, you can specify the name, the rotation and the gaps. As result, you obtain a pattern that is used for layout creation. See "Automatic Layout" Dialog.
To open the Layout Wizard, click the button "New Layout" in the toolbar, or press Ctrl+L+T. The following dialog displays:
The Layout Wizard comprises five steps that lead you through the process of creating a default layout:
•First step: "Select Template"
•Fifth Step: "Sheet Placement"
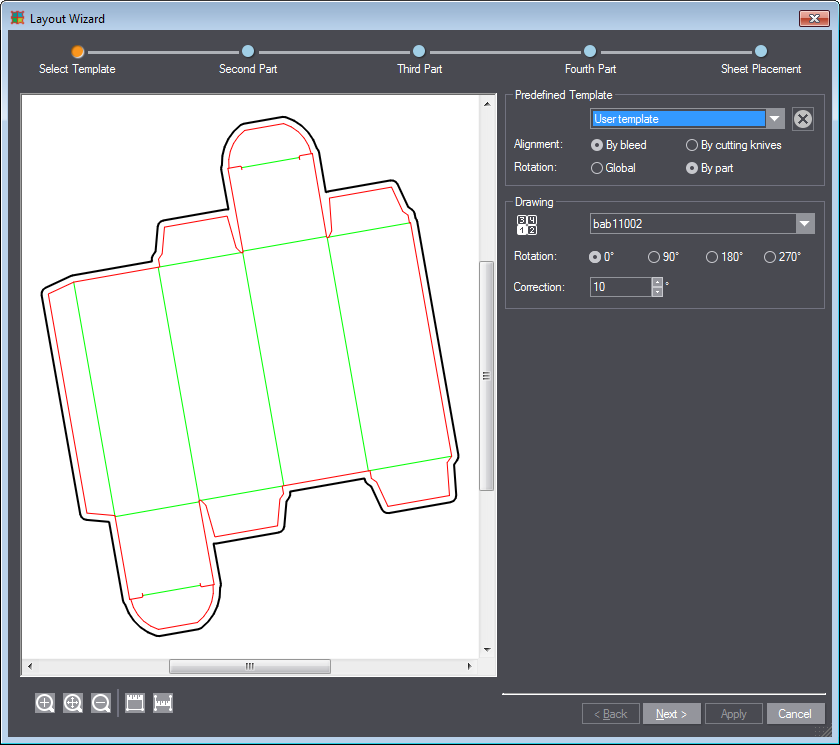
Set the first 1up in the "Select Template" step. This 1up will be placed on the origin of the coordinate system, in the first quadrant.
The table below explains the settings regarding the alignment and rotation of the 1up that you can make:
|
Controls in the Layout Wizard "Select Template" |
||
|---|---|---|
|
Predefined Templates: |
||
|
List box |
You can choose a predefined or a custom template here. Choose "None" if you do not want to create a new template. You will then be guided through each of the wizard steps. You will directly go to the last step if you are using predefined templates. |
|
|
Predefined Templates: |
||
|
1 x 1 |
The 1ups are placed one after the other in the layout in the same way. |
|
|
2 rows |
The 1ups in the second row are rotated at 180° and fit to the 1ups in the first. |
|
|
2 columns |
The 1ups in the second column are rotated at 180° and fit to the 1ups in the first. |
|
|
2 parts in rows |
Two different 1ups are used for the arrangement on the layout. Two are placed in each row. |
|
|
2 parts in columns |
Two different 1ups are used for the arrangement on the layout. Two are placed in each column. |
|
|
|
With this button you can delete a custom layout template. |
|
|
Choose whether the bleed lines or the cutting knives are to serve as alignment reference. |
||
|
You can set here if all 1ups are to be rotated ("Global") or if the rotation can be set individually for each 1up ("By part") in the steps to follow. |
||
|
Drawing |
||
|
|
Choose the first 1up in the list box. The list box contains all the 1ups available in the project. |
|
|
You can specify the rotation of the 1up here (0°, 90°, 180°, 270°). |
||
|
You can set an additional rotation in steps of one degree here. Values up to ±45° are allowed; in this way, any rotation angle can be set in combination with the selection made in "Rotation". |
||
|
Next |
Applies all corrections on the current page and opens the next wizard page. |
|
|
Cancel |
Discards all changes, closes the Automatic Layout tool and restores the original state of the layout. |
|
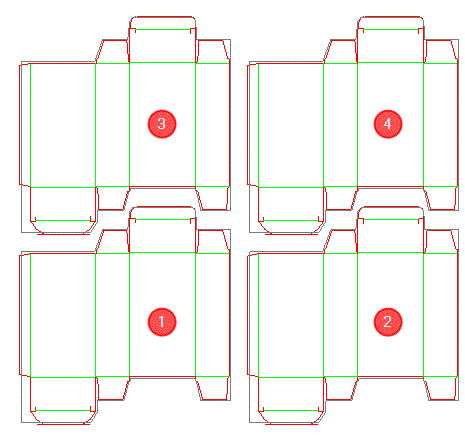
In each of the steps Two, Three and Four, you add another 1up. The second 1up is placed to the right of the first 1up. As a result, these two elements form the first row in the layout. The third 1up is placed above the first 1up. As a result, these two elements form the first column in the layout. The fourth 1up is placed to the right of the third and above the second 1up.

Note: Steps Two to Four are skipped if you selected a template in the first step. You can then click the "Back" button to go back step by step and make changes.
You can set the rotation and the alignment of the respective 1up in each of the steps:
|
Controls in the Layout Wizard - Steps Two to Four |
||
|
Drawing |
||
|
|
Choose the 1up here that you want to add. |
|
|
Rotation: |
||
|
Angle: |
You can specify the rotation of the 1up here (0°, 90°, 180°, 270°). |
|
|
Correction |
You can set an additional rotation in steps of one degree here. Values up to ±45° are allowed; in this way, any rotation angle can be set in combination with the selection made in "Rotation". |
|
|
|
Aligns 1ups parallel by their lines: 1.Click the button. 2.Select a line of the new 1up. It will turn yellow. 3.Now select a line of the previous 1up that you want to align parallel with this line. The new 1up will now align automatically so that both lines are parallel to each other. |
|
|
|
"Select coordinate system" Defines a new coordinate system and, consequently, the new horizontal and vertical direction. This is relevant for "horizontal" and "vertical" adjustment. 1.Click the button. 2.Select a line of the 1up to which the new coordinate system is to align. |
|
|
Horizontal Adjustment |
||
|
This is where you can move 1ups in horizontal direction so that they attach to adjacent 1ups without overlapping. No movement takes place if there is no object in the direction you selected. This function affects the values in the "Correction" area. If the "Gap" field contains a value, it is applied during moving. |
||
|
|
"Align to left" Aligns the selected layout element to the left of the reference object so that the extreme left points of the two objects lie on the same vertical line. |
|
|
|
"Align to right" Aligns the selected layout element to the right with the reference object so that the extreme right points of the two objects lie on the same vertical line. |
|
|
|
Aligns the 1up horizontally to a line of the reference 1up. 1.Click the button. 2.Move the mouse pointer over the lines of the new 1up. Three vertical lines appear: two dashed ones at the end points, and a solid line in the middle of the 1up line. 3.Click a line of the 1up. It will turn yellow. 4.Now select a line of the reference 1up. The 1up is aligned so that both blue reference lines overlap (or have an offset equal to the value in "X gap"). |
|
|
This lets you correct the horizontal position of the 1up. Clicking the gray button next to the input box lets you set the size of the step by which the value changes if you click the Down and Up arrows. |
||
|
You can set the horizontal gap (X-axis) to the adjacent 1up. This is a global value, i.e. you cannot set it by part. For individual changes, use the "Correction". The gap remains unchanged even after the "Move to" and "Align" functions. |
||
|
Vertical Adjustment: |
||
|
This is where you can move 1ups in vertical direction so that they attach to adjacent 1ups without overlapping. No movement takes place if there is no object in the direction you selected. This function affects the values in the "Correction" area. If the "Gap" field contains a value, it is applied during moving. |
||
|
|
"Align to Top" Aligns the selected layout element upwards to the reference object so that the topmost points of the two layout elements lie on the same horizontal line. |
|
|
|
"Align to Bottom" Aligns the selected layout element downwards to the reference object so that the bottommost points of the two layout elements lie on the same horizontal line. |
|
|
|
Aligns the 1up vertically to a line of the reference 1up. 1.Click the button. 2.Move the mouse pointer over the lines of the new 1up. Three horizontal lines appear: two dashed ones at the end points, and a solid line in the middle of the 1up line. 3.Click a line of the 1up. It will turn yellow. 4.Now select a line of the reference 1up. The 1up is aligned so that both blue reference lines overlap (or have an offset equal to the value in "Y gap"). |
|
|
This lets you correct the vertical position of the 1up. Clicking the gray button next to the input box lets you set the size of the step by which the value changes if you click the Down and Up arrows. |
||
|
You can set the vertical gap (Y-axis) to the adjacent 1up. This is a global value, i.e. you cannot set it by part. You can use the "Correction" function instead. The gap remains unchanged even after the "Move to" and "Align" functions. |
||
|
Back |
Returns to the previous page of the wizard without applying any corrections made in the current page. |
|
|
Next |
Applies all corrections on the current page and opens the next wizard page. |
|
|
Apply |
Applies the current corrections, keeping the current wizard page open. |
|
|
Cancel |
Discards all changes, closes the Wizard and restores the original state of the layout. |
|
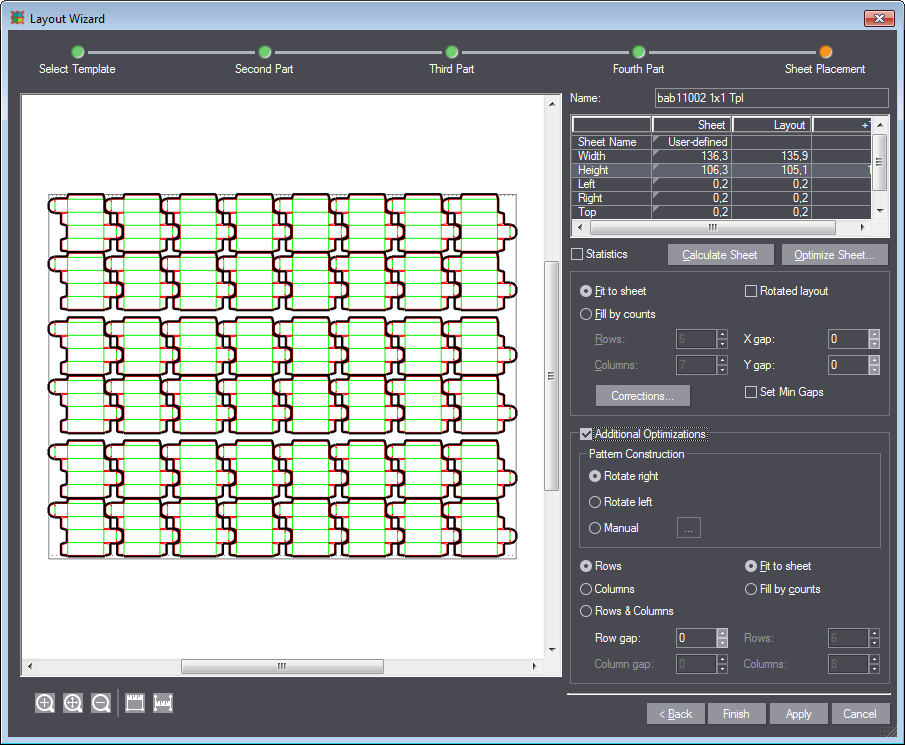
The last page of the wizard lets you make various final corrections to the overall layout. You can also define the final sheet size and margins. You can also launch the Sheet Optimization Wizard.
You can also start the placement of sheets with the button "Apply layout template to new sheet" after having completed the Layout Wizard. See Dialog "Apply layout template to new sheet".
|
|
|
"Apply layout template to new sheet" |
This is useful if you want to choose another sheet for the existing layout.
|
Controls in the Automatic Layout Wizard "Sheet Placement" |
||
|
Name |
The layout is stored as a user template with this name. See First step: "Select Template". |
|
|
Table - sheet definition |
||
|
Column: Sheet |
You can define the sheet of the layout in this column: 1.Click the right end of the Sheet Name field to open a list of predefined default sheet sizes. 2.Select "User-defined" if you do not want to use any of the standard sheet sizes. You have the option of editing these manually: 3.You can edit the width, the height and the margins of the sheet ("Left", "Right", "Top", "Bottom"). |
|
|
Column: Layout |
This column provides information about the layout width, height and margins. The fields in this column are read-only. The values in the fields change dynamically according to the corrections you make to the layout. |
|
|
Column: +1 ?: |
Indicates the value that would have to be added to the sheet size to accommodate another column or row. The fields in this column are read-only. |
|
|
Statistics |
With the option enabled, the table displays general statistics data (for straight and rotated layout) for the specified sheet. This includes: |
|
|
All Parts |
Number of all 1ups on the sheet. |
|
|
Area |
The area in square meters covered by the 1ups. |
|
|
Sheet Area |
Total sheet area in square meters. |
|
|
Waste % |
Waste percentage. |
|
|
Number of <xy> |
Number of 1ups of type <xy>. |
|
|
Area by <xy> |
Area covered by all 1ups of type <xy>. |
|
|
Calculates and applies a sheet size so that the currently defined layout fits fully onto the sheet. Above all, this is relevant if a certain number of rows/columns are specified. |
||
|
Optimal Sheet Selection... |
Starts the "Optimize Sheet" Dialog. |
|
|
Fit to sheet |
Fits the layout to the selected/user-defined sheet, automatically calculating the number of rows and columns that can be placed on the sheet. If the sheet is too small for the number of rows and columns already set in the "Rows" and "Columns" boxes (see below), the program clips the extra rows/columns. The program adds an appropriate number of rows/columns if the sheet can hold more rows/columns than specified. |
|
|
Fill by counts |
You can set the number of rows and columns to place on the sheet if you set this option. This number is not changed. Excess 1ups will flow over the sheet borders if the sheet is too small. In this case, specify other values for sheet width and height. |
|
|
Rotated layout |
Rotates the layout by 90° counterclockwise. |
|
|
Rows |
Here you define the number of rows in the layout. |
|
|
Columns |
Here you define the number of columns in the layout. |
|
|
X gap |
You can set the horizontal gap between adjacent 1ups. This value is identical with the X gap in the steps before. |
|
|
Y gap |
You can set the vertical gap between adjacent 1ups. This value is identical with the Y gap in the steps before. |
|
|
Opens the dialog "Align 2-nd column and row". |
||
|
Dialog "Align 2-nd column and row" |
||
|
Different 2nd column |
Makes the program handle the second column of the original "2 rows by 2 columns" layout differently to the first column. If there are more than two columns in the layout, the Automatic Layout tool handles each column as a "second" one and arranges the columns in the same way as defined in the preceding steps of the wizard. The option is checked automatically if the second column in the layout is different to the first one because of previous corrections made in the wizard (i.e. different arrangement, different element type, etc.). Functions: See Steps Two to Four. |
|
|
Different 2nd row |
Makes the program handle the second row of the original "2 rows by 2 columns" layout differently to the first row. If there are more than two rows in the layout, the Automatic Layout tool handles each row as a "second" one and arranges the rows in the same way as defined in the preceding steps of the wizard. The option is checked automatically if the second row in the layout is different to the first one because of previous corrections made in the wizard (i.e. different arrangement, different element type, etc.). Functions: See Steps Two to Four.
|
|
|
The values you specified in "X gap" and "Y gap" will be used as minimum gap values between 1ups if you enable this option. When you use this template in the "Automatic Layout" dialog, the program will compare the values of the template with the values you specify in the "Automatic Layout" dialog. See "Automatic Layout" Dialog. If you specify gaps in the "Automatic Layout" dialog exceeding the minimum gaps specified here, the latter are applied. Smaller values will be ignored; the minimum values of the template are used instead. |
||
|
Additional Optimizations |
||
|
Displays additional options. These optimizations refer to the empty space on the sheet that remains after the layout is positioned. The optimization options provide you with different ways to fill this empty space with additional elements. |
||
|
|
Pattern Construction: |
|
|
|
Rotate right |
Fills the blank space with a layout rotated by 90° in clockwise direction. |
|
|
Rotate left |
Fills the blank space with a layout rotated by 90° in counter clockwise direction. |
|
|
Manual
|
Starts another layout wizard assisting in creating a second layout that is to fill the empty space. Click "Finish" to add the second layout to the empty space.
|
|
|
X/Y Gap |
Only available if "Manual" is selected. You can set the gaps between new and existing 1ups in X-direction and Y-direction. |
|
|
Rows |
Adds elements arranged in rows to optimize the empty space on the sheet. |
|
|
Columns |
Adds elements arranged in columns to optimize the empty space on the sheet. |
|
|
Rows & Columns |
Adds elements arranged in rows and columns to optimize the empty space on the sheet. |
|
|
Fit to sheet |
Fits the layout to the empty space in the sheet, automatically calculating the number of rows and columns that can be placed on the sheet. |
|
|
Fill by counts |
You can set the number of rows and columns in the empty space in the layout manually if you set this option. |
|
|
Row gap |
You can set the row gap between the main layout and the empty space layout here. |
|
|
Col Gap |
You can set the row column between the main layout and the empty space layout here. |
|
|
Rows |
Here you define the number of rows in the empty space layout |
|
|
Columns |
Here you define the number of columns in the empty space layout. |
|
Back |
Returns to the previous page of the wizard. |
|
|
Finish |
Applies all the changes and closes the Layout Wizard. |
|
|
Apply |
Applies the current corrections, keeping the current wizard page open. |
|
|
Cancel |
Discards all changes, closes the Automatic Layout tool and restores the original state of the layout. |
|
Back to Tool Bar in the "Layout" tab.