"Automatic Layout"
|
|
"Automatic Layout" |
Click the "Automatic Layout" button in the toolbar to create a layout automatically. The following dialog displays:
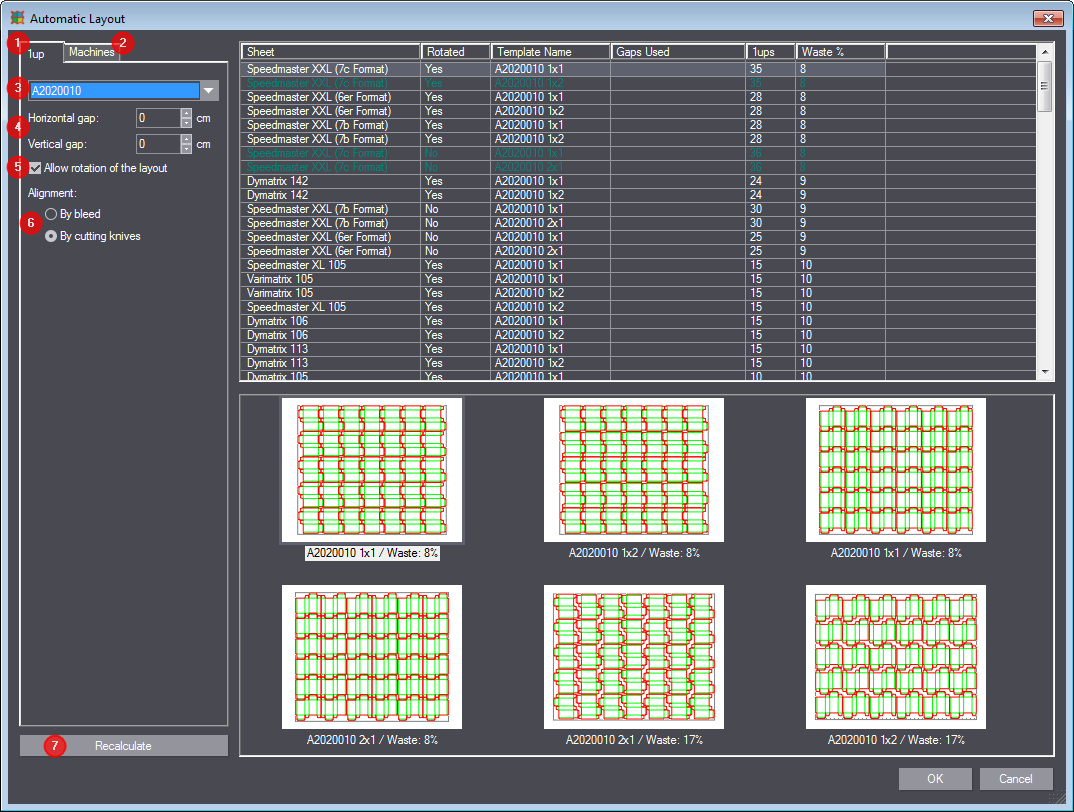
To the left, there are two tabs "1up" [1] and "Machines" [2] where you can make additional settings for the layout.
In the "1up" tab, select in the list box [3] the 1up for which the layout is to be created automatically. You can define gaps [4] to be reserved between the 1ups in horizontal or vertical direction. You can also choose whether the 1up may be rotated [5] and whether alignment is to occur by bleed or by cutting knives [6].
In the "Machines" tab [2], you can select the press you want the sheets to be calculated for, or you can define a custom sheet size.
Click "Re-calculate" [7] once you have finished all your entries.
To the right, you see a list of sheets that can be printed on the selected machine. The number of 1ups that fit on each of the sheets and the waste percentage are indicated. The values will update after changes were made on the left only when you click "Re-calculate" [7].
Several possible layouts are displayed if you click a sheet. Select a layout and confirm with "OK".
|
Controls in the "Automatic Layout" Dialog |
||
|---|---|---|
|
"1up" Tab |
||
|
List box |
This is where you choose the 1up for which the layout is to be created. |
|
|
Horizontal gap
|
This is where you define the gap in horizontal direction between the 1ups. In "Alignment", you choose whether the gap is to refer to the bleed or to the cutting knives. |
|
|
Vertical gap |
This is where you define the gap in vertical direction between the 1ups. |
|
|
Allow rotation of the layout |
Enable this option if the 1up may be rotated. |
|
|
Orientation |
This is where you choose if 1up alignment is to be by bleed or by cutting knives. |
|
|
Ignore material-irrelevant styles |
Ignore material-irrelevant styles
|
|
|
"Machines" tab |
||
|
Select All |
Click this button to select all machines in the list. |
|
|
Deselect All |
Click this button to deselect all machines in the list. |
|
|
Sheets |
Lists all known sheets for various machines. This is where you select the sheets to be included in the calculation. |
|
|
Custom size |
Enable this option to set the sheet size manually and to also include this sheet in the calculation. You can edit the values in the Size table.
|
|
|
Use selected as template |
First click one of the sheets in the upper table; the sheet is given a yellow background. Then click this button. The dimensions of the sheet will be applied as template in the lower size table where you can edit them. |
|
|
Size table |
Set the properties of a custom sheet here. |
|
|
Type |
Choose here where on the sheet you want to have the layout placed. The following options are available: "Bottom-Left", "Center" and "Bottom-Center". |
|
|
Width/Height |
Width and height of the sheet in cm. |
|
|
Left/Right/Top/Bottom |
Desired distance of the layout from the sheet margin. |
|
|
Trim width/height by layout |
Enable this option if the layout sheet (gray line) is to be trimmed to the width/height of the 1up layout. |
|
|
Re-calculate |
You have to click this button to update the calculation result on the right side after you have made changes. |
|
|
Table |
||
|
Sheet |
Sheet name. A preview appears in the bottom preview area if a sheet is selected. |
|
|
Rotated |
Indicates if the layout was rotated by 90 degrees. Other angles are not possible. |
|
|
Template Name |
Indicates the name of the template used to fill the sheet. Use the Automatic Layout Wizard to create new templates. See "Layout Wizard" - Create New Layout Template. |
|
|
Gaps Used |
This column indicates that there is a conflict between the gaps specified in this dialog and the minimum gaps specified when the template was created. See Set Min Gaps. If the gaps specified here are smaller than the minimum gaps in the template, the minimum gaps of the template are shown in this column and applied to the layout. You must edit the template accordingly if this is not desired. |
|
|
1up |
Indicates the number of 1ups on the sheet. |
|
|
Waste % |
Indicates the surface percentage lost as waste. |
|
Back to Tool Bar in the "Layout" tab.