
Prerequisite: This function is contained in Prinect Label Pro.
|
|
"Nesting Wizard" |
You can use the Nesting wizard to automatically create one layout or multiple layouts. Each of the 1ups will be nested during this process. This is particularly feasible for irregularly shaped labels. Compared with the standard Layout Wizard, using the Nesting Wizard with shapes significantly differing from a rectangle produces less waste.
You are offered several solutions from which you can choose the one that suits best. A suggested solution can contain one or multiple layouts. This depends on whether you have set that multiple sheets can be used and also on whether several sheets are required for an optimized arrangement of 1ups.
During optimization, the number of inking units in the connected press is taken into account, i.e. the number of inks that can be printed during a single pass. This is important if the total number of colors in all articles to be printed exceeds the number of inking units. The optimization will then arrange the articles on the press sheet in such a way that the number of inking units is sufficient for each press sheet.
Click the button "Nesting Wizard" in the toolbar to start the Nesting Wizard.
The Nesting wizard guides you to the new layout in three steps:
•Second step "Specify Material, Standard"
You see this view in the first step.
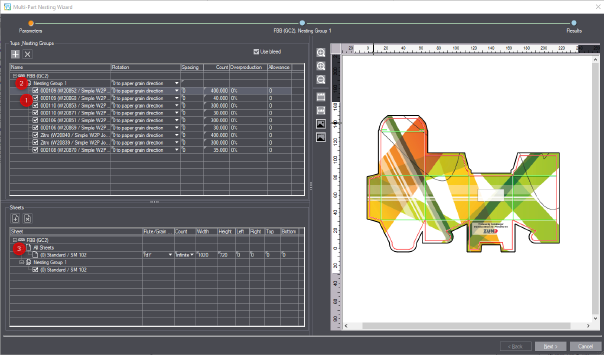
1.All 1ups are ticked initially [1]. Untick a 1up if you do not want to include it in the layout to create.
2.Initially, all 1ups are located in the "Standard" [2] nesting group. Click the + button and enter a name to create nesting groups that may become necessary. The 1ups of a nesting group are placed in clusters on one or multiple sheets. Place the 1ups into the appropriate nesting groups with drag and drop as needed.
The "Sheets" section displays a nesting group if it contains at least one 1up that is ticked.
3.Set the parameters ("Rotation", "Spacing", "Count", "Overproduction" and "Allowance", see the table below) as you need them.
4.Initially, "Sheet" [3] in the "Sheets" section displays all sheets you specified when creating the job. Add more sheets as needed by clicking "+".
Edit the sheet parameters ("Flute/Grain", "Count", "Width", "Height", "Left", "Right") as needed. Sheets whose parameters you edited are named "Custom".
5.All sheets are ticked initially. Untick a sheet if you do not want to include it in the layout to create.
6.Click "Next" to go to the second step "Specify Material, Standard", see Second step "Specify Material, Standard". The program will calculate the optimized layout nesting. When placing 1ups on the sheets, the program processes each of the 1ups separately by adhering to the set conditions.
|
Controls in the "Parameters" step of the Nesting Wizard |
|
|---|---|
|
"Use bleed" |
If this option is enabled, the optimization algorithm for arranging the 1ups will take the bleed of the 1ups into account. You can set the bleed in "File > Preferences > Packaging > Defaults for LabelPro > Bleed for shape". This option is disabled by default if Prinect Business Manager initiates the automatic creation of a layout. (In this workflow, the shapes are moved so that their cutting lines abut, and overlapping bleeds are corrected automatically by the "Middle Path Resolution", see also Middle path solution). |
|
|
Click the + button if you wish to create a new nesting group. Click the name of the nesting group to specify a new name. You can move the desired 1ups with drag and drop from the standard group to a nesting group. During optimization, all 1ups of a nesting group are always placed on the same sheet. To appear in the "Sheets" section, a nesting group must contain at least one 1up that is ticked (i.e. this 1up is to be included in the optimization). |
|
|
To delete a nesting group, select it and click the X button. |
|
"Name" |
The name of the 1up as specified in the project. Uncheck the checkmark if you do not wish to include the 1up in the layout. A 1up that is found not to fit on the selected sheet right from the onset is displayed in red. When you select a 1up that cannot be placed on the sheet, it will be displayed in red at the bottom of the sheet list. |
|
|
This is where you define if the respective 1up is to be rotated. Rotation is important if you want to print labels parallel to the paper grain, for example. The rotation chosen for a 1up is automatically applied to all 1ups having the same shape. If a paper with defined paper grain was selected, this grain is taken into account. Preset the rotation in "File > Preferences > Packaging > Orientation default between 1ups". Rotation relative to the cutting die (regardless of the paper grain): •"0°", "90°", "180°", "270°" •0° or 180°. •90° or 270°. •"0°" or "90°" or "180°" or "270°" •"Free Rotation" To optimally fill the sheet, the program may rotate the 1ups by any angle (in multiples of integer values in degrees).
Rotation relative to the paper grain: •"0°", "90°", "180°", "270°" •0° or 180°. •90° or 270°. |
|
Spacing: |
Specify the mandatory spacing between each of the shapes. To set the default units for spacing in Prinect Signa Station, go to "File > Preferences > Default unit of measure". To can set the minimum spacing between 1ups in Prinect Signa Station, go to "File > Preferences > Min. Spacing between 1ups". |
|
"Count" |
This is where you enter the number of 1ups to be produced. |
|
"Overproduction" |
This is where you specify the overproduction percentage the customer is willing to accept. |
|
"Allowance" |
This is where you specify the allowance additionally required for production. (The allowance compensates for the waste loss.) |
|
"Sheets" section: Press sheet settings |
|
|
|
Click this button to add a sheet with assigned paper to the list box. The new sheet is added to "All Sheets" and also to the standard group and all nesting groups that may exist. |
|
|
To delete a sheet, select it in "All Sheets" and click the X button. |
|
"Sheets"
|
"Sheets" displays all existing sheets to which a paper is assigned. •"All Sheets": "All Sheets" displays all existing sheets with pertaining parameters ("Flute/Grain", etc.). At first, all sheets you created when setting up the job are contained here. The values for "Width", "Height", "Left" and "Right" are taken from the Preferences. You can change the parameters for these sheets. When you do so, the sheet name will change to "Custom ...". •"Standard" and any other nesting groups you may have set up: To appear here, a nesting group you set up must contain at least one 1up that is ticked (i.e. this 1up is to be included in the optimization). Every nesting group displays all available sheets, i.e. also new sheets that may have been added. For each nesting group, you can tick or untick the sheets to determine if they are to be included in the optimization. If in the upper list you select a 1up that is found not to fit on the selected sheet right from the onset, it is displayed in red. |
|
“Flute/Grain direction“ |
This is where you specify the grain/flute direction of the material. If a paper with defined paper grain was selected for the sheet, this grain is taken into account. •"fdX": Long grain: The grain-/flute direction is parallel to the X-axis (sheet width). •"fdY": Short grain The grain-/flute direction is parallel to the Y-axis (sheet height). •"fdAny": The grain-/flute direction is undefined. Either the material has no grain/flute direction or the grain/flute direction is irrelevant for arranging the 1ups. |
|
“Width“/“Height“ |
These are the dimensions of the paper associated to the selected sheet. |
|
"Left"/"Right" |
Use these parameters to define the minimum offset of 1ups to the paper edge. |
Second step "Specify Material, Standard"
The second step offers different layout variants that may contain one or more layouts.
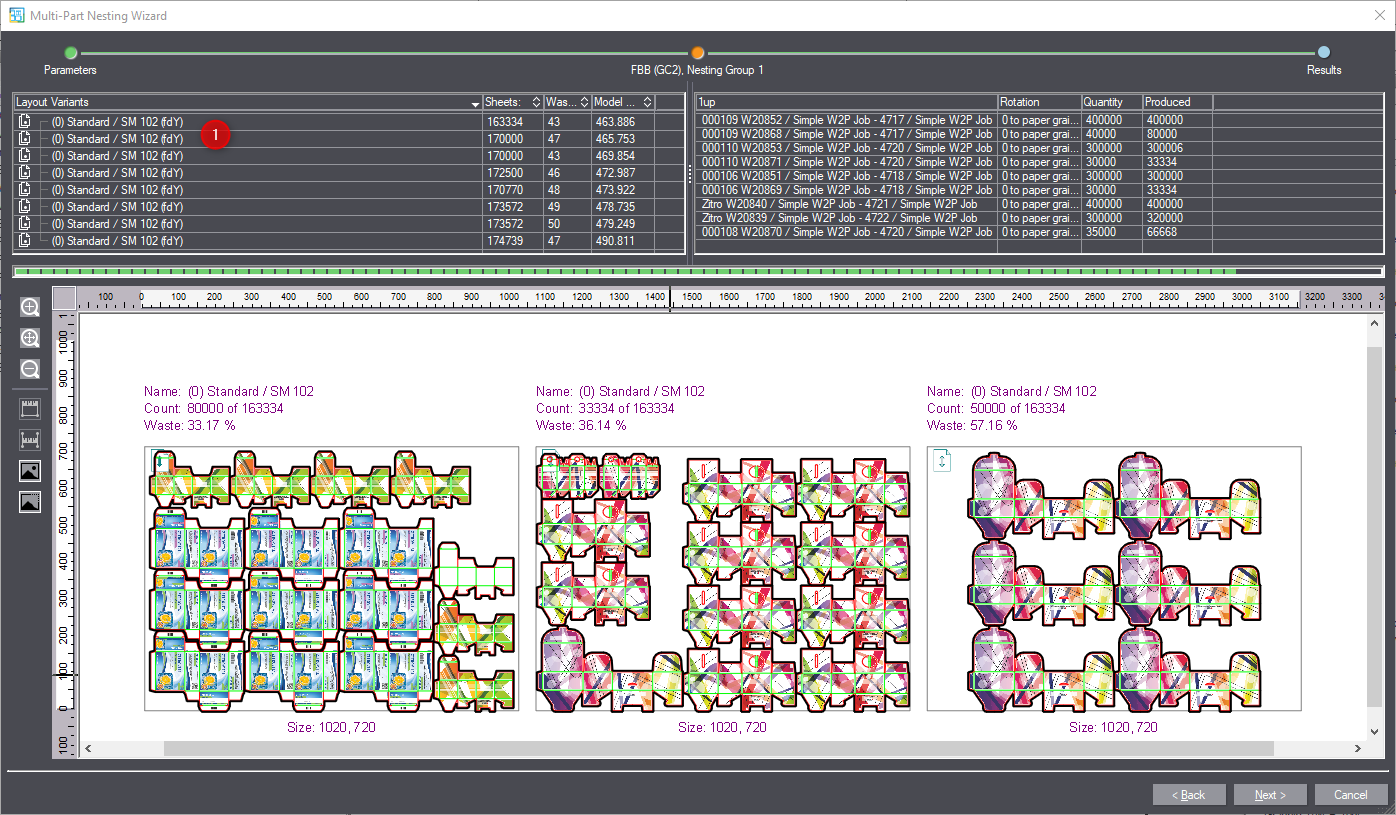
7.Choose the layout variant [1] in the list that suits best. You can edit the layout manually later.
8.Click "Next" to go to the third and last step "Results", see Third step "Results" .
|
Controls in the "Specify Material, Standard" step of the Nesting Wizard |
|
|---|---|
|
"Layout Variants"
|
This is where all calculated layout variants are listed. The best solution is at the top of the table. The solution at the bottom is the least optimal one where only one shape is used per sheet. Right-click the list to select different sorting criteria for the list. |
|
Total Sheet Count |
The number of sheets required to produce the desired quantity of 1ups. The number of sheets for each layout is displayed if the layout variant contains multiple layouts. |
|
Waste % |
The waste percentage of the total area. |
|
Model Cost Estimate |
This criterion determines the sorting order of the layout variants. |
|
"1up" |
Name of the produced 1up |
|
"Rotation" |
Rotation (see above) that was applied to this 1up. |
|
"Quantity" |
The number of 1ups as defined in the "Count" column of the preceding step. |
|
"Produced" |
The real number of 1ups produced ("Quantity" + "Overproduction"). |
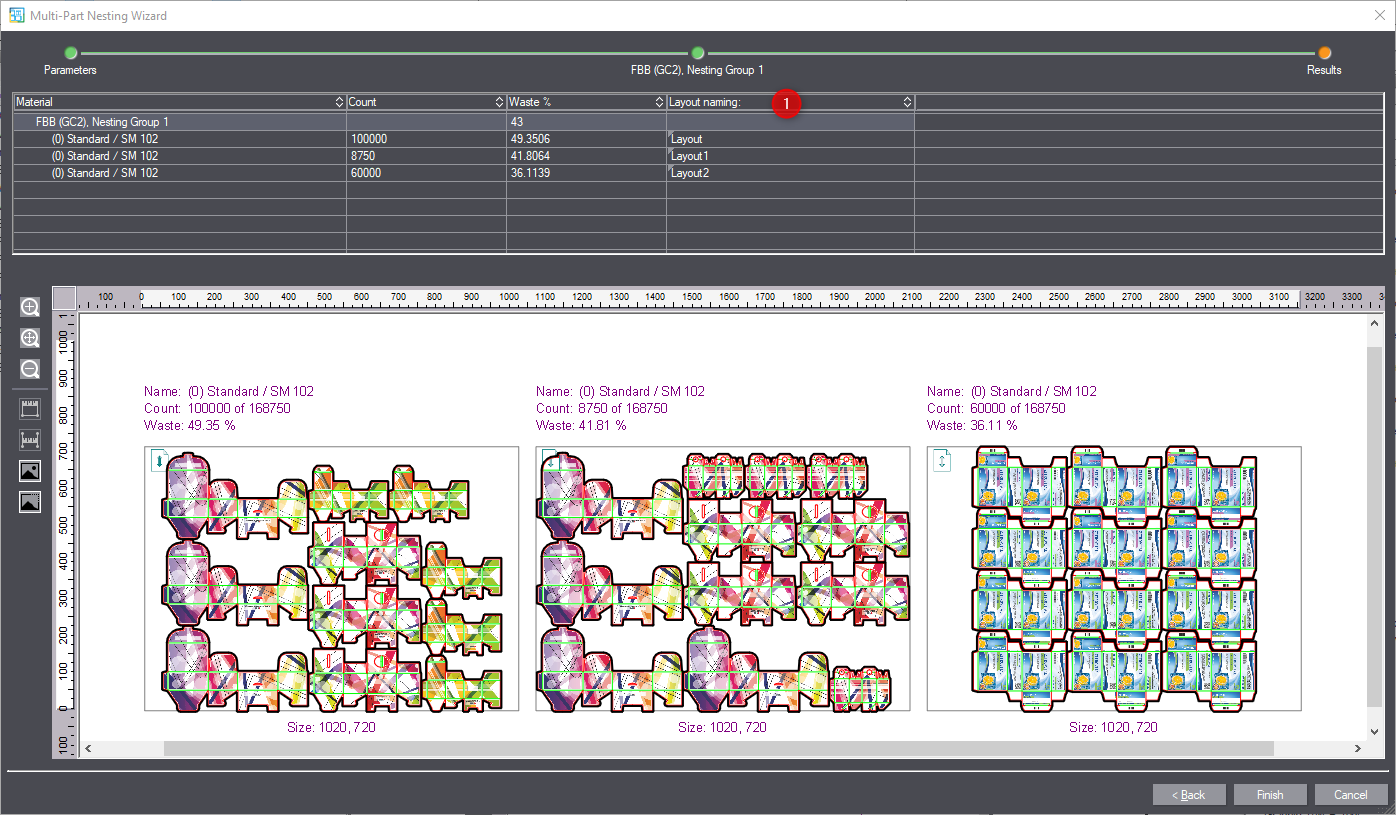
The third step displays the selected layout variant with all contained layouts. This step provides a final overview, and you can give the layouts the names you want in the "Layout naming" column [1].
Clicking the "Finish" button will submit the layouts to Packaging Pro. Packaging Pro opens a new tab for each new layout.

If you confirm with "OK" here in Packaging Pro, the optimized layout will be submitted to Prinect Signa Station and displayed there. You can edit the optimized layout, for example by moving 1ups or shapes beforehand. The optimized layout will then be saved along with the changes and submitted to Prinect Signa Station. However, this only applies if no shapes are deleted or added. If the number of shapes is changed, the optimization result is discarded and not submitted to Prinect Signa Station.
Return to Tool Bar in the "Layout" tab.