"ClipPath Conflict Resolution"
Mode "ClipPath Conflict Resolution"
|
|
"ClipPath Conflict Resolution" |
In the "1up" tab, you can add a bleed line to your drawing. See Mode "Generate Bleed by Levels of Importance". There may be clip path conflicts when creating the layout. You can fix these issues in the "ClipPath Conflict Resolution" mode.
To start this mode, click the "ClipPath Conflict Resolution" button in the toolbar or use the key shortcut "Ctrl+0". The "Automatic Conflict Resolution" dialog displays. See Automatic Conflict Resolution. Close this dialog by clicking "Cancel" if you want to solve clip path conflicts in a different way.
The program detects clip path conflicts and highlights them by enclosing them in colored frames.

Note: The currently selected conflict is dark purple. Click the frame to zoom into the area. The bounding box becomes a hatched area when you zoom in the conflict.

Note: The elements involved in the currently selected conflict are displayed with all objects belonging to them. Only the trim shapes display for the remaining layout elements.
The following edit bar appears above the canvas:

The edit bar offers the following methods to solve clip path conflicts:
•Automatic Conflict Resolution
|
|
"Automatic Resolution" Opens the Automatic Conflict Resolution dialog. |
|
|
"Previous Conflict" Takes you to the previous conflict in the layout. |
|
|
"Next Conflict" Takes you to the next conflict in the layout. |
|
|
"Zoom to Conflict" Scales up the section in the layout to give you a better view of the conflict. |
|
|
"Repeat changes" Usually, the program recognizes conflicts of the same type as a group. Enabling this button will automatically apply all the following changes to all issues of the same type. |
|
|
"Middle Path Resolution" Opens the Middle path solution dialog. (Key shortcut: Ctrl+1) |
|
|
"Split line" Switches to the Split with line. (Key shortcut: Ctrl+3) |
|
|
"Draw split path" Opens the Draw Split Path dialog. (Key shortcut: Ctrl+4) |
|
|
"Modify bleed" Opens the Modify Bleed dialog. (Key shortcut: Ctrl+5) |
|
Angle |
Angle of the split line with the X-axis. Is used in the "Split line" mode. See Split with line. |
|
|
"Select Quadrant" |
|
|
|
"Automatic Resolution" |
The "Automatic Resolution" dialog opens automatically if you go to the "ClipPath Conflict Resolution" mode. In this mode, you can solve clip path conflicts automatically with a few clicks only. Close this dialog by clicking "Cancel" if you want to solve clip path conflicts in a different way.
To solve conflicts automatically, proceed as follows:
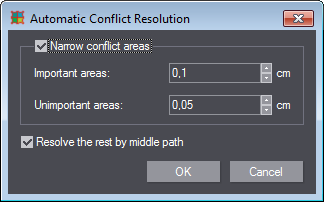
1.Click the "Automatic Resolution" button in the edit bar of the "ClipPath Conflict Resolution" mode. The "Automatic Conflict Resolution" dialog displays.
|
|
|
2.Enable the "Narrow conflict areas" option if you want to solve conflicts in narrow areas automatically. In this case, specify a minimum trim for important and unimportant areas.
3.Enable the "Resolve the rest by middle path" option to solve all other conflicts by middle path. See Middle path solution.
All conflicts will be solved by middle path if you only enable the second option.
4.Confirm with "OK".
5.The system automatically resolves any conflicts found, and a message displays showing you the number of solved conflicts.
Back to Controls in the Mode "ClipPath Conflict Resolution".
Back to Tool Bar in the "Layout" tab.
|
|

|
"Middle Path Resolution" |
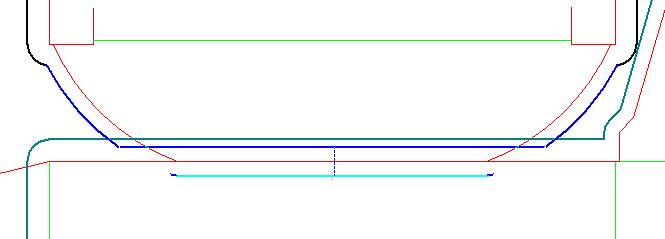
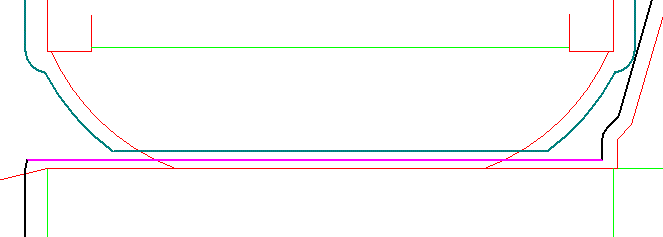
This function lets you automatically look for a solution that finds the middle between two overlapping trim areas. This is especially useful for overlappings in curved areas. For example:
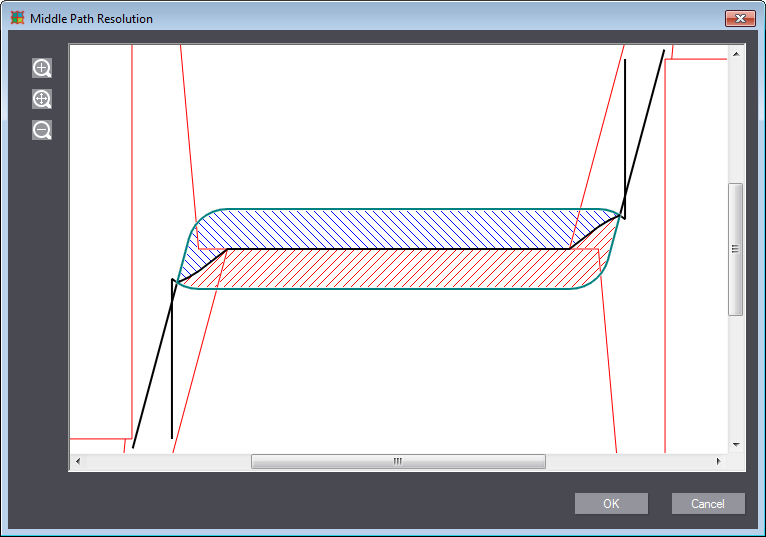
1.Click the "Middle Path Resolution" button in the edit bar of the "ClipPath Conflict Resolution" mode.
The middle path conflicts are resolved automatically and the solution is displayed.
2.Confirm the solution with "OK" or discard it with "Cancel" and choose a different method.
Back to Controls in the Mode "ClipPath Conflict Resolution".
Back to Tool Bar in the "Layout" tab.
|
|
|
"Split line" |
The "Split with line" mode offers you a simple solution by splitting the clip path with a single line. By default, the system selects the optimal angle between the splitting line and the X coordinate axis, depending on the conflict at hand. However, you can orient the line to different angles to find the best split.

1.Click the "Split line" button in the edit bar of the "ClipPath Conflict Resolution" mode.
2.Position the line and click in the graphic window. The program shows a selection dialog if several splits are possible with the defined line:
To position the line, you can use the following controls in the edit bar:
|
Controls in the Mode "ClipPath Conflict Resolution" - "Split with Line" |
|
|---|---|
|
Angle |
Angle of the split line with the X-axis. By default, the system sets the optimal angle between the splitting line and the X coordinate axis, depending on the conflict at hand. You can specify a different angle in the "Angle" box. Enter the angle and press "Enter" on the keyboard to confirm the new angle. The orientation of the line (cyan in the screenshot below) is changed automatically. |
|
|
"Select Quadrant" |
Example
Assume the following situation:

1.By default, a horizontal split line is suggested. As you want a vertical line, you have to type a value of 90 in the "Angle" box and confirm with the "Enter" key.
2.A gray line identifies the middle. Click in the position where you want to have the split performed. A dialog appears and indicates several split options if applicable:
·Option 1:

·Option 2:

3.Select the split you want and click the relevant button in the dialog. The program applies the selected solution and automatically goes to the next conflict.
Back to Controls in the Mode "ClipPath Conflict Resolution".
Back to Tool Bar in the "Layout" tab.
|
|
|
"Draw split path" |
The "Draw Split Path" wizard is a flexible tool for manual conflict resolution. Use this wizard if you have to draw a more complex clip path to solve your conflict. You can use the line and arc drawing tools to outline the clip path.
Click the "Draw split path" button in the edit bar of the "ClipPath Conflict Resolution" mode. A wizard containing two steps opens:
•First step: "Draw split path"
•Second Step: "Conflict Resolution"
In this step of the wizard, you can use line and arc drawing tools to resolve the conflict manually.
|
Controls in the Mode "ClipPath Conflict Resolution" - "Draw Split Path" |
|
|---|---|
|
|
"Zoom In" Scales up the conflict area. |
|
|
"Zoom 1:1" Fits the conflict area to the screen. |
|
|
"Zoom Out" Scales down the conflict area. |
|
|
"Line" Goes to the Mode "New Rules Drawing". |
|
|
"ArcBEH" Goes to Arc By BEH. |
|
|
"Back" Reverses the last operation. |
|
Next |
Use this button to go to the next page in the wizard. |
|
Cancel |
Exits the wizard without applying the changes. |
Second Step: "Conflict Resolution"
In this step of the wizard, you can preview the defined solution before you apply it to the selected conflict. You can also return to the previous page to make additional changes in the conflict resolution. Click "Finish" to apply the agreed resolution to the selected conflict and to quit the wizard.
Back to Controls in the Mode "ClipPath Conflict Resolution".
Back to Tool Bar in the "Layout" tab.
|
|
|
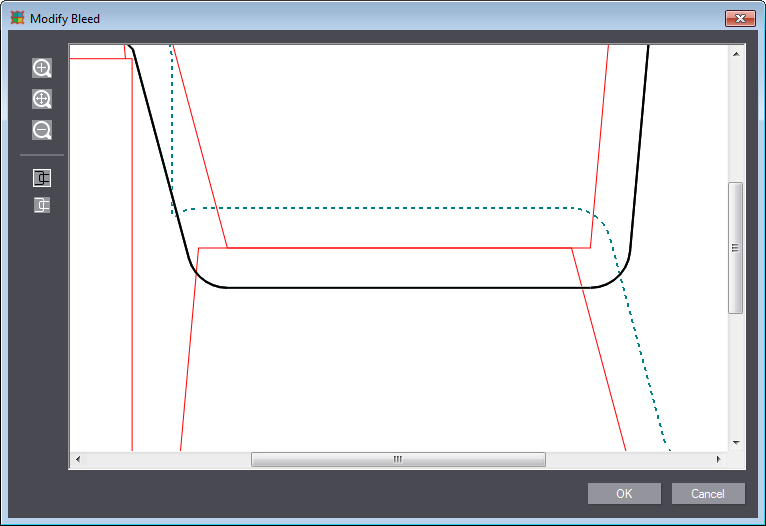
"Modify bleed" |
This method of clip path resolution is based on dragging the outlines of the trim. You can select multiple objects and drag all the selected objects together until you remedy the overlapping of parts.
1.Click the "Modify bleed" button or press Ctrl+5.
The program displays the "Modify Bleed" window with options to scale up or down the conflict area or fit it to the screen as well as to move the trim lines.
|
Controls in the Mode "ClipPath Conflict Resolution" - "Modify Bleed" |
|
|---|---|
|
|
"Zoom In" Scales up the conflict area. |
|
|
"Zoom 1:1" Fits the conflict area to the screen. |
|
|
"Zoom Out" Scales down the conflict area. |
|
|
"First Part" / "Second Part" A group of buttons for selecting the one or the other of the two overlapping parts. The selected part becomes active and its outline color turns black. The outline of the part not selected is dashed. |
|
OK |
Applies the changes you made and closes the dialog. |
|
Cancel |
Closes the dialog without applying the changes. |
Modify the trim as follows:
2.Select one of the parts with the appropriate button (see description above).
3.Select that part of the clip path that you want to move in order to correct the trim.

Note: Use the "Ctrl" button on the keyboard to make a multiple selection or remove an object from the selection.
4.Move the selected outline by dragging it with the mouse until it is in a position in which the parts do not overlap.
5.If necessary, repeat steps 1 thru 3 for the other part.
Example
Bleed 1 Modification
Bleed 2 Modification
Back to Controls in the Mode "ClipPath Conflict Resolution".
Back to Tool Bar in the "Layout" tab.

