"Apply layout template to new sheet"
Optimize Sheet is a tool that automatically runs a 'cost-benefit' analysis for each sheet size. It shows you the number of sheets you will need, the elements ("Parts") per sheet, the total number of elements ("Parts") produced, the empty space ("Waste Area") on the sheet in square meters, and the percentage of waste area (%) for each sheet size.
The Optimize Sheet Wizard is designed to assist you in choosing the optimal sheet size for your layout (i.e. a sheet size that will have the minimum possible percentage of waste in the production process for the assigned number of parts).
To launch the Sheet Optimization Wizard:
•in the Automatic Layout Wizard: In Fifth Step: "Sheet Placement", click the "Opt. Sheet" button
or
•After closing the Automatic Layout Wizard, click the button "Apply layout template to new sheet" in the toolbar. Then click the "Opt. Sheet..." button.
|
|
|
"Apply layout template to new sheet" |
The "Opt. Sheet" wizard comprises two steps:
•Second Step: "Select Best Sheet"
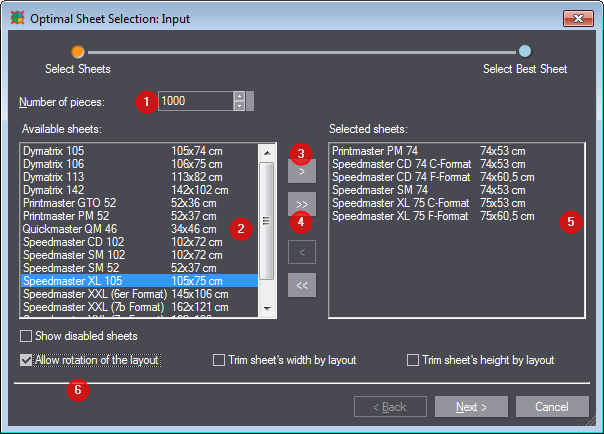
1.Enter the number of elements (parts) you wish to produce in "Number of pieces" [1].
2.In the "Available sheets" list [2], select the sheets that could possibly be used for the current layout. Click the arrow button [3] to move selected sheets to the "Selected sheets" [5] table to the right.

Note: To select multiple successive or alternative sheet sizes, click the ones you want holding down the Shift and Ctrl keys respectively. To select all sheet sizes, click the double-arrow key [4].
3.With the three options [6], you specify if the layout may be rotated or if the sheet's width or height is to be trimmed by the layout.
4.Click "Next" to proceed and to display the results of sheet optimization based on the selected sheet sizes and the set quantity.
|
Controls in the Optimal Sheet Selection wizard |
|
|
Quantity |
The number of elements (1ups) that will be produced |
|
Available sheets |
This is where you select the sheets that could possibly be used for the current layout. |
|
Selected sheets |
This is where the selected sheets are listed. |
|
Show disabled sheets |
Enable this option to also include sheets not suited for the layout in the list. |
|
Allow rotation of the layout |
Enable this option to also include rotated layouts in the optimization. |
|
Trim sheet's width by layout |
Enable this option to use a sheet whose width is to be trimmed to fit the layout width. |
|
Trim sheet's height by layout |
Enable this option to use a sheet whose height is to be trimmed to fit the layout height. |
Second Step: "Select Best Sheet"
Shows the result of calculations for sheet optimization. The sheets are listed in descending order, sorted by their waste percentage (i.e. according to the cost-benefit calculation). The top sheet is the one with the lowest waste percentage and is your best choice. The fields in the table are read-only.

|
Note: The sheet optimization result depends on your choice of options in the "Sheet Placement" step of the Automatic Layout Wizard. See Fifth Step: "Sheet Placement". •The wizard will consider the sheet dimensions and fit the optimum number of parts per sheet on each matching sheet size (if there is one) if you enabled the option "Fit to sheet". •With the option "Fill by counts" enabled, the exact number of rows and columns will be kept, i.e. each sheet size capable of accommodating the layout will be shown as a match. The number of parts in the "Parts/Sheet" column always matches the result of the multiplication "rows by columns". The "Parts/Sheet" column will show the value 5 for all matching sheet sizes if you, for example, specified three rows and two columns. |
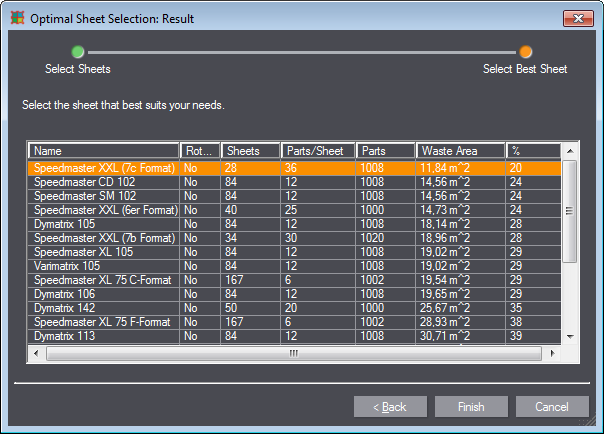
1.Select the sheet that best suits your purpose. Generally, this is the first sheet.
2.Click "Finish" to apply the selected sheet format.
|
Meaning of Columns in the "Optimal Sheet Selection" Table |
|
|
Name |
Displays the name of the sheet size as it appears in the sheet database. |
|
Rotated |
Indicates if the layout was rotated. |
|
Sheets |
Displays the total number of sheets needed for the production of the assigned "number of pieces". |
|
Parts/Sheet |
Displays the number of 1ups that fit into each sheet of the selected size. |
|
Tiles |
Displays the quantity to be printed. Generally, the number set in this column is identical to the quantity (Number of pieces). However, sometimes the combination of the number of elements per sheet and the number of sheets needed for production results in a different (always greater) quantity. |
|
Waste area |
Displays the sum total waste of all sheets of the current job in square meters. |
|
% |
Displays the percentage of waste of the sheet area. |

Note: Prinect Signa Station Packaging Pro & Label Pro displays either a dash, a zero or an empty cell for all the sheet sizes that are not applicable for the currently defined layout.
Back to Fifth Step: "Sheet Placement".
Back to Tool Bar in the "Layout" tab.