
Mode "Shape Design" (Label Pro)
Prerequisite: This function is contained in Prinect Label Pro.
|
|
"Rectangle" |
|
|
"Ellipse by Center and Radii" |
|
|
"Elliptical Arc by Rectangle" |
|
|
"Regular Polygon" |
Apart from lines, circles and arcs, there are four additional modes you can use to draw objects: "Rectangle" , Ellipse , Elliptical arc , and "Regular Polygon" .
To toggle between the modes, keep the mouse button pressed over the button currently displayed in the toolbar. Then release the mouse button when the pointer is on the desired button.
|
|
|
"Rectangle" |
In this mode, you can draw rectangles. They will be aligned parallel to the coordinate axes automatically.
The following edit bar belongs to the mode:

|
Controls in the "Rectangle" Mode |
|
|---|---|
|
Dx |
Lateral length of the rectangle in horizontal direction. |
|
Dy |
Lateral length of the rectangle in vertical direction. |
Drawing rectangles
1.Click the "Rectangle" button.
2.Click anywhere in the 1up drawing. This is the first corner of the rectangle.
3.Now choose the opposite corner to draw the rectangle. You can also type values in the edit bar and confirm with "Enter".
4.You can join more rectangles to the first one in order to obtain a connected shape. Each additional rectangle will be joined to the vertical side of the first rectangle. This will lock the side; only the side in X-direction can be changed.
5.Press "Esc" to quit the mode, or select "Cancel current mode" in the context menu.
|
|
|
"Ellipse by Center and Radii" |
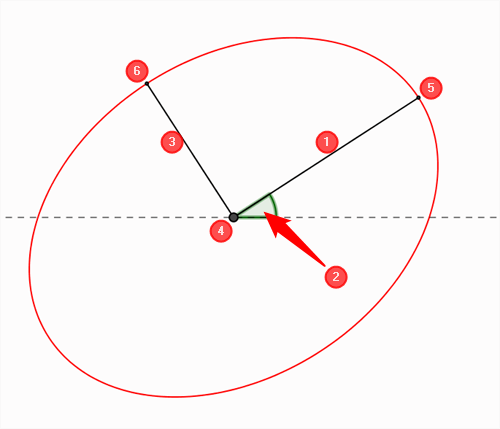
In this mode, you can draw an ellipse by defining its primary axis and secondary axis. The primary axis [1] connects the center of the ellipse [4] and the major apex [5]. The secondary axis [3] connects the center of the ellipse [4] and the minor apex [6].
The following edit bar belongs to the mode:

|
Controls in the "Ellipse" Mode |
|
|---|---|
|
Primary
|
Primary axis of the ellipse [1]. |
|
Angle |
Angle between primary and X-axis [2]. |
|
|
"Select Quadrant" |
|
Secondary |
Secondary axis of the ellipse [3]. |
Drawing ellipses
1.Click the "Ellipse" button.
2.Click anywhere on the 1up drawing to define the center of the ellipse [4].
3.Select the first apex [5]. You can also type values in the edit bar and confirm with "Enter".
4.The ellipse will be created when you have chosen the second apex [6].
|
|
|
"Elliptical Arc by Rectangle" |
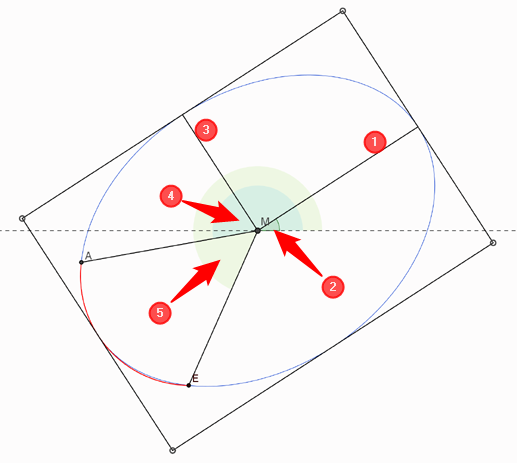
In this mode, you can draw an elliptical arc by first defining a circumscribing box and then the start and end points of the arc.
The following edit bar belongs to the mode:

|
Controls in the "Elliptical arc" mode |
|
|---|---|
|
Primary
|
Primary axis of the ellipse [1]. This is the distance between the center of the ellipse and the first apex. The corresponding side length of the circumscribing box is twice this value. |
|
Angle |
Angle between primary and X-axis [2]. |
|
|
"Select Quadrant" |
|
Secondary |
Secondary axis of the ellipse [3]. This is the distance between the center of the ellipse and the second apex. The corresponding side length of the encircling box is twice this value. |
|
Start |
This angle determines the start point A of the elliptical arc. The radius AM incorporates this angle [4] with the primary axis. |
|
End |
This angle determines the end point E of the elliptical arc. The radius EM incorporates this angle [5] with the secondary axis. |
Drawing elliptical arcs
1.Click the "Elliptical arc" button.
2.Choose the first corner of the imaginary box that is to circumscribe the ellipse.
3.Draw the first side of the box. Specify half the length of this box side in "Primary" in the edit bar.
4.Now draw the second side of the box parallel to it.
5.You see a preview of the ellipse. Choose the start point of the elliptical arc.
6.Choose the end point of the elliptical arc. This completes the elliptical arc.
|
|
|
"Regular Polygon" |
In this mode, you can draw regular polygons. These are polygons that are equilateral and also equiangular. A regular polygon with three sides, for example, is an equilateral triangle, one with four sides a square. You can create polygons with up to 99 sides.
The following edit bar belongs to the mode:

|
Controls in the "Regular Polygon" mode |
|
|---|---|
|
R |
Radius This is where the radius of the polygon's circumscribed circle or inscribed circle is indicated. It depends on the following selections: •For "Inscribed radius": Inscribed radius of the polygon. This is the distance between the polygon center and the center of a side. •For "circumscribed radius": Circumscribed radius of the polygon. This is the distance between the polygon center and a corner. |
|
L |
Length Side length of the polygon. |
|
A |
Angle This where you specify the angle of the polygon. The value identifies the angle the line connecting the polygon center and the selected corner forms with the X-axis. |
|
Inscribed radius/Circumscribed radius |
"Inscribed radius": The polygon circumscribes the imaginary circle with radius "R". "Circumscribed radius": The polygon is inscribed in the imaginary circle with radius "R". |
|
Pages |
Here you define the number of sides of the polygon. You can choose values in a range between 3 and 99: |
Drawing regular polygons
1.Click the "Regular Polygon" button.
2.Select the number of polygon sides in the edit bar.
3.Click the point to be the polygon center.
4.Determine a corner. The polygon is created.
Back to Tool Bar in the "1up" Tab.