"Offset"
|
|
"Offset" |
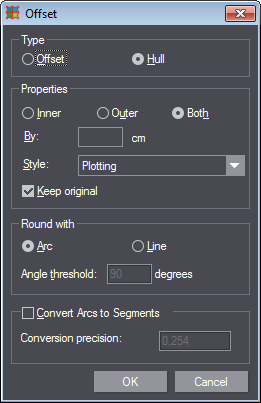
With the "Offset" dialog, you can copy an object and insert it at a specified offset to the original object. You can also create shapes around one or several objects.
Select an object and click the button "Offset" on the toolbar. The following dialog displays:
|
Controls in the Dialog "Offset" |
|
|---|---|
|
Type |
|
|
Offset |
Moves the selected object by a specified offset (see input box "By"). A copy of the object will be created if the option "Keep original" is enabled. |
|
Shape |
Creates a hull around one selected object or several selected objects. The space between the hull and the object is defined in the "By" box. |
|
Properties |
|
|
Inner |
Only for "Hull" Draws the hull inside the object. This is possible for closed objects only. |
|
Outer |
Only for "Hull" Draws the hull outside the object. |
|
Both |
Only for "Hull" Draws the hull to be on both sides of the object. |
|
By |
This is where you specify the offset in cm between the original object and the offset/hull. |
|
Style |
Defines the style of the offset/hull. More details can be found in Dialog "Global Styles". |
|
Keep original |
Specifies whether an original object will be kept or deleted after drawing an "offset/hull". |
|
Round with |
|
|
This is where you specify the way to round offset/outer hull angles. |
|
|
Sheet |
Rounds the corners of the original objects by drawing arcs in the offset/hull. |
|
Line |
Flattens the corners by drawing line segments that intersect the respective corners in the offset/hull. |
|
Angle threshold |
Defines the angle threshold - the corner is not rounded or chamfered if the angle exceeds the specified value. Example: If the angle threshold is set to 15° and the original angle is 20°, the system will not round the offset angle. Allowed value range: [0.00° to 90.00°]. |
|
Convert arcs to segments |
|
|
Convert arcs to segments |
Check this option if you want to convert all arcs of the resulting offset/hull to line segments. I.e. use this option to produce an object composed entirely of line segments. |
|
Conversion precision |
Defines the precision that the system will use when converting the arcs to line segments. Smaller values give you greater precision. The value must be greater than 0.0005. |
1.Select the object(s) that you want to create an offset for.
2.Click the "Offset" button.
|
|
|
"Offset" |
3.In "Type", click the "Offset" radio button.
4.Specify the distance between the original object and the offset in the "By" edit box.
5.Specify the style of the offset object(s) in the "Style" list box.
6.Check the "Keep original" box if you want to keep the original object(s).
7.Select the fillet style ("Arc" or "Line" radio buttons) for the offset object(s).
8.Click "OK" to create the offset. All possible offset solutions for the selected object(s) are calculated and offered in an alternate choice panel.
|
|

|
|
9.Hover over one of the suggested solutions with the mouse to automatically generate an exact preview of the offset.
10.Click on the number of the desired choice to draw it.
1.Select the object(s) that you want to create a hull for.
2.Click the "Offset" button.
3.In "Type", click the "Hull" radio button.
4.Select the type of hull: click either the "Inner", "Outer" or "Both" radio button.
5.Specify the distance between the hull and the original in the "By" edit box.
6.Specify the style of the hull object(s) in the "Style" list box.
7.Check the "Keep original" box if you want to keep the original object(s).
8.Select the fillet style ("Arc" or "Line" radio buttons) for the hull object(s).
9.Click "OK" to create the hull.

Back to Tool Bar in the "1up" Tab.