Using rules, you can use different automarks configurations within a job depending on the folding sheet (for example, different marks and parameters for the cover and for the body or different settings for certain customers).
As a general rule:
•You can insert each rule type only once per selected automark.
•If there are several rules for an automark, this configuration is used if all the rules are applicable (And operation).
•In the case of several criteria within a rule, this rule is applicable if one of the criteria is met (Or operation).
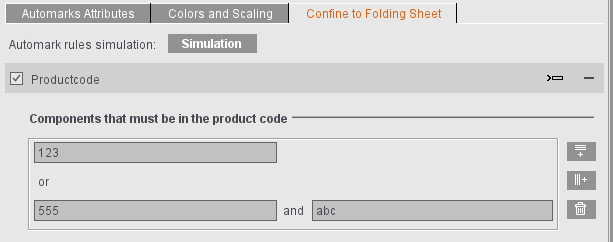
Product Code
With a product code, you can specify several components within a rule. Use the buttons on the right to add a new row or a new column in the selected row or to delete the selected item.
The rows use OR operation, i.e. one of the text strings must be in the product code. The columns use AND operations, i.e. both text strings must be in the product code for the rule to apply.
See also Example 2: Placement of the Assembly Block Label Depend-ing on the Product Code
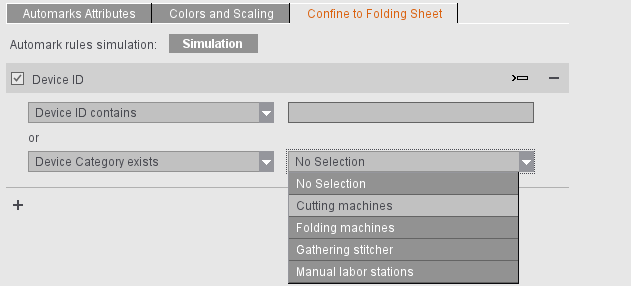
Device ID
Special marks are needed for certain finishing steps. For example, the PushToStop folding machines need barcodes at certain positions to be able to process the folding sheets automatically. You can use the "Device ID" rule to control the folding sheet-specific and device-specific placement of such marks,
With Device ID, you can define not only a text string but also a device category. This means that the marks are placed only as follows:
•The mark is set if any device category is contained in the JDF: "Device Category exists" and "No Selection"
•The mark is set only if a certain device category is contained in the JDF: "Device Category exists" and, for example, "Folding machines"
•Vice versa, if "Device Category does not exist" and "Folding machines" are selected, the mark is set for all other device categories or if no device category is contained in the JDF.
You can also enter several device IDs by separating the items by commas.

Note: If a device ID changes or if finishing machines are to be added, it is important to make this change for all marks that have the "Device ID" rule. Within an automarks set, you can customize this fast and reliably using synchronization (see Overview of the button functions).
Device ID/Product Code - Simulation of Automarks Rules
For the "Product Code" and "Device ID" rules, the values in the rule are available only for a full job run including MIS. This means that if you wish to build up automarks sets with visual control, in other words based on a dummy job where the impact of the rules on the marks can be checked in the graphic view, these dummy jobs ought to be set up first in the Business Manager, for example, for all the product codes and device IDs to be tested, something which means a lot of time and effort. To make this easier, the product codes and device IDs can be simulated in Prinect Signa Station.
You can start simulation whenever a "Product Code" or "Device ID" rule is created for one of the marks:

When you click "Simulation", a dialog displays where you can specify values for the product code and the device ID for each folding sheet. To do this, mark a row, enter a value in the text boxes below and click the row again. In this way, you can assign different values to each folding sheet. When the simulation dialog opens, simulation also starts and is active while the simulation dialog stays open. Simulation ends whenever the simulation dialog closes again.
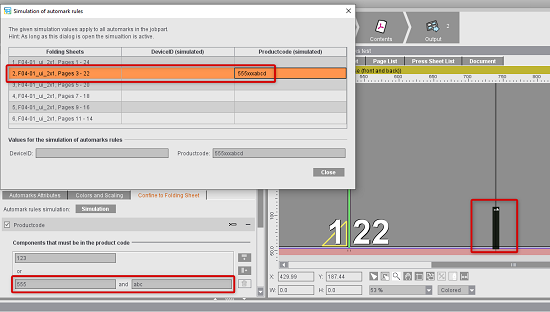
If simulation is active, the values set in the simulation dialog are used in the current job. In the example shown, placement of the collating mark is to depend on whether the product code has "123" as the text string or "555" and "abc" as text strings. In the simulation dialog, a product code "555xxxabcd" is simulated for the folding sheet of pages 3-22, meaning that the second row with the rule is applicable. This means that the collating mark is placed on this folding sheet but not on the others.

Note: Values for the product code and the device ID that in the job can originally come from the MIS, for example, are ignored during simulation.
You can continue to operate Prinect Signa Station while the simulation dialog is open. Changes to the setup of the job can still be made. This is helpful to be able to set the single attributes of the marks.
An active simulation is indicated by a flashing exclamation point in the tile of the "Marks step.

Output is not possible when simulation is active because the marks situation in the graphic view can be significantly different to the actual marks situation. An appropriate warning appears if the "Output" step is invoked when automarks simulation is active. Output is possible only after simulation was disabled by closing the simulation dialog.
Simulation is automatically disabled when the job is saved. This means in particular that automarks simulation is always disabled after loading the job. This prevents an incorrect marks situation from being displayed in the graphic view. The simulation values entered for the device ID and the product code are saved along with the job.

Note: Simulation is available in the "Marks" step in the job and also when creating product part templates.
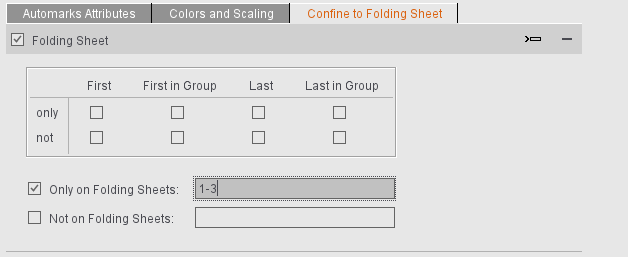
If the mark is not to be set on all folding sheets, you can set this to suit your needs using this option. You can set the data either related to a group by selecting options in the table or by specifying the folding sheets directly in one of the two text boxes, "Only on Folding Sheet/Not on Folding Sheet". In this case, you can either confine output to certain folding sheets or exclude certain folding sheets. You can also specify several folding sheets (separated by a semicolon or comma, e.g. "1;3") or a range (e.g. "1-3").
Examples:
•"Only on Folding Sheet" enabled, input "1": The mark appears only on the first folding sheet, not on any of the other sheets.
•"Only on Folding Sheet" enabled, input "1;3": The mark appears only on the first and third folding sheet, not on any of the other sheets.
•"Only on Folding Sheet" enabled, text box is blank: The mark does not appear on any folding sheet.
•"Not on Folding Sheet" enabled, input "1": The mark does not appear on the first folding sheet but on folding sheet 2, 3, 4, etc.
•"Not on Folding Sheet" enabled, text box is blank: The mark appears on all folding sheets.
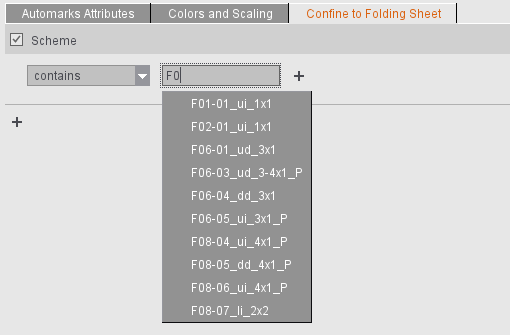
List boxes for "Scheme" and "Customer"
To make it easier to fill the boxes, a list of suitable items from the Resources is shown to you during input (max. 10 suggestions). This means that you only have to enter the first part of an item and can then simply select the variant you want by clicking it in the list. You can also enter only part of a string if the rule is to be used in several cases (for example, "contains" "F02" if the mark is to appear on all F02 folding sheets).