"Optimization" Step
The "Optimization" step contains a great number of possible settings. As a basic principle, we recommend that you set known cost data once in the Preferences and apart from that try to find better placements only for a specific job, for example, using the slider. You can collapse the cost data for a better overview (with the triangle button).
You always work with sheet optimization when you are handling gang jobs.
The parameters that you can set differ slightly according to the type of sheet optimization.
You can type in the sheet optimization parameters for the job or load them using a selected parameter set ("Sheet Optimization Setup" button). You can also set certain parameters in the "Plate Template" and "Papers (Printing Materials)" resources and then import them from there ("Use Optimization Parameters from Plate Template" option). This option of combining data does away with creating great numbers of parameter sets and the cost and conditions for certain plates and papers are entered directly at the source.
Another benefit is that you can set up several plate templates in the job that are then all included in optimization. In this case, you should define the optimization parameters in the plate template. The plate template with the best optimization results is then used accordingly and displays in the "Results" step.
In the sections below, you will find a description of the functions in the "Optimization" step or notes on handling them.
Input List for Sheet Optimization (grouping table)
List of the imported gang parts or PDFs with the option of sorting them.
Double-clicking the box in the "Delivery Quantity" column lets you specify a different delivery quantity for every gang part. Clicking the "Optimize" button again causes the screen contents in the graphic window to change accordingly and also the "Optimization Result" to be recalculated.
The columns that display in the table depend on the selected optimization mode (without layout default, with layout default, packaging).
All the columns whose values can be edited directly in the input list are tagged by a triangle in the top left corner.
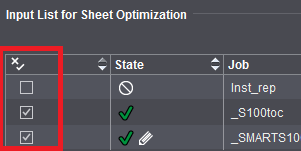
In the "State" column, you can view the latest details about placement of all gang parts after each optimization run. As many as three icons per job display:
|
General Information
|
Additional Information
|
Special cases
|
|
The first icon indicates the general status of the job.
|
Additional information can indicate why the job was not placed or that it was edited manually.
|
At present, two special cases display: "Can" articles that were placed and "Must" articles that were not placed. This displays only if you are working with an enabled deadline.
|
|
|
The gang part is optimized and placed on one or more press sheets.
|
|
The job was edited afterwards. A part of the placed 1ups was removed manually in the graphic view.
|
|
"Can" article that was placed nevertheless.
The "Target Date" is further in the future than the set "Deadline"; the job was placed despite this through optimization.
|
|
|
The gang part was not placed on one of the press sheets.
|
|
The gang part was not placed because the rating of the press sheet would otherwise be below the set limit.
|
|
"Must" article that was not placed.
The data for the "Deadline" of the gang job and the "Target Date" of the gang part showed that the job ought to have been placed. However, the job was either removed manually or is no longer placed because of the poor press sheet rating.
|
|
Possible reasons for non-placed jobs: All placed 1ups removed manually, press sheet not utilized adequately, target date not reached (see additional information).
|
|
The job was edited afterwards. All placed 1ups were removed manually.
|
The icons for "Can" and "Must" articles display also in the "Target Date" column.
|
|
|
|
|
The gang part was not placed because the target date was not yet reached.
|
|
|
|
The gang part is not placed on one of the press sheets because it was set to "inactive".
|
|
|
|
|

Note: The icons in the "State" and, if applicable, "Target Date" columns also display in the optimization report.
You can disable gang parts from optimization and enable them again through the "Active" column.
"Process Order" column
The gang parts are sorted in the gang job in the order in which you selected them for import. The process order defines the order in which each of the gang parts will be submitted to the Optimizer after you click "Optimize".
In the field, the process order does not influence the optimization result or only negligibly especially where gang parts with different sizes and delivery quantities are concerned because other criteria like optimal utilization of plates and sheets are more important.
In the case of uniform jobs, on the other hand, the arrangement of the 1ups on the optimized sheets can differ, depending on the process order.
If the "Process Order" column is selected, you can move the gang part you just marked using the arrow buttons and, by doing so, change the process order.
Other functions:
•Using "Remove Gang Part from Gang Job" in the context menu, you can move gang parts or folding sheets back to the gang job folder (gang pool) again. For details, see the description in the header below or in Job Import from Gang Pool.
Note: The functions in the context menu like "Edit Delivery Quantity" or "Set Orientation to..." are available irrespective of the column in which the cursor is currently located.
•Double-click the delivery quantity to open a window where you can change the delivery quantity.
•Drag-and-drop a gang part to the graphic window in the "Press Sheet" tab.
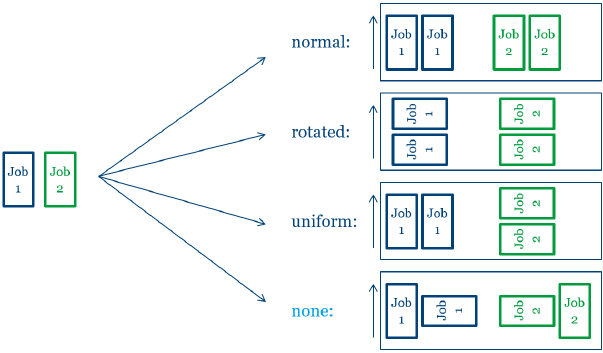
•When you double-click the "Orientation" column, a dialog opens where you can set the orientation to the paper grain for selected gang parts. You can choose between the following settings:
"normal": Folding sheet at 0° in relation to grain direction
"rotated": Folding sheet at 90° in relation to grain direction
"uniform": Determine direction as best as possible (this direction is then applicable for all 1up copies)
"none": Determine direction as best as possible, with 1up copies possibly having different orientations
With "normal" and "rotated", you specify the orientation related to the paper for all 1up copies of this article. With "uniform", optimization determines the better of the two variants for utilization of the sheet. In this process, all 1up copies of the article have the same orientation; this means that either they are all rotated or none are rotated. If you select "none", orientation is ignored and only the best possible utilization of the sheet is considered. In this case, it is possible that some 1up copies of the article are rotated and some are not. This can be a good idea in the case of articles where the grain direction of the paper is irrelevant or for materials without grain direction.
The settings are interpreted as follows:
·For schemes with a folding rule: Back margin orientation
·For schemes without a folding rule: Page orientation
·For Montage: Page orientation
"as per placement": If "FromLayout" is entered in the gang part XML, this means that orientation is not defined in the gang part XML but is delegated to the Prinect Signa Station product part used. In this case, orientation is determined from placement in the product part. The grain direction of the paper of the product part is included when determining this value. The result determined is always "normal" or "rotated".
Procedure:
·The entry in the gang part XML is first checked to determine the orientation default: If "Normal", "Rotated", "Unique" or "None" is set there, this value is used in the input list for sheet optimization when importing the gang part XML.
·If none of these items or "FromLayout" is entered in the gang part XML, the setting of the product part in "Parameters for Ganging Optimization" is used. If "normal", "rotated", "uniform" or "none" is set there, this value is used in the input list for sheet optimization when importing the gang part XML.
See Working with Grouping Tables for details about sorting a grouping table.
Ganging...
You can use the "Ganging..." button to import customer jobs at any time from the gang pool.
Gang parts that were removed from the press sheet in the grouping table (see above) automatically display again in the gang pool ("Job Import from Gang Pool" dialog).
List of packaging jobs
In packaging jobs, the table also shows the assigned shape. A preceding "0" indicates that a cutting die with this shape is not loaded at present. When you press the Optimize button "General" in such a case, optimization is impossible with the current settings, and an error message appears.
Prinect Signa Station then offers the option of looking for a suitable cutting die. To do so, the folder selected last in the "Open Cutting Die" dialog is searched for an exactly matching cutting die. If the search is successful, optimization is run; if not, a note appears in the "Optimization Result" indicating that shapes are not assigned to all packaging articles.
You can perform the assignment using the context menu invoked on the table row in question when cutting dies are loaded but some articles do not have an assignment.
You can change the order of the articles in the table using the buttons to the right of the table. The order of articles in the table determines how they are arranged on the press sheet. If you change the order of articles, you must run optimization after that for the change to be applied.
Naming the folders of gang jobs
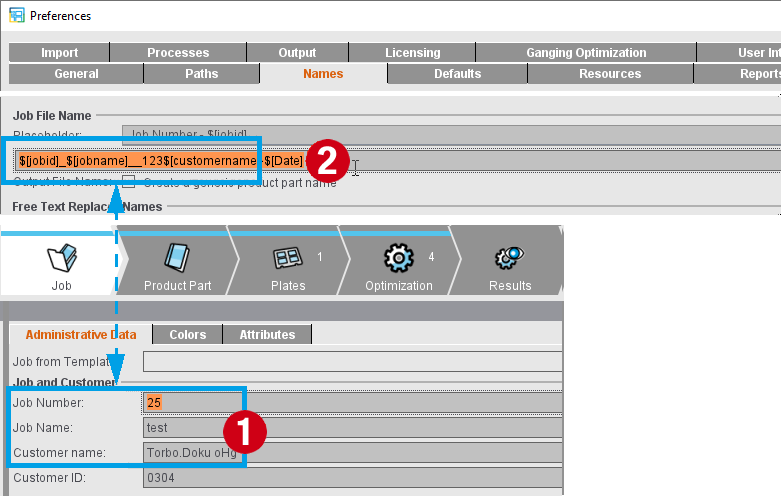
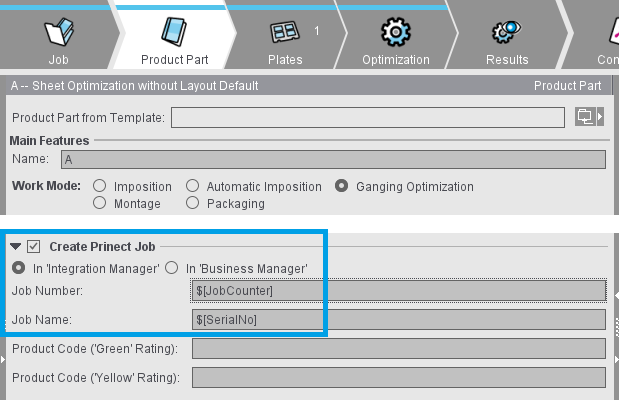
Jobs are automatically named in the way that you set this in the Preferences. In the "Names" tab, you can insert placeholders for this in "Job File Name" that are then filled with the data of the job for each job. The default entry is "$[jobid]_$[jobname]", this means that the job name is made up of the entries for job number and job name in the "Job" step (1). However, you can also set invariable data ("123") or insert other placeholders like the selected customer name or the current date (2).
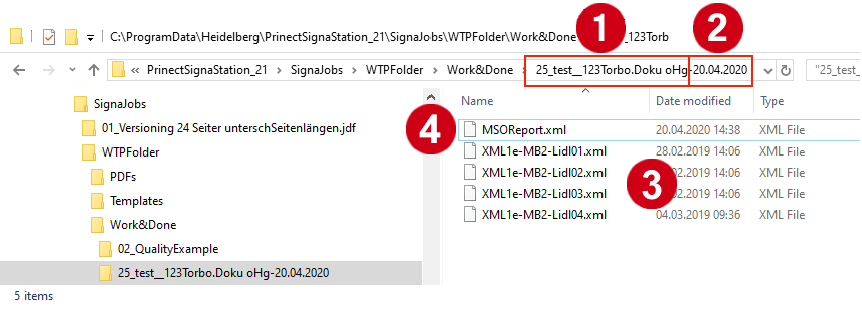
During ganging, a subfolder is created for each gang job in the pool for gang jobs in "Work&Done". The components of the job (3) are pooled in this subfolder and a report in XML format that can be evaluated on a machine is generated (4). This is valid for all forms of gang jobs with the exception of manual ganging using the "Import PDF" function.
This subfolder generated for every gang job is named automatically based on the same rules that you defined for the naming of jobs.
When creating a gang job manually using the "Ganging..." function, you set these data as usual in the "Job" step. When a Prinect job is generated automatically (when manually creating a gang run form and also during the automatic processing of gang tasks by the Prinect Signa Station Gang Server), the data for job number and job name are generated via the placeholders that you entered in the gang task in "Create Prinect Job" in the "Product Part" step.
The data generated in this way are then copied to the boxes in the "Job" step at the start of processing and used in the same way for naming the subfolder in "Work&Done".
Combi button: Import PDF...
Select this option if you want to import PDF files to a gang job.
Combi button: Import CAD...
Select this option if you want to import cutting dies to a gang job.
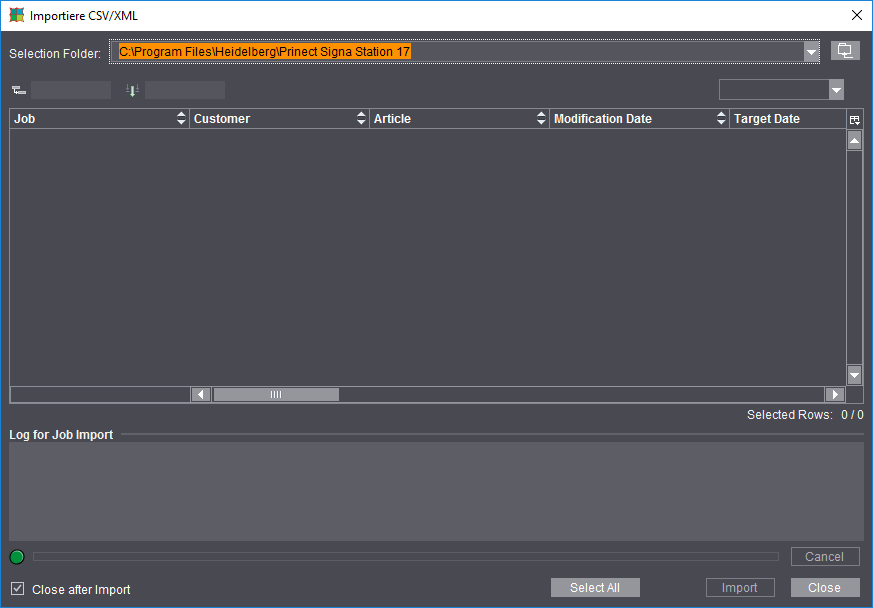
Combi button: Import CSV/XML...
Job description files as CSV or XML files and content files (PDF files) in defined structures must be available in order to work with a hotfolder.
Normally, these data are generated and made available by the "MIS" or the Prinect Integration Manager.
Combi button: Create New ...
Define a new assembly block for the PDF import and import it.
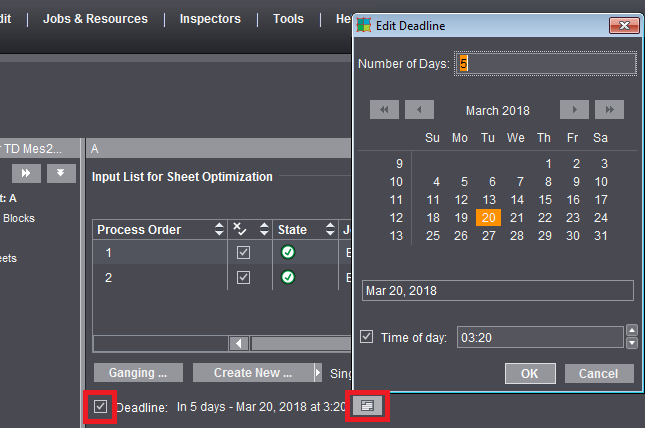
Edit Deadline
The deadline is included in optimization if the "Deadline" option is enabled. When the option is enabled, the currently used deadline is indicated beside it.
When the option is enabled, you can open the "Edit Deadline" dialog with the "Edit" button. Your input can be relative or absolute.
•In the "Number of Days" box, your input is relative to the current date. Positive values are for days in the future, negative values for days in the past.
•Use the calendar to select a specific data for an absolute input.
Both input variants influence each other mutually, with one variant always matched according to the input of the other variant.
The greatest value possible for days is 99 days or -99 days.
The set deadline is persistent relative to the current date. This means that when you enter a deadline of "in 2 days", for example, "2" is saved as the value. As a result, the deadline is pushed back accordingly if the job is used again at a later date.
If you enable "Time of day", you can specify a set time using the arrows or by entering the data directly. If "Time of day" is disabled, the last possible period in the selected day is set, this means 23:59:59 hrs.
Optimization Result
The preliminary results of optimization display without having to go to another step. Go to the "Results" step if you wish to view the full results.
Optimize
Optimizes the press sheet(s) taking into account the assigned folding sheets/assembly blocks and the data set in the "Optimization" step.
Report (Optimization Result)
Display of the results of optimization The optimization result is output as text in your default browser when you click "Report".