Plates
List of Selected Plate Templates
The plate templates selected for the product part are shown in the list.
Using the buttons on the right, you can load or replace plate templates to the product part or remove them from there:
|
|
Folder button
Click the folder button and select a created plate template in the "Choose Plate Template" window that then appears. You can now add it to the product part.
|
|
|
To replace a plate template
Click this button and then replace the plate template selected in the list by another one.
|
|
|
"More" (only in the "Imposition" work mode):
|
|
Load plates and schemes from product part template (gang run form only)
Click this button if you wish to add a plate template with a scheme from a product part template. The "Gang run form" option must be enabled in the product part template.
You can file standard plate templates with additional custom settings (scheme, marks, paper, etc.) as product part templates and load them later to new jobs to make work easier for you.
|
|
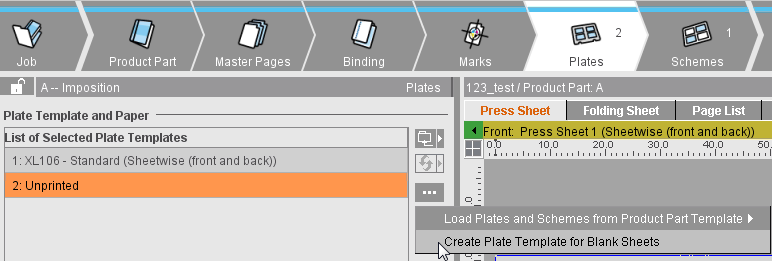
Create Plate Template for Blank Sheets
Blank (unprinted) folding sheets are found as part of the final product especially in book production (examples: front/back end sheets, cardboard of the book cover).
This function lets you create an additional plate template for unprinted sheets that uses the paper size of the selected plate template as the default. Because there is no real printing plate for such sheets, the size of the plate always remains identical to the paper size.
No dimensions and no gripper margin display in the graphic view.
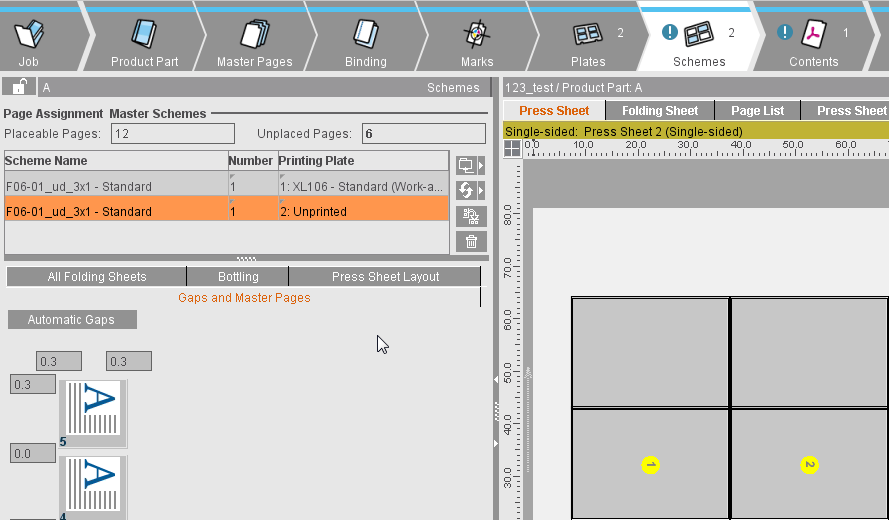
In the "Schemes" step, you can then assign single folding schemes to the plate template. No page numbers are given to it in the graphic view. Unprinted sheets cannot have any marks.
Menu in the "Plates" step:
Unprinted sheet in the "Schemes" step:
|

Note: The paper size does not change. An error message displays if the paper already defined has become too big because of the different plate. In such a case, first change the paper size and then replace the plate.
|
|
Trashcan
You can delete the plate template selected in the list and its values from the product part by clicking the trashcan icon.
|
Selected Plate Template
This displays the selected plate template in the required size.
You can also create or modify plate templates in "Plate Templates" in the "Jobs & Resources" menu, see also Plate Templates .
Gang run form
Can only be used in the "Imposition" mode.
You can place different folding sheets on the plate template if you select this option.
A gang run form is different from normal plate templates in that only the exact number of press sheets you set in "Number" is created. The folding schemes are placed only on the first press sheet, the others are generated automatically based on the same pattern.
The "AutoPosition Subject" function is disabled if "Gang run form" is enabled.
The position and orientation of the folding schemes is set in the "Schemes" step > "Active Inspector Section" > "Press Sheet Layout". See Press Sheet Layout.
Number
Can only be edited if "Gang run form" is enabled.
This is where you define the number of press sheets that will be created with the plate template.
Press Sheet Variants
Only available if you are working on a job with versions (Job Inspector "Number of Layers" >1, "Versions" minimum of 1).
You can create several variants of one press sheet. The variants differ in the number of folding sheets (or page positions) with different versions assigned to a press sheet. Apart from that, the variants do not differ. This method is similar to a 1up optimization. You go by the quantity of the single versions when you combine the versions on the press sheet variants. In doing so, you try to optimize the quantities of the single press sheet variants and minimize the surplus of each version.
Banner Content (for Digital Web Press Only)
The banners are included during output when this option is enabled.
Banner Count (for Digital Web Press Only)
Enter how often the various banners will be repeated on the positions (can also be set in the Press Sheet Inspector).
Placement rule for perfecting
Work Style
This is where you can change the rule for generating the back sheet (perfecting).
•Single-sided
This is what you have when the front consists of single plates and no plates will be created for the back.
•Work-and-turn
This is what you have when the front and back are on one plate. As a result, you do not need a plate for the back. The stack of paper is turned after printing and printing is now on the reverse side. The operator doesn't need to load a new plate.
Explanation of "Work-and-turn": The stack is turned from right to left after printing. The side that is not yet printed is printed now.
•Work-and-tumble
See "Work-and-turn", the stack of paper, however, is tumbled after printing.
Explanation of "Work-and-tumble": The stack is turned from front to back after printing. The side that is not yet printed is printed now.
•Perfecting
Two plates are created for printing, one for the front and one for the back. The stack is turned from front to back after printing the front. A perfector in the press does this.
•Sheetwise (front and back)
Two plates are created for printing, one for the front and one for the back. The stack is turned from right to left after printing the front.
Note: For the "Sheetwise" work style (work-and-turn as well), the subject is always placed on the plate beyond/above the gripper margin. The minimum space between subject and gripper margin is equivalent to the page trim of the left master page. For the "Perfector" work style (work-and-tumble as well), the subject is centered horizontally and vertically on the plate. If you want centering for "Sheetwise" as well, you must check "Center subject" in "Preferences > Defaults".
Separating Gap
Only active if "Work-and-turn" or "Work-and-tumble" is selected
If several folding sheets are positioned on a press sheet, you can push them apart by defining a separating gap in this box.
Paper Definition for Production
This shows the paper that may have been selected when creating the job and that you can change for the current job.
In "File > Preferences > General", it is possible to make the "Name" section editable. See Paper Name Editable.
The paper thickness affects creeping, see also Creeping and Bottling.
You can assign the job a paper type or create one for it by displaying the "Choose Paper" dialog using the folder button to the right. You can also do the same for the paper size.
You can also create or modify papers and paper sizes in the "Jobs & Resources" menu > "Resources & Machines" in "Papers" or "Page and Paper Sizes". See also Page and Paper Sizes.
Keep Dimension
The current paper size in the job is overwritten by default by the paper size stored in the MDS when a paper is selected from the MDS.
Because you do not always want this default behavior, you can now keep the paper dimension in the job when you set this option.
Multiple Web Widths
Prerequisite: "Show check items for cover bonding and glue line" must be enabled in "File > Preferences > User Interface".
Only makes sense to use this in web printing.
You can define the width of each roll (list box beside it) if you have multiple webs.
Center offset
Prerequisite: "Show check items for cover bonding and glue line" must be enabled in "File > Preferences > User Interface".
See Center offset.
Subject Settings
AutoPosition Subject
The lower edge of the subject with the bleed size is positioned on the lead edge (blue line).
You can change the subject position manually if the option is disabled.
Center Subject Vertically/Horizontally
The subject is centered in vertical (Y) or horizontal (X) direction. If the options are not selected, you can define a set offset of the subject to the lower edge and/or the left edge.
Note: Please note: Input of the value of "0" for the "Left" offset does not mean horizontal centering like in the program versions up to 2018 but actually positioning exactly on the left side. As of version 2019, jobs from program versions up to 2018 where horizontal centering was set with "Left offset = 0" open automatically with "Center Subject Horizontally" enabled.
Include Gripper Margins and Non-Printable Margins
During the automatic calculation of the number of 1ups, this includes the gripper margin and the areas for lead edge of print and tail edge of print as well as the margins on the side as set in the machine parameters. The option does not affect the whole product part but only the plate concerned. As a result, you can define, for example, different settings for cover and body. You can generally enable/disable the option in the Preferences in "Defaults > Subject Settings".
When the option is enabled, a warning will be issued if subject, folding sheet, bleeds or marks are found in one of the critical areas during output. This includes the following areas:
•off the paper
•on the gripper margin
•in the non-printable area/tail edge of print