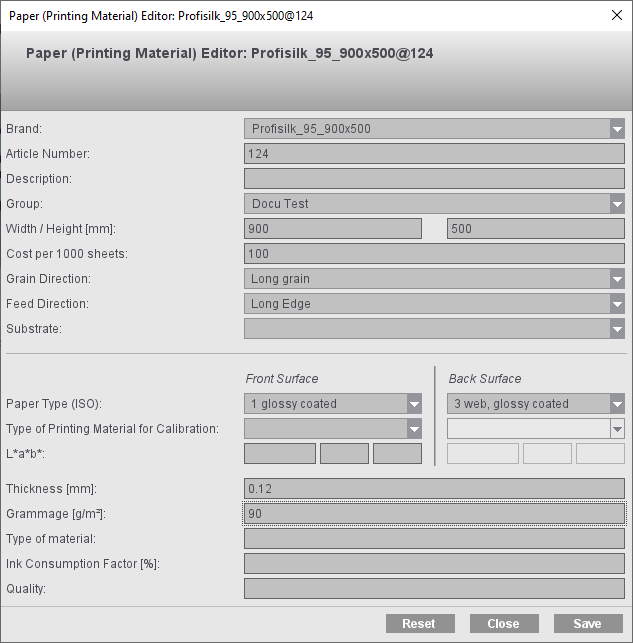
Paper (Printing Material) Editor
Use this editor if you wish to create/edit a data set that defines a paper. It is saved as a resource in "Papers (Printing Materials)". Editing is done in the same editor, regardless of whether the resource is filed internally in Signa Station or in the MDS (if "Use MDS" is enabled).
The "Papers" resource is loaded to the job in the "Plates" step in "Select paper for production from Resources...".
Warnings display in the header of the dialog if your data are incomplete or lie out of the set area.
The following parameters are available for naming and identifying printing materials:
•Type of Printing Material for Calibration

Note: The front and back of a paper can be different in certain parts. That is why you can define different settings for front and back for "Paper Type (ISO)", "Type of Printing Material for Calibration" and "L*a*b". These data are written to the JDF and submitted to the Prinect system.

Note: If you do not know various parameters when you are creating a new printing material, you can take the values from the reference table to complete your data:
|
Grade (ISO) |
Grammage |
L*, a*, b* |
Thickness |
|---|---|---|---|
|
1 glossy coated |
135 g/m² |
95, 0, 0 |
120 µm |
|
2 matt-coated |
135 g/m² |
95, 0, 0 |
120 µm |
|
3 web, glossy coated |
– |
– |
– |
|
4 uncoated |
135 g/m² |
95, 0, 0 |
120 µm |
|
5 uncoated, yellowish |
135 g/m² |
88, 0, 6 |
120 µm |
You can enter a brand in this box, for example, the one used by the manufacturer.
Article numbers are entered automatically if Prinect Production is connected to an MIS system. If this is not the case, you can enter brands for new printing materials in this column.
Printing materials are defined in Business Manager if Prinect Production works with Prinect Business Manager as its MIS system. This is where printing materials are managed solely by article number. As a result, different article numbers may be defined for one brand. In this case, it's possible for you to define an alternative identifier for the printing materials in the "Name" column. A name is generated automatically if you don't enter an identifier in this column. The automatic name is generated based on the following pattern:
•The brand is used if there is no article number.
•The name is made up of the brand name and the article number, separated by a stroke, if there is an article number.

Note: Please do not use the term "Default" as the name.
The "Group" parameter lets you group printing materials for faster identification if you should have a large number of materials. You can enter a freely selectable group identifier in the "Group" column, but it is not mandatory that you specify this. Using the "Group" parameter is a good idea especially if you wish to group the materials.
Enter the geometric data of the paper in this box.
This is where you can type in the cost for 1000 sheets. This value can make it easier for you to determine the printing costs if print jobs with sheet optimization are to be calculated.
The grain direction is important for folding the paper. You can choose between the following grain directions:
•Long grain and
•Short grain
This parameter lets you set the feed direction of the paper in the machine. This parameter is designed mainly for digital printing and makes it possible to specify the direction in which paper grain is oriented for printing materials used in digital printing. This detail lets you specify the correct orientation of a paper grade for digital printing. This parameter also displays in the table of printing material parameters.
If the paper definition does not contain the feed direction, the feed direction set in the plate template is written to the JDF.
This is where you can select a substrate defined in the "Substrate" tab.

Note: When you assign a substrate to a printing material, the properties of the substrate relevant for the printing material are not copied to the printing material description. This means that the printing material properties set in this dialog continue to be valid.
You can choose between one of five paper types:
•1 glossy coated
•2 matt-coated
•3 web, glossy coated (for web offset)
•4 uncoated
•5 uncoated, yellowish
Type of Printing Material for Calibration
Default calibrated paper types are listed here. Select the (calibration) paper type that you wish to assign to the paper.

Note: Make sure that you have a calibration for the (calibration) paper you selected (refer to "Calibration Manager - User's Guide).
The L*a*b* values for the paper's basic color are entered in these columns. The percentages are entered separately for L*, a* and b*.
Enter the thickness (in mm) of the printing material in this box.
Grammage (grams per m²) refers to the exact weight of the paper.
This parameter is needed for packing materials. The material type must be specified to generate a correct PDF 3D with the Cutting Die Editor.
The ink consumption factor (in percent) is a gauge for the paper-specific consumption of ink with a defined area coverage density in print.
If necessary, you can enter quality information here. This parameter is not available for all printing materials or is not used by all processes in the workflow referring to printing materials.
The use of roll paper makes it possible to cut off fixed segment lengths from a roll of paper (e.g. for machines with a Cutstar connection). This makes it possible to reduce paper consumption.
The following steps are necessary:
•Create a paper for web printing with a "Height" = "0" in the Paper Editor or the MDS.
•Create a plate template with the "Web sheeter installed" option enabled.
In the "Paper Segment" box you can then specify the segment length of the paper (default: maximum paper height of the press).
•If necessary, enable "Automatic Paper Height Reduction" in the job in the "Plates" step
Automatic Paper Height Reduction
•For "Ganging Optimization without Layout Default", the paper height of each resulting press sheet can be reduced automatically to the subject plus set margins in keeping with the layout ("Automatic Paper Height Reduction").
•This kind of automatic function is also available for "Packaging" and "Ganging Optimization Packaging". In this process, the paper height is reduced to make the subject with all the marks fit on the paper and to avoid collisions with press sheet marks.
•This automatic function can also be used if sheet paper is used. In this case, the paper height is trimmed before printing. Possible field of application: Produce more unprinted waste and not printed waste.
The paper sizes per resulting press sheet display in "Results" in ganging optimization and are always included in the output.
Use this editor if you wish to create/edit a data set that defines a paper format (page size, page-related extra space, trim). This is saved in the "Page and Paper Sizes" resource.
Loading the 'Page and Paper Sizes' Resource to the Job
This is where you load the "Page and Paper Sizes" resource to the job:
•"Master Pages" step and "Select page size from the resources..."
•"Contents" step in the Document Inspector and select "Page" tab.
Select the "Select page size for trim box from the resources..." button.
Use this editor if you wish to define the position of folding sheets on a press sheet (plate) to suit your needs. See the Press Sheet Layout to learn how this function works.