
Administration - Planned Tasks
In the "Planned Tasks" group, you can schedule specific tasks for the print jobs. The planned tasks display in a list.
Prerequisite: You need administrator permissions to create, change or delete planned tasks. "Planned Tasks" does not display if you do not have administrator permissions.

Note: If you should also use the "Backup function" (creation of scheduled backups of the Prinect system), make sure that the planned tasks do not overlap time-wise with the backup.
The items shown in the columns show the settings that were set in the "New Planned Tasks" window when you were defining the tasks.
Name
This displays the name of the planned task.
Type
This displays the type of task. Every task type has an icon of its own.
Status
This displays the current status of the respective task (active / inactive).
Next Run
This shows when the next run of the planned task will take place. The "Next Run" column is empty if a task has been completed ("Finished " status) because no future run has been scheduled. The next scheduled run is indicated in gray because it cannot be run according to the current status if a task is currently disabled ("Inactive" status).
Last Run
The time the scheduled task was run last is indicated here. In addition to the time stamp of the last run, the number of jobs affected by this run is also displayed. For example, "(3)" following the time stamp of the last run of a "Stop Jobs" scheduled task indicates that the last run stopped three jobs because they matched the filter criteria at this point in time.
Created by
This displays the user who created the respective task.
Creation date
This displays the date and time the scheduled task was created.
Modified by
The user who made the last change displays in this box if a task was modified at a later date.
Modified:
This displays the date and time the scheduled task was last modified.
Comment
This shows any comment that was entered.

Note: You can use the grouping function in this list (see Structured view). This can enhance the overview if the list has many items. You can also sort the scheduled tasks by individual columns in ascending or descending order; to do so, click the respective column header. You can also customize the selection of displayed columns with a column set (see also Define a custom column set ).
Search function
Typing a key word in the "Search" box lets you search for particular expressions in the task list. Filtering in the list starts as you type. You can search for any expression present in any of the columns of a task list, e.g. part of a name or author. To view the unfiltered list again, clear the "Search" box (click the cross).
Buttons below the list of tasks
"New" button
Click the "New" button to open the "Create Planned Task" dialog (see the Create Planned Task).
"Open" button
Click "Open" to open the "Create Planned Task" window for the selected planned task. You can change settings now:
"Delete" button
You can delete the currently selected task with the "Delete" button. Multiple selection is not possible.
The context menu offers the following commands in addition to the functions "New", "Open" and "Delete":
Duplicate
The selected task is duplicated with all options and "Copy" (and a consecutive number if applicable) added to its name. You can then open the file and edit it with the wizard. You can also rename it then.
Activate
An inactive task is activated. The defined actions will then be executed at the specified times.
Deactivate
An active task is set to the "inactive" state. None of the defined actions is executed in this state.
Run Now
The actions defined in the task are executed regardless of the set times. This also applies to tasks in the "inactive" or "finished" state.

Note: You can also invoke the "New > Create Planned Task" and "Open" functions in the "File" menu. You can also invoke the "Delete" and "Duplicate" functions in the "Edit" menu. You can also use the shortcuts "command key + N" (New), "command key + O" (Open), "command key + Del" (Delete). See also Keyboard Shortcuts.
The dialog "Create Planned Task" opens when you click the button "New" or the item "New" in the context menu. This dialog is a wizard that step by step leads you through the process of creating a planned task.

Note: In the wizard, you can always go to any step you like by clicking the icon of the respective step. With "Next" and "Back", you go to the next or to the previous step. If you quit the wizard with "Finish" without having completed all its steps, the missing steps will be configured without parameters or with the default parameters.

Note: For a better overview, we recommend increasing the size of the "Create Planned Task" window by dragging a corner or a border so that all contents are clearly visible.
The wizard offers the following steps:
Step 1: Specifying the Task Type
This is where you select which function the new task will perform.

Prerequisite: The kind and the number of task types depend on the configuration of Prinect Managers and the licensed options. That is why "Archive Jobs" and "Empty Recycle Bin" are not available is some constellations. All other task types are always available.
You can choose a type from the following task types:
To select the task type, click the appropriate icon.

Prerequisite: A configured sequence of the "Archive" type must be available.
This function lets you archive selected jobs automatically with an Archive sequence.
In "Sequence Name" click "Select" to select the archiving sequence which will be used for automatic archiving.
With this function, jobs stop automatically when the set parameters are met.
The jobs are marked accordingly in the job list if you enable this option.
With this function, jobs move automatically to the recycle bin when the set parameters are met (preliminary to deletion).
With this function, jobs in the recycle bin are deleted irretrievably if the selected conditions are met.

Note: This option is not available for versions of Prinect Manager comprising prepress modules (Integration Manager, Prepress Manager) because, for reasons of security, the automated, ultimate deletion of complex prepress jobs should be executed only if supervision by an operator is ensured.
"Remove archive before job deletion" option
If this option is enabled, the jobs selected in the next step will be removed from the archive if the Archiver option is available and the jobs to be deleted have been archived.
You can operate the "Job data older than" box when you have enabled this task type (marked the icon). Here you specify how old a reusable job has to be (in days) before pertaining data is deleted.
This task will irretrievably delete all job data (e.g. documents, pages, page lists, layouts, history logs, etc.) of selected jobs when the specified date is reached ("Job data older than"). In this process, solely "Reuse" jobs are affected.
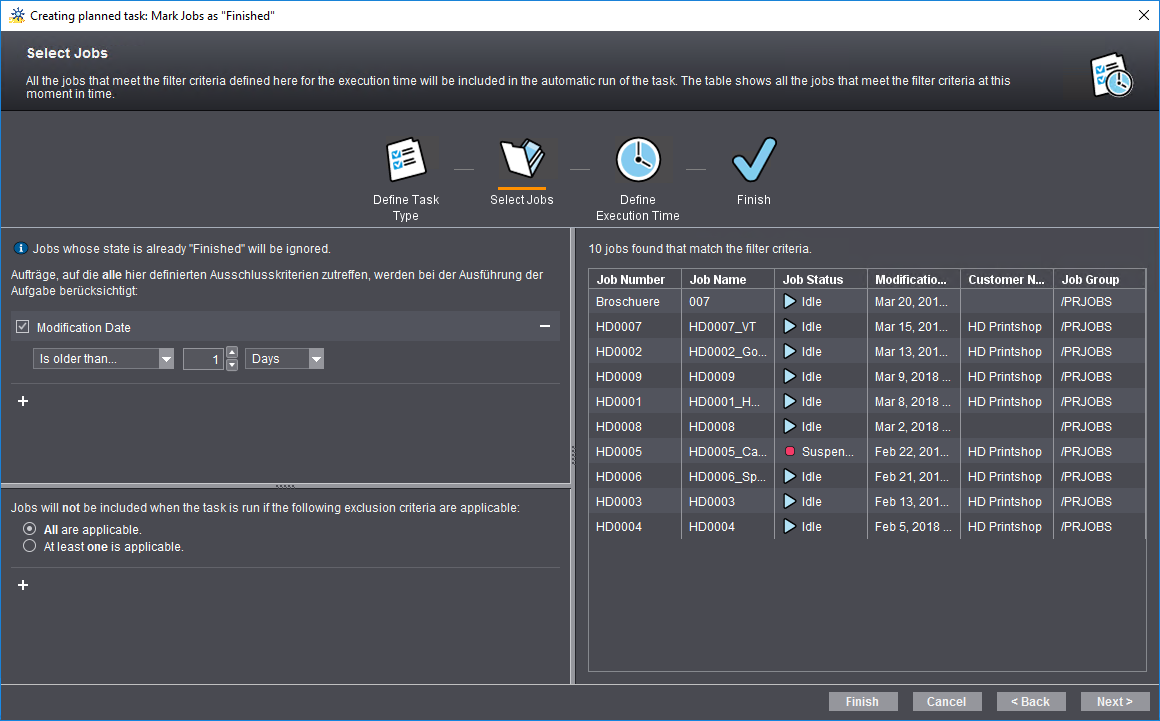
This page is a filtered job list containing all the jobs matching the filter criteria. In the left pane, you specify the filters (with various criteria). You can enable or disable each of the filters. If several filters are enabled, only those jobs that match all the filter criteria at the same time are selected.

Note: The job list shown is a snapshot of jobs complying with the selection criteria. When the respective task is executed, the selection of jobs can be different because some jobs, for example, may have been processed by another scheduled task or manually before the time for scheduled execution was reached.
Filter Rules
Click the Plus sign to open the "Add filter rule" dialog. This is where you can specify the criteria by which the job list will be filtered. This filtering corresponds to the job list filtering in the "Jobs" pane (see Filters and recycle bin).
Modification Date
If enabled, the "Modification Date" filter rule is used as the first filter rule for each new planned task. With this option, you display all the jobs that are older than the specified modification date, i.e. whose last modification date dates back farther than the specific date.
The exclusion filter rules exclude jobs from selection that match these filter rules. In other words, if jobs selected on the basis of the selection criteria set in the upper part meet the exclusion filter rules at the same time, they are not added to the selection. For example, if "Job name contains HE" is created as a filter rule and "Job name contains HEIDE" as an exclusion filter rule in the upper part, then jobs with "HENKEL" as part of the job name are added to the selection list, but jobs with "HEIDELBERG" as part of the job name are not added to the list.
You must set the impact of filter combinations if more than one exclusion filter rule is defined.
In "Jobs will not be included when the task is run if the following exclusion criteria are applicable", select:
•"All are applicable" or
•"At least one is applicable".
If the first option is enabled (default), only those jobs to which all the exclusion criteria are applicable at the same time are excluded.
If the second option is enabled, all jobs to which at least one exclusion criterion is applicable are excluded. In this case, the number of excluded jobs is generally greater than with the first option set or vice versa: the number of remaining jobs is generally smaller than with the first option set.
Example:
The complete, unfiltered job list is as follows:
The following exclusion criteria are now set:
•Job name contains "HD"
•Job number contains "05".
If "All are applicable" is enabled, 10 jobs remain in the selection list:
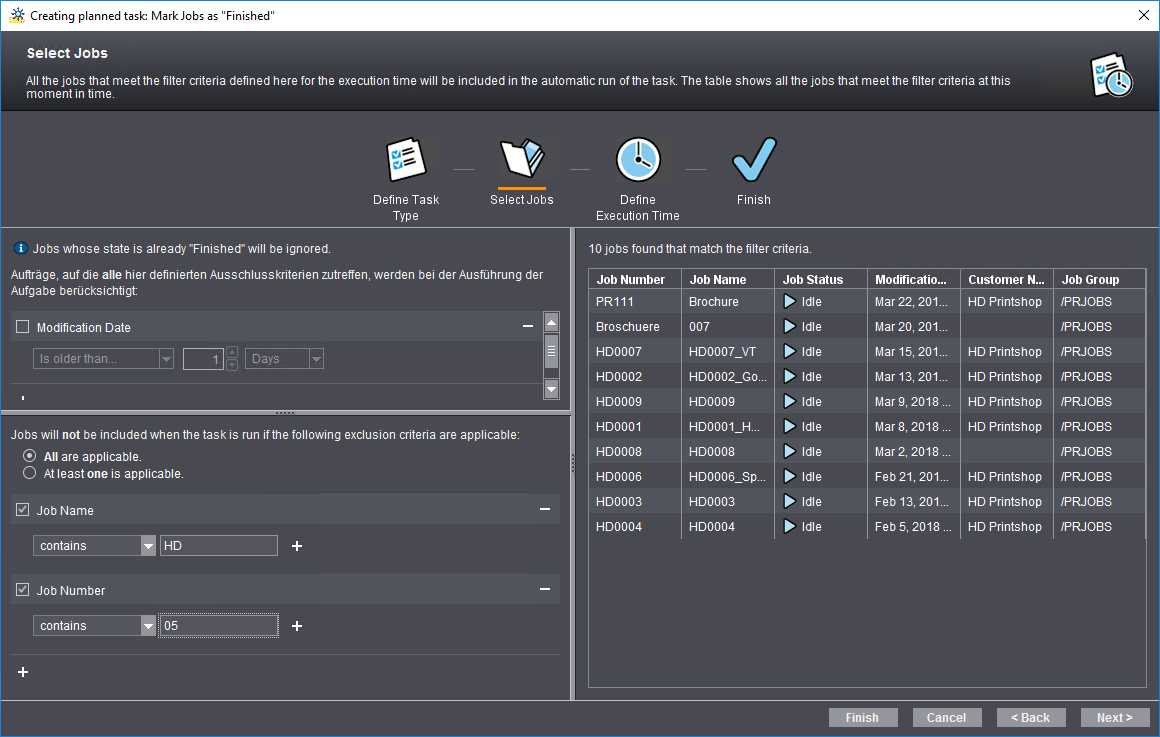
Job "HD0005_Cards" with job number "HD0005" has "HD" in the job name and "05" in the job number and is excluded for that reason. All other jobs (11 in total) are selected.
If "At least one is applicable" is enabled, two jobs remain in the selection list:

The "Brochure" job with job number "PR111" and the "007" job with job number "Broschuere" have neither "HD" as a string in the job name nor "05" in the job number and as a result are not excluded.
Step 3: Specifying the Execution Time
Here, you select when ("Start time") and how often ("Recurrence") archiving will be done.
•"Daily"
In the right pane, choose the diurnal rhythm (every 1, 2, 3 ... etc. days), and the start time (time).
•"Weekly"
In the right pane, choose the weekly rhythm (every 1, 2, 3 ... etc. weeks), the weekday(s), and the start time (time). At least one weekday must be specified.
•"Once"
Choose the start time (date and time) in the right pane.
This step provides an overview of the settings you made so far.
1.Enter a name for the task in the "Name:" field. Remember that the names of all the scheduled tasks in the Prinect environment must be unique. If you type a name that already exists, a corresponding warning is issued, and the name will not be accepted. In this box, you can also type a new name for a modified or a duplicated task.
We recommend that you briefly explain in the "Description" box what the task does at which point in time.
Option "Activate this option after saving"
The task is activated automatically after saving when you enable this option.
2.Click "Finish". The task is saved.