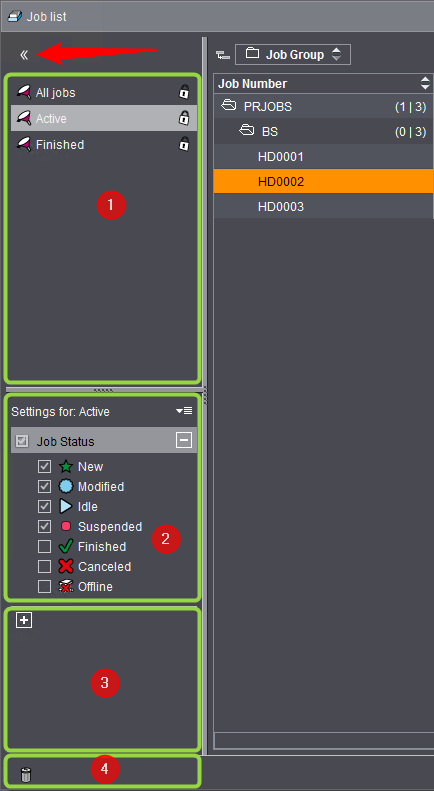
Controls for filtering the job list and for placing jobs in the recycle bin or retrieving them from the recycle bin are located to the left of the job list. Only icons display in the minimized view. This means that you can only see (going from top to bottom) a double arrow, some "funnel" icons and a "recycle bin" icon. You can open and use the navigation pane by clicking the double arrow.
The available filters display in the top part of the "filters and recycle bin" section (1). A funnel icon represents each filter. Use these filters to view or hide jobs in the job list by certain properties. In very long job lists, filters can help you have a fast overview of the jobs that need particular attention.
The three filters, "All jobs", "Active" and "Finished", are predefined and can neither be changed nor deleted. A closed lock indicates this.
A filter becomes "active" when you click it, and the job list shows only those jobs that match the filter criteria. At the same time, the criteria enabled in the marked filter display in "Settings for: [filter name]" (2).

Note: If the job list is filtered, a job does not have to display in the job list to open it with the search function (Ctrl + F). Only a part of the job number must be known to find the jobs.
You can edit the filter criteria and create a new custom filter by saving the modified filter under a new name.

Note: The "canceled" job status may make it necessary for you to adapt filters defined beforehand.
Example: Edit "Active" filter and save as a new filter
Click this filter item to display the "Job Status" option and the related suboptions in "Settings for: Active" (2).
You can enable or disable the single options.
When you edit the default options and then click another filter, a message displays, informing you that changes were made to the filter. You will be asked whether or not you want to save the changes. If you answer "Yes", a dialog displays where you must enter a new name for the filter. You cannot modify the preinstalled filter "Active".
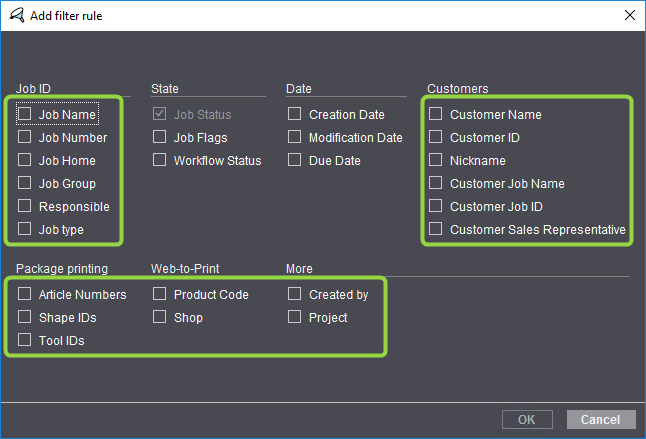
Below that (3) you can define a new filter rule by clicking the plus sign or with "Add filter rule" (from the context menu beside "for [filter name]"). The "Add filter rules" dialog opens for this.
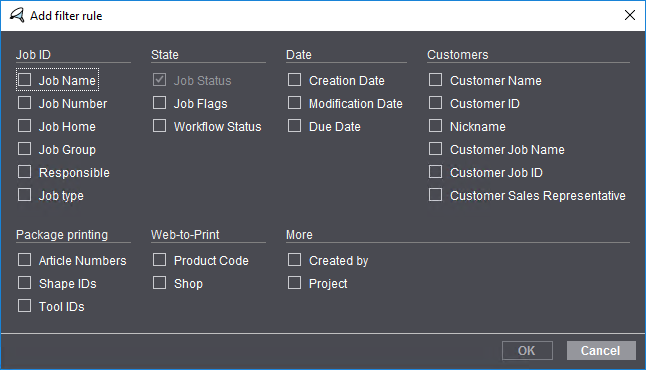
This is where you can select the properties by which the job list will be filtered. The following criteria are available:
|
Criteria Group |
Criterion |
|---|---|
|
Job ID |
Job Name Job Number Job Home Job Group Responsible Job type (see Job type) |
|
Status |
Job Status Job Flag Workflow Status |
|
Date |
Creation Date Modification Date Due Date |
|
Customers |
Customer Name Customer ID Nickname Customer Job Name Customer Job ID Customer Sales Representative |
|
Packaging printing |
Article Numbers Shape IDs Tool IDs |
|
Web-to-Print |
Product Code Shop |
|
More |
Created by Project |
Example: "Product Code"
The dialog closes after you confirm with "OK" and this property displays as a criterion.
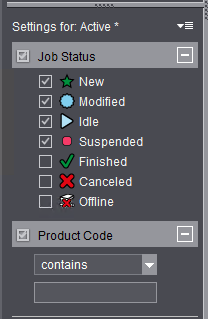
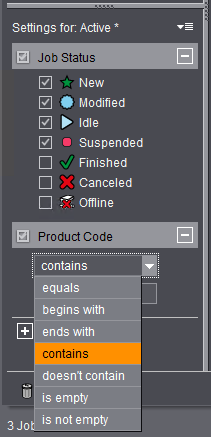
You can now select a condition in the list box, e.g. "equals", "contains", "doesn't contain", "is empty", etc.
In the "Date" group, for example, for "Creation Date", you can select one of the date conditions, set the number of elements and select a time unit. In the box, enter the number of hours, days, weeks, months, years that will be used as a filter. You can also increase or reduce the input value for the number using the arrow buttons. The filter is applied at once to the job list and works immediately there when you enable the check box before "Creation Date". Vice versa, the effect of the filter is revoked when you disable the check box.

Note: You can enable several criteria at the same time in the "Add filter rules" dialog or you can open this dialog at a later point in time and add other filter rules. All selected filter rules can then be enabled and used. This lets you create complex filters, with all active filter rules affecting the job list at the same time.
The "Due Date" filter lets you filter by due dates for milestones. See Due Dates for Steps (Milestones). Do this to have a fast overview of all jobs that currently have pending milestones.
If you selected "Due Date", you can first select in one list box what the due date refers to (job, single step, any) and in another list box a time criterion for selecting the due dates:
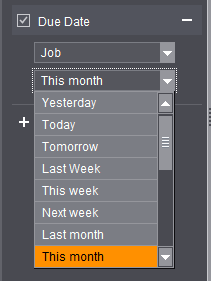
This box gives you a great selection of different time criteria that you can use to filter out jobs with different milestone states.
Filter criteria with "Or" or "And" operation
Example: You want to filter out all jobs that have "Print" or "Shop" in the customer name. To do this, select "Customer Name" as the filter criterion and confirm the "Add filter rule" dialog with "OK". The new criterion, "Customer Name", displays in the filter section. Set "contains" as the condition and enter "Print" as the value. Another condition displays when you click the plus sign to the right of the "Print" box:
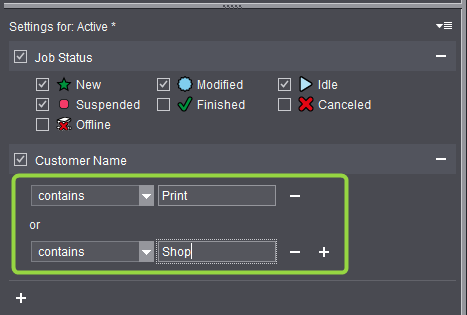
These two conditions are linked by an "Or" operation. In other words, the jobs are filtered so that at least one criterion must be met. In the example, jobs with "MyWEBShop" and "HD-Print" as customer names would also be selected.

Note: In earlier versions of the Prinect Manager, several conditions were always linked to an "And" operation. This means that in the example above only jobs that had "Print" and "Shop" in the customer name would have been selected. "MyWEBShop" and "HD-Print" would not have met this criterion.
The filter criteria highlighted by frames in the diagram below link several conditions to an "Or" operation:
The criteria without a frame either do not allow the definition of several conditions or the conditions are linked to an "And" operation. For example, you can define the following conditions for the "Job Flags" criterion:
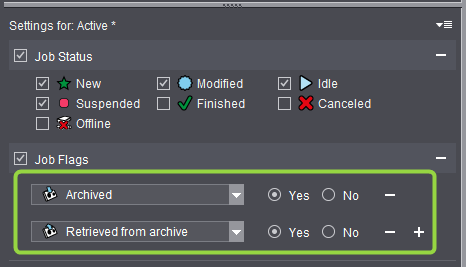
Both conditions are linked to an "And" operation. This means that all linked criteria must be met in order for jobs to be selected based on the filter rule. In this example, only jobs that have "Archived" as their flag but not "Retrieved from archive" are selected.
Filters: Settings for creation date, modification date and due date
You can set different periods for the "Creation Date" and "Modification Date" filters. This makes extremely differentiated filtering possible.
You can also set different periods for the "Due Date" filter.
"Yesterday", "Today" and "Tomorrow" refer to the respective whole day, beginning at 00:00 and ending at 23:59. The same is applicable for the week, month and year filters. However, the week filters play a special role in this process because the distinction between the various weeks depends on which day is taken as the first day of the week. You can set the first day of the week in the settings for "All Users" in "Administration". See Calendar week.
Save filter rules
If you wish to use a combination of custom filter rules on a long-term basis, you can save it as a filter by giving it a new name in the "Save as" popup command. The new filter now has a funnel icon, and you can choose from a number of different colors for these icons. Your new filter is then listed in the top part of the navigation pane along with the predefined filters.
You can modify custom filters at any time and if necessary, save them using the previous name or a new one. When you click one of the filters, the job list changes according to the criteria set in the active filter.
You can delete a custom filter by clicking the box with the minus sign to the right of the filter name.

Note: Click the predefined "All jobs" filter to display all the jobs again.
The recycle bin function affects jobs in the job list and it works like the Windows or Mac OS-X trashcan function. In other words, "two-stage deletion" is possible: You remove jobs from the job list by putting them in the recycle bin. This makes your job list much clearer. The jobs are now filed in a "recycle bin list" from which you can retrieve them again if needed. You can delete these jobs irrevocably from this list if you are sure that you no longer need them.

Note: You can also drag-and-drop jobs from the job list to the recycle bin.

Prerequisite: You can only put stopped, finished or canceled jobs in the recycle bin. A suitable message is issued if this is not the case. You can set one or more marked jobs to "finished" (or "canceled") using "Mark as Finished" (or "Mark as Canceled") in the context menu.
Delete jobs
Proceed as follows to put one or more jobs in the recycle bin:
1.Mark the job(s) in the job list and select "Stop" in the context menu or click the "Stop Job" button in the "Job" view (see Start / Stop).
2.Leave the job(s) marked and hit the Del key or select "Put in Recycle Bin" in the context menu. A warning displays that you must confirm with "Continue". The marked jobs are then removed from the job list.
Retrieve jobs from the recycle bin
Proceed as follows to retrieve jobs from the recycle bin:
1.Click the recycle bin icon. The job list now displays only the jobs that are in the recycle bin.
2.Mark the job(s) that are to be retrieved and click the "Restore" button. The jobs are removed from the recycle bin list.
3.Click "Close" to quit the recycle bin.
Delete jobs permanently from the recycle bin
Proceed as follows to delete jobs permanently from the recycle bin:
1.Click the recycle bin icon. The job list now displays only the jobs that are in the recycle bin.
2.Mark the job(s) that are to be deleted permanently and click the "Delete" button. The "Delete Jobs" dialog displays. If needed, you can exclude single jobs in the list from being deleted by disabling the relevant check box. After you confirm the dialog with "Continue", the dialog closes and the respective jobs are removed permanently from the recycle bin list.
3.To view the full job list, click the "All jobs" filter in the navigation pane. If you click a different filter, the content of the job list will change accordingly (see Filters).