
You can set the following parameters here:
After installation of the Prinect Cockpit, the user interface appears in the language that is set in the operating system of the computer (Windows Start menu: "Start > Control Panel > Regional Settings").
The system language is also set in the Prinect Cockpit if "Use system language" is enabled.
You can set a different default language for all the users in the "Choose language" list box. Each user logged in to the Cockpit can then set the language he/she wants afterwards in the "Preferences" tab in the "Users [username]" group. The language set here also determines the language in which error messages generated by the sequences (Qualify, Prepare,...etc.) display.
To apply the new language setting, you must confirm the setting with "Save" and then exit and restart the Prinect Cockpit.
When "Permission to store password" is enabled, Cockpit users can store their password when they log in to the Cockpit, making it unnecessary to enter the password again when they log in at a later date.
It is not possible to store the password if this option is not enabled.
This lets you set globally for all users the weekday with which a calendar week begins.
Grouping of manually added files
If you wish to add a large number of document files to a job, either in the "Prepress" tab of an open job or using the hotfolder function, you can select a block of files with multiple selection and add these files all at once, for example, by dragging-and-dropping them.
"Keep file groups as added" is enabled:
All files added are processed as a block, i.e. one after the other. In the course of this, an internal communication process (creating JDF and JMF files) is triggered each time. Each of these processes needs quite a lot of time.
"Keep file groups as added" is disabled:
You can speed up processing by disabling this option and entering a number greater than '1' in "Start creating groups when adding equals or more than ... files". Then the documents added as a block are grouped in the set size if you have at least as many documents as was entered in the box. The processes run only once for the files of one group when processing starts. This can save time noticeably. For example, if you set that at most 10 files will be grouped together and you have a job with 14 document files, you will then have two groups: one with 10 files and one with 4 files. The start procedures are now run only twice instead of 14 times.
Prerequisite: This requires that the files you want are selected together when they are added.

Note: For large jobs with a great number of files, grouping files can speed up your work considerably. However, in this case, the system no longer shows the progress of each individual file.
Add Files Defaults
If the "Always show the 'Copy Files' dialog" option is set, the "Copy Files" dialog displays each time before you add new documents to a job. You must answer the query before you can add the files.
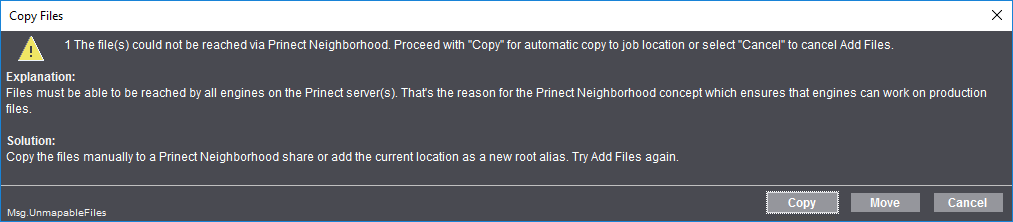
The files are added without the dialog showing if you disable this option.
When you enable the "Document Storage" option, copies of the original documents in the state they had before processing with the Prinect Workflow will be saved in the system.
Files whose names are based on the scheme "<FileName>_p<NumberList>.pdf" are treated as correction pages if "AutoReplace Correction Pages" is enabled (default setting). For example, the "NumberList" scheme for <FileName>.pdf is interpreted as follows: "brochure_p2,4.pdf" contains correction pages 2 and 4 of "brochure.pdf".
Correction pages are not replaced automatically if this option is disabled.
Changing this option setting immediately impacts all Qualify sequences. Jobs that are already processed are not affected by this.
This is where you can set preferences for creating new jobs. All new created print jobs are assigned the parameters set here are as default; you can edit or overwrite them when setting up the jobs. You will find more details about job settings in: Sections in an Open Job.
"Marks and Colors" group
"Color standard" parameter
Here you select the default color standard for Prinect Manager color output. There are different color standards around the world:
•EURO (Europe)
•SWOP (mainly US/Canada)
•TOYO (Asia)
Parameter "Set new SpotColor to:"
Here, you choose how to handle newly defined spot colors:
•Output: The spot colors are output as individual spot color separations.
•Process: The spot colors are mapped to process colors. In this process, spot color mapping recipes or newly defined mappings present in the jobs are used — if present.
"Use ProofColor from Prinect Signa Station" option
Prinect Manager Workflow will import special spot colors defined in Prinect Signa Station (DieLine, ProofColor) if you enable this option.
"Automatic assignment of job colors to mark colors" parameter group
In this group, you define if and how colors present in the PDF files of the print job or set up in this parameter group will be used for the color marks. These colors are referred to as "Job Colors".
Automatically per Surface
The job colors are assigned automatically to the color marks for each surface if you enable this option. It is no longer possible to set up the mark colors manually. These settings are lost if mark colors were already defined manually (see "User-defined" option). Through this setting, the system automatically tries to avoid gaps in the color control bars.

Note: We recommend that you enable this option (default).
User-defined: Global
Select this option if you wish to manually assign colors to color marks. With this option, you can assign all job colors to the marks placeholders of the Heidelberg color control bars. Manual assignment of the colors to the marks colors has a uniform impact on the whole job. A suitable default setting is calculated if this option is enabled.
User-defined: In Layout
Select this option if you wish to manually assign colors to color marks. With this option, you can assign all job colors to the marks placeholders of the Heidelberg color control bars. The manual assignment of colors to marks colors affects only marks contained in the imported layout. If the job contains color marks not defined in the layouts, the manual assignment will not affect such marks.
Assignment of a job color to a mark color can differ from sheet to sheet. A default setting that is equivalent to "Automatically per surface" is calculated initially when this option is enabled. In other words, assignments can then differ per sheet, depending on the position of the data.
Allow spot colors for BCMY
It is possible to set spot colors to the "BCMY" process color code by enabling this option. By doing this, you can avoid gaps in the color control bar.
If a job does not have all of the CMYK process colors but their spot colors instead or even just spot colors, issues can occur in the "Optimized Color Workflow" when assigning the job colors to the mark colors because normally the process colors are expected in the order "CMYK". When you enable this option, the spot colors are assigned to the "BCMY" marks placeholders, making correct assignment possible.

Prerequisite: This function is designed solely for the "Optimized Color Workflow" with a set assignment of the job colors to the process colors and can be enabled only for this workflow. We recommend that you enable this option.
Print Order
This is where you set the preferences for the CMYK ink sequence. This sequence determines the overprint behavior of the process colors: the ink at the bottom is printed first.
"Submit print order to press" option
The sequence of colors specified in the job settings will be applied during printing if this option is enabled.
You can change the color sequence in a different location of the workflow if this option is disabled.
"Target Color Space"
The settings in this group solely affect the search in the color tables. The search is preferably by L*a*b* colors or by CMYK colors, depending on what is set.
A distinction is made between the "process" and the "output" target.
•"Process" applies to processing in the Prinect Manager.
•"Output" applies to the print output color space (press, proofer, etc.).
For the "process" target, use:
•CMYK..., else L*a*b*
If it is set for the process that the color values are to be taken from the color tables, the search gives preference to CMYK colors for the processing of colored objects. This means that the colors are replaced by CMYK representations, irrespective of how they were originally defined in the PDF file. Processing in the Prinect workflow is done in the CMYK color space.
L*a*b* colors are used if no suitable CMYK colors are found.
•L*a*b*, else CMYK
If it is set for the process that the color values are to be taken from the color tables, the search gives preference to L*a*b* colors for the processing of colored objects. This means that the colors are replaced by L*a*b* representations, irrespective of how they were originally defined in the PDF file. Processing in the Prinect workflow is done in the L*a*b* color space.
CMYK colors are used if no suitable L*a*b* colors are found.
•CMYK..., else error
If it is set for the process that the color values are to be taken from the color tables, the search gives preference to CMYK colors for the processing of colored objects. This means that the colors are replaced by CMYK representations, irrespective of how they were originally defined in the PDF file. Processing in the Prinect workflow is done in the CMYK color space.
Processing is aborted with an error message if no suitable CMYK colors are found.
•L*a*b*, else Error
If it is set for the process that the color values are to be taken from the color tables, the search gives preference to L*a*b* colors for the processing of colored objects. This means that the colors are replaced by L*a*b* representations, irrespective of how they were originally defined in the PDF file. Processing in the Prinect workflow is done in the L*a*b* color space.
Processing is aborted with an error message if no suitable L*a*b* colors are found.
For the "output" target, use:
•CMYK..., else L*a*b*
CMYK is set as the target color space if objects defined in CMYK are found in the input data. L*a*b* is set as the target color space if there are no CMYK objects.
•L*a*b*, else CMYK
L*a*b* is set as the target color space if objects defined in L*a*b* are found in the input data. CMYK is set as the target color space if there are no L*a*b* objects.
•CMYK..., else error
CMYK is set as the target color space if objects defined in CMYK are found in the input data. An error message is issued and processing canceled if there are no CMYK objects.
•L*a*b*, else error
L*a*b* is set as the target color space if objects defined in L*a*b* are found in the input data. An error message is issued and processing canceled if there are no L*a*b* objects.
"Take color definitions for new colors from color tables" option
"new colors" refers to colors that are added to the job by adding new input documents.
The preferences for new colors are taken from the Prinect Manager color tables when this option is enabled.
The preferences for new colors are taken from the PDF when this option is not enabled.
Color definitions for colors that enter the system through MIS import are always taken from the color tables irrespective of this setting if the MIS does not supply any values.
"Autoresolve naming conflicts for new colors" option
If this option is checked, the following actions are performed:
•All spot colors are checked for compliance and notation (e. g. CYAN to Cyan).
•All PANTONE extensions (CV, CVC, CVU, ...) are automatically changed to the new ones (C, U).
•HKS and PANTONE colors whose names only differ in their extensions automatically use one name. No difference is made between upper and lower case during the verification.

Note: We recommend that you always enable this option.
"Printing Process" group
This is where you can set profiles for print output (output profile) and for process standard. Click the "Change" button to open a dialog where you can browse to the desired profile file. This profile selection is used as the default if no other profile is selected. If necessary, you can replace these profiles by other profiles at a different point in the workflow configuration.
"Rename scheme for duplicate sequences" list box
In an open job, you can set up the processing workflow for the job in the "Processing" tab. When doing so, you can mark single sequences and display "Duplicate" in the context-sensitive menu. The sequence concerned is then duplicated and used in its modified form for processing this job. The duplicate sequence is renamed automatically to make sure that sequence names remain unique.
This is where you define how duplicate sequences will be renamed automatically. You can choose between the following schemes:
•Name_$ [<name>_<number>]
Example: HDQualify_01, HDQualify_02, etc.
•$_Name [<number>_<name>]
Example: 01_HDPrepare, 02_HDPrepare, etc.
"Job Home Name Scheme" list box
This is where you can define how the folder that is created automatically for each new print job will be named. You can choose between the following naming modes:
•Job Name
The folder uses the job name as its name.
•Job Name and Job Number
•Job Number and Job Name
•Job Number
"Name Scheme for Job Export" list box
This is where you can define how the folder that is created automatically for each exported print job will be named. You can choose between the following naming modes:
•Job Name
The folder uses the job name as its name.
•Job Name and Job Number
•Job Number and Job Name
•Job Number
"Rename Sheet Names for unique Sheet Names" option
When you enable this option, the system automatically makes sure that sheet names do not occur twice. This could happen if a layout assigned to a job has at least one sheet name that is already in the job currently being processed. In this case, the sheet names of the newly assigned layouts are changed to prevent the name from being used twice. All the sheets are always renamed with this function.
This option affects the following layout functions:
•Create new layout.
•Open a copy of a layout.
•Import layout: This lets you set up the renaming of sheet names in detail.
With these functions, the new, modified or imported layout may have sheet names that are already in your job. In such cases, it may be necessary to rename the sheets.
•The "Rename Sheet Names for unique Sheet Names" option is set:
·In the layout view mode > context-sensitive menu for the sheet "Properties" > "Properties > Properties of Sheets > Sheet Name": You can only enter sheet names that are not yet found in your job.
·The "Force unique Sheet Names in the Job" option is set by default in the "Import Layout" Window.
·The following is valid for the other two layout functions ("New" and "Open as Copy"):
The layout is used without any renaming if there are no naming conflicts.
If there are, the sheet names are renamed. The sheets are renamed based on the "Rename Mode" that was last set in "Force unique Sheet Names in the Job" in the "Import Layout" window. The layout is used if the sheets are renamed successfully.
If not successful, the "Rename Mode" is set to the rule "Old Name + Number". The number is incremented in steps of 10 until the layout can be used without any naming conflicts.
•The "Rename Sheet Names for unique Sheet Names" option is not enabled:
·In the layout view mode > context-sensitive menu for the sheet "Properties" > "Properties > Properties of Sheets > Name": You can enter every sheet name even if it is already in your job.
·The "Force unique Sheet Names in the Job" option is set by default in the "Import Layout" window.
The sheet names are never renamed for the other two layout functions ("New" and "Open as Copy"):
"Suggest page list name with prefix for layout import" option
When this option is enabled, page list names with the prefix "PL_" are suggested for new page lists when importing sheet layouts.
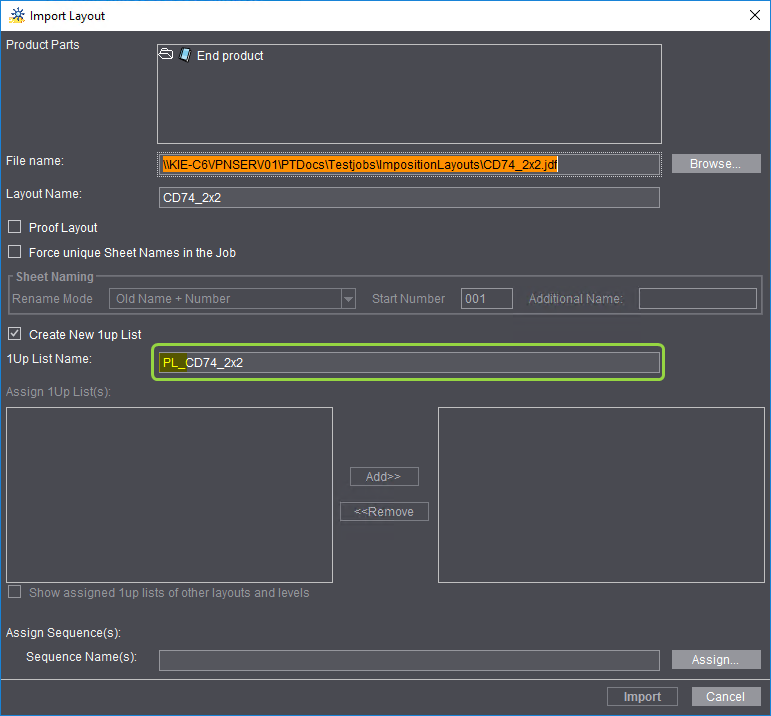
The layout name without the prefix is suggested each time for the page lists if this option is not checked.
"Name Scheme for Operations" list box
This is where you define how operations created automatically will be named:
•Sheet description
•Sheet name
•Sheet description and sheet
•Sheet and sheet description
This is where you can set that warnings will be issued in certain cases.
"Paper Property Check"
"Warnings enabled" option
Different properties of the printing materials defined in a job are checked when this option is enabled. You can enable to check the following properties:
•Type of printing material for calibration
•Paper grade (ISO)
•Thickness
•Grammage
•Grain direction
•L*a*b* values
•Size
An appropriate warning is issued if inconsistencies should occur between the job settings and the material parameters defined in the output sequences used.
"Page Assignment: Difference check between the size of the trimmed layout and the TrimBox of the PDF" (TrimBox)
"Show a warning if the difference is out of bounds" option
If this option is enabled, the system checks whether the difference between the size of the trimmed layout and the trim box set in the PDF document is within the set maximum values.
You can set the following reactions if the maximum values are exceeded:
•Manual
·Show a warning for pages without a TrimBox:(TrimBox)
A warning is issued if the PDF documents have pages that do not have a trim box.
·Show a warning for old layouts without trimmed size:
A warning is issued if sheet layouts are used that do not have a trimmed size.
•Automatic
The automatic settings are designed mainly for automated workflows ("Smart Automation").
·Issue warning and do not assign:
A warning is issued; the pages are not assigned automatically to the page list placeholders of the layout.
·Issue warning and assign:
A warning is issued; the pages are assigned automatically to the page list placeholders of the layout. The size of the page trim box is not changed.
·Issue warning and fit pages:
A warning is issued; the pages are assigned automatically to the page list placeholders of the layout and fit to the trim boxes of the layouts.
"Show warning if submitted sheet has pages without Prepare."
If this option is enabled, a warning is issued if a sheet layout has pages that were not processed by a "Prepare" sequence. This makes sure that all the pages to be output were processed by a "Prepare" sequence (e.g. "Color Conversion" or "Preflight").
"Warning if plate sets not set up correctly for printing"
If this option is enabled, a warning is issued if plate sets are not set up correctly for printing. This affects jobs planned in the MIS with the Planning Assistant and/or with the Scheduler.
This is where you can set that certain actions will run if there are issues with the system healthiness of the Prinect server.
"Display warning if disk space is below .. GB" option
A warning is issued if a disk space on the Prinect server falls below the set capacity when this option is enabled.
"Display error if disk space is below .. GB" option
An error message is issued if a disk space on the Prinect server falls below the set capacity when this option is enabled.
"Limit number of displayed jobs to" option
This option lets you set the maximum number of jobs that will display in the job list. For performance reasons, it makes sense to limit this number. By default, 2000 jobs display. It is a good idea to use the filter function of the job list if there are a great number of jobs in the system (see Filters and recycle bin). The filter functions affect all jobs in the system.
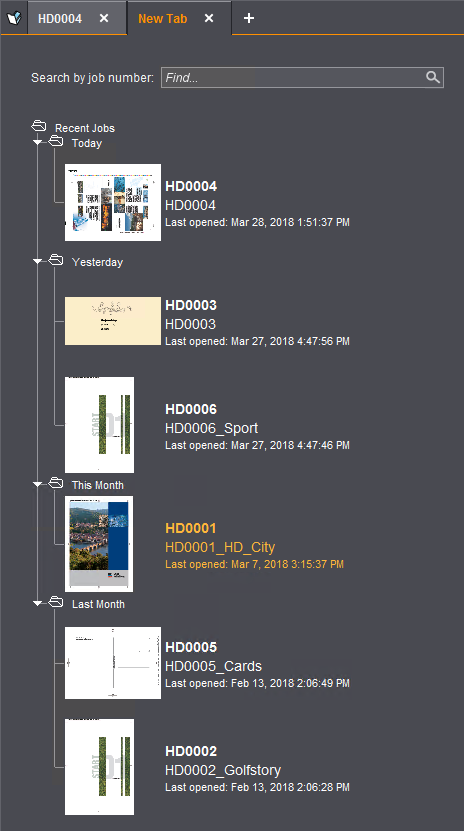
"Recent Jobs" option
This is where you can select how many jobs will display at the most in the "Recent Jobs" list in a job tab where no job is open.
"Delete ImpositionOutput files after job is finished" option
When this option is enabled, the ImpositionOutput files (TIFF-B files) are deleted automatically after processing of a print job is finished. By doing this, you can prevent the disk capacity of the Prinect server from running out of memory too fast. However, you can no longer output imposed files again in one easy step.
"Delete external ImpositionOutput files after job is finished" option
"External" ImpositionOutput files are also deleted if this option is enabled. These are files that are not filed in the "PTJobs" folder of the Prinect server.
"Delete proof files after job is finished" option
When this option is enabled, the proof files such as Softproof bitmaps or Proof PDF documents re deleted automatically after processing of a print job is finished. By doing this, you can prevent the disk capacity of the Prinect server from running out of memory too fast.
"Delete proof files after job is finished" option
"External" proof files are also deleted if this option is enabled. These are files that are not filed in the "PTJobs" folder of the Prinect server.
"Stock withdrawal: Allow manual input of quantities" option
You can replace production quantities of the planned operations partially or fully by pre-produced and stocked quantities in the "Binding", "Folding", "Cutting" and "Sheet-fed Printing" steps in the Planning Assistant. You can also manually enter quantities for stock withdrawal if this option is set. The quantities are determined solely from the available data if this option is not set.
You can add user-defined attributes to the job in the "Submit to Ganging" function (see User-defined Attributes). This is where you can define user-defined attributes.