
In "Administration > System", you can manage the engines and the Cockpit-integrated functional elements of your Prinect Manager.
Note: You can only operate the "System" section only if you are logged on as a user with corresponding administrator rights. The "System" section cannot be seen if you do not have these permissions.
The left part of the "System" section displays the engines that are located in the system environment of the Prinect Manager in a tree structure. You can view the single engines by expanding the structure nodes. The following engines are found in a standard configuration:
|
Engine |
|
|---|---|
|
APSC |
"APSC" stands for "Automatic Paper Stretch Compensation". In this case, this is the internal engine for automatic paper stretch compensation (Administration > Paper Stretch Compensation) and not the stand-alone application for automatic paper stretch compensation. |
|
ASArchiver |
The Prinect "Archiver" engine for archiving jobs. |
|
ASRetriever |
Engine for retrieving archived data. |
|
AutoPreset |
Engine for generating press presets and sheet preview. |
|
AutoLayout |
Engine for automatic imposition and layout preparation. |
|
AutoPage |
Engine for automatic page list output. |
|
AutoSheet |
Engine for automatic sheet output. |
|
CDM |
The Central Device Manager. This is where offset and digital presses, for example, are set up. |
|
CEPSConverter |
Engine for CEPS conversion of TIFF/IT-P1 files to the PDF format. |
|
CockpitServer |
Makes internal services for job processing and administration available. |
|
Color Carver |
Controls the Prinect color management. |
|
ContentHotfolder |
Controls the hotfolder mechanisms in the Prinect Manager. |
|
CopydotConverter |
Engine for the conversion of Copydot data (digitized plates). |
|
DocumentHandler |
Engine for the document-specific processing of PDF files. |
|
Imposer |
Engine for marks replacement and generation of PDF files for sheets and booklets. |
|
JobImExporter |
Engine for the import and export of jobs. |
|
Messenger |
Engine for sending e-mails, among other things for proof approval. |
|
Normalizer |
Engine for normalizing PDFs in Qualify sequences. |
|
PDConnect |
Connection management to the Package Designer. |
|
PDFCompare |
Engine for the comparison of edited and unedited (original) PDF documents. |
|
PlatesetterExternal |
CTP devices from other manufacturers can be set up and configured here. See Add External CTP Device. Heidelberg CTP devices are set up in "Renderer". |
|
PPFOut |
Engine for the CIP-PPF output to print and finishing equipment. |
|
Preflighter |
Preflight engine in Qualify and Prepare sequences. |
|
Recombiner |
The Recombiner engine combines separated PDF documents to composite documents. |
|
Renderer |
The Renderer engine processes all proof, CTP and digital print outputs. |
|
ResponseHandler |
Engine for processing customer approvals. |
|
TiffBHandler |
Engine for connecting Prinect Shooter workstations and/or third-party imagesetters via TIFF-B files. |
|
Timer |
Engine for running time-controlled and condition-controlled actions. |
|
Trapper |
Trap engine (spreading). |
If you click an element in the tree structure, the accompanying setup options are shown on the right hand side in the dynamic section of the tab.
This is where you can view the settings for the engine types and the parameters of the individual engines and edit the engine clusters.

State icons of the engines
|
Engine |
|
|---|---|
|
|
One of more engines of this type are available. |
|
|
No engine of this type is licensed. |
|
|
An engine of this type is not available (not started). |

Note: The following applies only if Prinect Portal Services is installed: A root alias is entered automatically for each Prinect Portal Services server using the name of the data exchange area ("EXCHANGE"). This gives the "prinect" user or the Prinect Manager engines access to this area.
Select Debug Level (context-sensitive menu command)
This function is for servicing, for example, to localize errors. Log files containing details about internal processes during job processing are generated for this.
The amount of information per engine that is issued with the relevant log file can be specified. The default setting is "Info". The other settings for further output should only be used temporarily, if a greater depth of information is required when troubleshooting for example, as the log file increases in size when the debug level is increased.
For "debug output", an appropriate debug tool must be installed and linked to the Prinect System. This is only necessary in exceptional cases for servicing purposes. Further information can be obtained from the service department.
To alter the debug level, mark the engine and select "Debug Level..." from the context-sensitive menu. You can choose between the following levels:
•Info
•Low
•Medium
•High
"Send Log to DTV Service" option
When you enable this option, all error messages that occurred through debugging are sent to the DTV service. The DTV service gathers the logs of all the Prinect components and makes them available to the Heidelberg Service team for troubleshooting. We recommend that you enable this option.
Confirm the dialog with "OK".
The debug level can be set to the same level for all engines of an area or for the server, depending upon which entry is currently marked in the left-hand area.
When an engine is selected, information about the configuration, e.g. icons symbolizing the processes, and engine settings display on the right of the window. The entries merely serve information purposes and can not be altered.
If an engine has several processes, each of the setups display in a table. The single processes are listed in the "Process Name" column.
You can enable or disable only the "JDF Keeping" option. If this option is enabled, information about jobs processed by the engines will be saved in corresponding sub-folders in "JDFStorage in the configuration folder (by default "PTConfig"). This has no influence on job processing. The information can however be helpful for troubleshooting if issues occur.
If the setting for "JDF Keeping" is modified, you must save this change with "Save". After that, you must restart all engines (with the Prinect Supervisor).

Note: The information shown in the right part of the window depends on the "Hide Clusters"/"Show Clusters" setting. You must use the "Hide Clusters" button to show the engine settings and paths.
Engines running internally, in other words, locally on the PC, and the corresponding settings are shown under "Cockpit" on the left. The settings in principle are equivalent to those of the server engines, except that in this case you cannot select a debug level.
You will find the following items on the right:
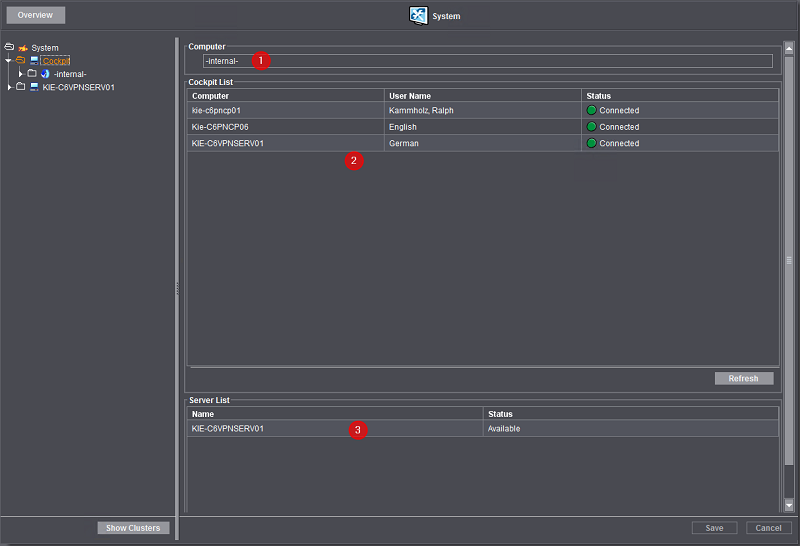
This displays the computer on which the currently invoked Cockpit is running. Generally, "-internal-" displays in the box.
This lists all the computer names on which Cockpits within the Prinect system environment are currently running. The names of the users logged in to the Cockpits also display. The "Status" column displays the connection state of each Cockpit with the Prinect server.
This lists all the Prinect servers that were referenced so far in the processed jobs, e.g. as sequences that use certain engines of a server. Normally, the status of these servers is "Available".
It can happen that a server that was used previously is not available because, for example, it was switched off or because it cannot be accessed because of network issues. If a job now tries to use a function of such a server, the Prinect System would wait until a timeout is reported and the function concerned canceled. If there is a great number of such cases, the whole Prinect Manager could "freeze" for a longer period of time. To prevent this from happening, after the first failed connection attempt, the server concerned is flagged as "not available" and all further attempts to connect are suppressed. If the processing of jobs that reference unavailable servers is aborted, you can check fast at this point whether this is because the server concerned is not available.
When you mark an unavailable server in the list and then click "Check", the system tries to connect again to this server. If this attempt is successful, the status of the server switches to "available" and all jobs referencing this server continue to be processed.
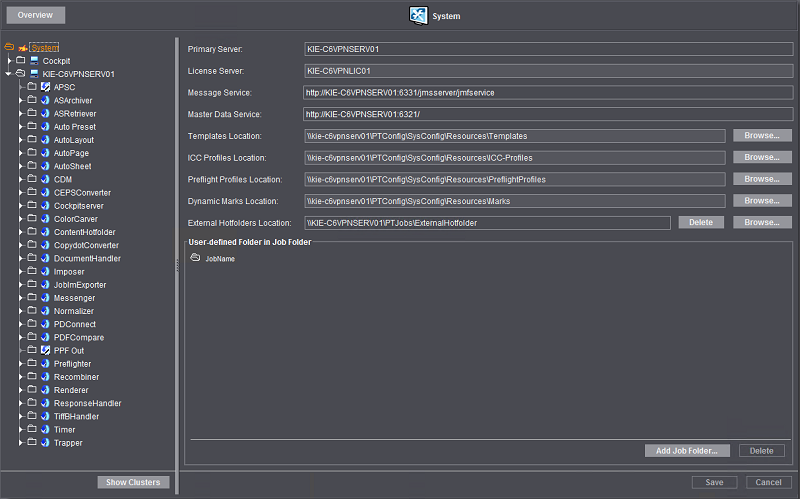
When you select "System", the primary server, the License Server, the URLs of the Message Service and Master Data Service, the file locations and the user-defined folders in the job folder (if any) display.
"Primary Server" box
Only the computer name of the master server is entered in "Primary Server" for your information.
"License Server" box
The computer name of the license server is entered in "License Server". You can edit the name directly in this box.
Any change not yet saved is highlighted by a green circle. A License Server that is not available or cannot be accessed (possibly because the name was typed incorrectly) is highlighted by a red cross as a warning. The symbol disappears after saving.

Caution: All necessary license options must be available on the license server.
By default, the license server specified during installation is shown. If you change this later, you must make sure that the new license server makes the required licenses available. This is not checked at this point.
"Message Service" box
The (URL) address of the "Message Service" is shown for your information only. The Message Service is responsible for internal transmission of messages in the Prinect workflow.
"Master Data Service (MDS)" box
The (URL) address of the "Master Data Service" is shown for your information only. The Master Data Service holds system-wide master data such as user and customer information, printing materials, ICC profiles, etc. and provides this data to all PCs logged in to the Prinect Manager.
The paths to the resources and templates are shown in the input boxes. By default, these are links, which are set up to the resources and templates supplied with the system during installation and are made up of the computer name of the server, the configuration directory (default: "PTConfig") and "SysConfig\Resources\...".
You can edit the path directly by typing into the box or set the path using the "Browse" function. If non-existent paths are entered, a red cross appears alongside the box as a warning symbol. No actual check is made, to find out whether the correct resources and templates are available in the specified path.


Caution: Alter paths only directly after installation!
As a rule, you should alter the paths immediately after installation only, for example if the ICC profiles used in the workflow are already stored in a folder other than the one specified in the Prinect system and if you want to continue using this folder. Alterations to resource paths can, under certain circumstances, lead to problems with existing jobs that, for example, try to access profiles that no longer exist after alteration.
As an alternative to altering the access path you can also add your own color tables and profiles to the pre-installed resources by using the relevant import functions in the "Resources" tab.
Changes to the paths will only be applied after clicking "Save".
With the Prinect Manager, new jobs can be created automatically based on an existing job by filing PDF files to a special hotfolder. Administration of these special "hotfolder jobs" is done centrally in the "Hotfolder" section (see Hotfolder). The initial job must be prepared accordingly for this. One item is that it uses a Qualify sequence in which "Hotfolder" is enabled and set up appropriately (see also "Hotfolder" option). In this connection, you can set up hotfolders specifically for each job as subfolders in each job folder (in "PTJobs" of the Prinect server) or centrally in an "External Hotfolders Location".
For the latter, you select the "External Hotfolders Location" with "Browse" (you can also create a new folder).
"User-defined Folder in Job Folder" section
Prinect Manager sets up a separate job folder for each job. In this section, you can define a sub-folder structure for these job folders within the job folders. This folder structure you specified will then be used for every new job.
The "JobName" entry is set by default and indicates that the main job folder is given the name of the print job. Click the "Add Job Folder..." button to create a new sub-folder. You can delete separate folders with "Delete".
When you select the Prinect (primary) server in the tree structure, the setup options for the server display on the right side. These options include storage locations (paths in the server's file system where specific files are stored), settings for the Master Data Service, JDF Connector Service, Analyze Point Service, Central Device Manager, Business Manager Connector Service, Web-to-Print Manager Connector Service (if a Web-to-Print Manager is connected), Root Alias, and the job location. These locations can be directories on the Prinect server or URL addresses, depending on the component concerned.
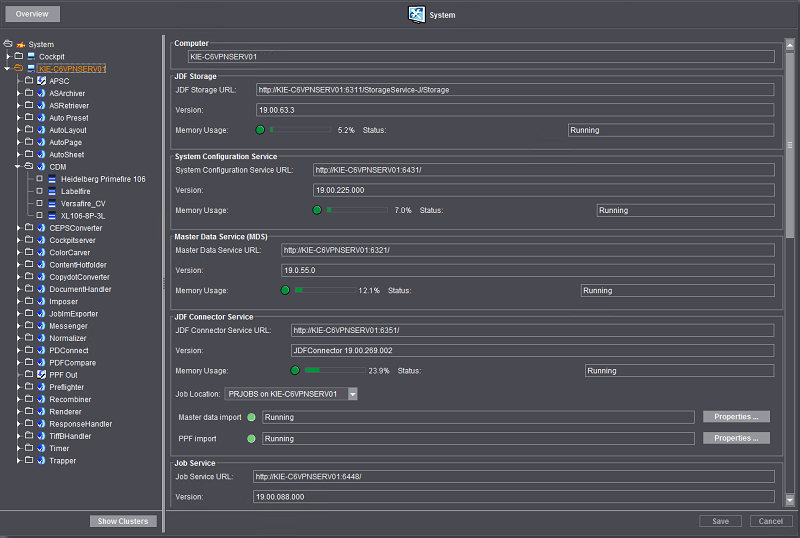
In this area, the name of the Prinect Server is displayed.
In this section, all information related to JDF Location is displayed. The JDF Storage is the path of the Prinect Server where JDF files ("Job Definition Format") are stored and managed. The JDF files contain dynamic information on the print jobs and the processing steps of required for the respective jobs.
"System Configuration Service" section
Information about the System Configuration Service displays in this section. The System Configuration Service provides a HTTP WEB address, through which the system configuration of the Prinect server can be accessed via an Internet connection. The System Configuration Service is used, for example, by the Prinect Portal.
"Master Data Service (MDS)" section
In this section, all information related to Master Data Service is displayed. The Master Data Service holds system-wide master data such as user and customer information, printing materials, ICC profiles, etc. and provides this data to all PCs logged in to Integration Manager.
"JDF Connector Service" section
This section displays all information related to the "JDF Connector Service". The JDF Connector Service provides the interfaces between the Prinect server and an MIS (Management Information System), e.g. Prinect Business Manager. The JDF Connector Service provides a HTTP web address, through which the external JDF components are connected.
JDF Connector Service URL
This displays the URL for the JDF Connector Service. A icon before the text box indicates whether the connection service is accessible or not. You can trigger a new verification request with "Refresh".
Job Location
This displays the default job location. If several job locations are defined in the Prinect neighborhood, you can select a job location for the JDF Connector Service.
Configuration of the JDF Connector Service

Note: In earlier versions of the Prinect Manager, this is where the JDF import settings were set up. Now the JDF Connector Service is set up in "JDF Import" in Administration. See JDF Import. See Configure JDF Import for more details about JDF import and about master data import and PPF import.
The Job Service provides a HTTP WEB address to make administration of print jobs possible via an Internet connection. The Job Service is used, for example, by the Prinect Portal.
"Analyze Point Service" section
In this section, all information related to Analyze Point Service is displayed. These details are mainly for the service team so that they can assess your system..
Inspection Reports
This is where the database usage is displayed if inspection reporting is set up for Prinect Inspection Control 2 and/or Prinect Inspection Toolbox. A yellow status means that old inspection reports were deleted because of the volume of memory used. The related job reports in Analyze Point, however, are still kept.
"Properties" button
Click this button if you wish to set data for the inspection reports in Analyze Point.
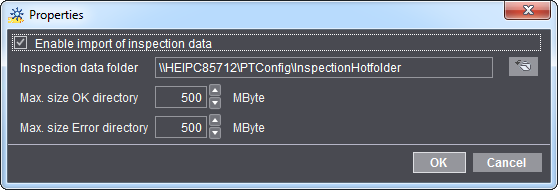
"Enable import of inspection data" option
When this option is enabled, all the reports in the inspection data folder are processed and can be seen in the operation evaluation (see Operation evaluation). The reports in the inspection data folder are not processed if this option is disabled. Reports that were already processed can still be seen in Analyze Point even after this option is disabled.
Inspection data folder
Prinect Inspection Control 2/Prinect Inspection Toolbox write the inspection reports to this folder. This folder must be set up as the output directory on the inspection system so that data can be transferred.
"Max. size OK directory" and "Max. size Error directory" boxes
The maximum size indicates which volume of data is saved in the OK directory and in the error directory of the inspection folders. Old reports are deleted automatically after the values are exceeded.

Note: The deletion of reports in the inspection data folder has no impact on the display in Analyze Point. The reports from the inspection data folder continue to be seen in Analyze Point even after deletion because they are saved separately for Analyze Point.
"Central Device Manager" section
This area provides information regarding the "Central Device Manager". The Central Device Manager manages Prinect System services ensuring communication with the various output devices. The Central Device Manage works on the basis of a database (Heidelberg Prinect Common Database) that is installed on the Prinect server.
"Database status" box
This box shows you details about the status of this database.
"Database Size" box
This shows how much capacity of the database is used. If its capacity reaches a critical level, please contact your Heidelberg service agent to clarify whether it is best or necessary to extend the database license.
Use the "Details" button to view an HTML page in your Internet browser with additional information about the Central Device Manager, Counterbox Manager and Prinect DFE.
Click the "Properties" button to define additional options for the Central Device Manager:
The settings you make in this dialog also affect the connection of offset presses via Prinect Press Center. You will find more information about the Prinect Press Center at the following point: How do I establish a connection to the Prinect Press Center?).
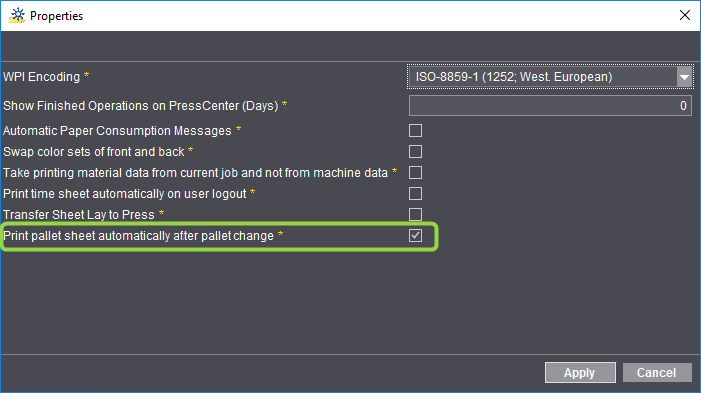
In the "WPI Encoding" listbox, you can change the encoding for the "Work Place Interface (WPI)" if necessary.
In the box Show Finished Operations on PressCenter (Days)", you can specify a period (number of days) during which to show finished operations in the PressCenter. When this period has expired, finished operations are no longer shown.
When you enable the option "Automatic Paper Consumption Messages", messages regarding the paper consumption of the press will automatically appear in PressCenter.
"Swap color sets of front and back" option
By default, the option is disabled. The way the option works depends on whether the machine has a perfector or not. The presence of a perfector and the number of printing units are made known through the configuration in the Central Device Manager (CDM).
•Machine with perfector
·Option is enabled
If an operation has color sets for front and back, the color sets are swapped between the front and back surface. There is no swap if this means that there are not enough printing units before and after perfecting.
Example: There is no swap in a 2/4 operation on a six-color press with perfecting in the third printing unit because an additional print run would be necessary.
·Option is disabled
If an operation has color sets for front and back, the color sets are not swapped between the front and back surface. The color set for the front is sent to the press as the front and the back as the back.
•Machine without perfector
·"Swap color sets of front and back" has no impact on presses without a perfector. If an operation has a color set only for the front, this color set is sent as it is (i.e. the front) to the press. If an operation has a color set only for the back, this color set is sent as the front to the press.
When you enable "Take printing material data from current job and not from machine data", repeat operations will not use the machine setup data that were defined the first time the respective operation was run but rather the current data set at the press (see also Use printing material data from the current job).
"Print pallet sheet automatically after pallet change" is enabled by default. This means that every time a pallet changes the related pallet sheet is printed automatically. You can disable this option if you do not want this.
"Business Manager Connector Service" section
In this section, you are given information regarding connection to a Heidelberg Business Manager MIS system, and you can also make some connections settings here.
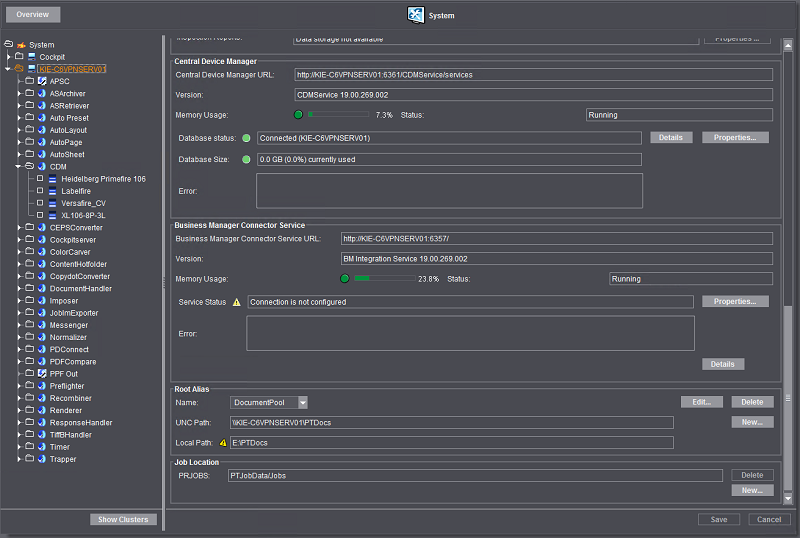
The "Business Manager Connector Service URL" box displays the URL to use for connecting to the Business Manager Connector Service.
Additional boxes provide information about the version, memory usage and the Connector Service status.
The "Service Status" box provides information on the Business Manager service. With the "Properties" button, you can check or edit the parameters of the connection to the Prinect Business Manager.
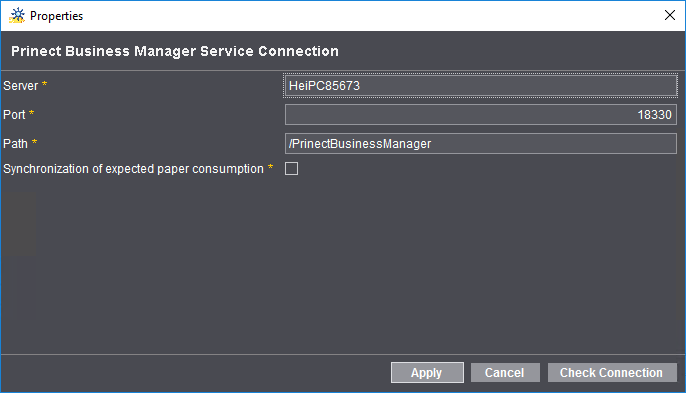
The "Server" box contains the name of the Prinect Business Manager computer. You can edit the name here if the name of the Prinect Business Manager PC has changed after installation of the Business Manager.
The "Port" box displays the port number of the Prinect Business Manager service.
The "Path" box contains the path of the Prinect Business Manager application.
The date on which it is expected paper will be used that is set in the Scheduler is automatically sent to the Prinect Business Manager if "Synchronization of expected paper consumption" is enabled.
Press the button "Check Connection" to test whether or not the settings are correct. The word "Server" appears in red and a warning icon is added if connection to the Business Manager cannot be established.
"Web-to-Print Manager Connector Service" section
This section displays only if a Web-to-Print Manager is connected to the Integration Manager. This section shows you status details about the Web-to-Print Manager Connector Service. The Web-to-Print Manager Connector Service controls communication between the Web-to-Print Manager and the Integration Manager.
The "Web-to-Print Manager Connector Service URL" box displays the URL address to the connected Web-to-Print Manager.
The "Version" box displays the version of the Web-to-Print Manager.
Use the "Properties" button to open the "Properties" window to set up the Web-to-Print Manager:
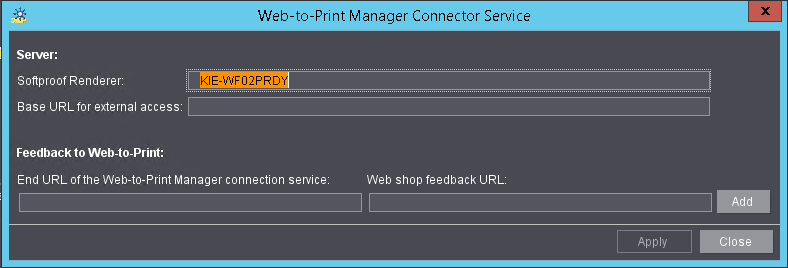
"Server" section
In "Softproof Renderer", you enter the name of the computer on which the "Softproof Render" engine is installed. This engine creates the soft proof data for the web shop. Usually, this is the central Prinect Manager server, but it can also be another computer on which the Prinect Renderer software is installed. This entry is needed to inform the Web-to-Print Manager on which computer the soft proof files will be created.
In "Base URL for external access", you enter the base URL of the web shop that is seen in the Internet, for example, "http://www.example.com" for http://www.example.com/w2pc/printshop.
"Feedback to Web-to-Print" section
In "End URL of the Web-to-Print Manager connection service", enter the short name of the Internet address of the web shop, e.g. "printshop" for "www.example.com/w2pc/printshop".
In "Web shop feedback URL", enter the URL which the Prinect Manage invokes for feedbacks to the web shop, for example, when milestones in production are reached. The administrator of the web shop will provide you with details about the feedback URL.
Click "Add" if you wish to set up other web shop Internet addresses. You can remove items with the "Delete" button (recycle bin icon).
A "root alias" is the short name for a certain folder that is essential for the Prinect Manager. Such folders contain information on the system configuration, for example, or serve as storage locations for job data. As these jobs are often accessed in the user interface, defining a short name makes configuration easier, as all you need to do is select the root alias name from a list box at the corresponding points instead of searching for the full path in the file system and entering it.
You can select the settings for the folders defined as a root alias (e.g. "DocumentPool", "PTConfiguration" and "PTJobData") in the "Name" list box.

Note: The parameters for the "DocumentPool", "PTConfiguration" and "PTJobData" folders were set up during installation of the Prinect software and cannot be edited here. It is also not possible to delete these alias items.
in this section you can assign new alias names for shared folders of the Prinect server. You can create such files in Windows Explorer on the server PC, for example, and share them in the network.

Prerequisite: A folder you want to set up as new root alias must be located on a local data medium of the Prinect server. This folder must also be shared in the network with read and write permissions for all persons or services that are to access it. The respective network share name must be made known.
A folder that you configured with an alias name becomes part of the "Prinect Neighborhood". This folder can be accessed very quickly when adding new job elements, for example. For example, to add documents to an open job in the "Documents" section, click "Add Files" to display a dialog of the same name.
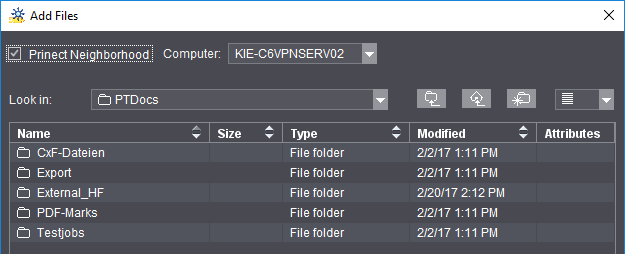
If "Prinect Neighborhood" is enabled, you can select the item you want from the defined alias names in "Look in" without having to look for the folder in the file system.
1.Click the "New" button.
The "New root alias" window appears.

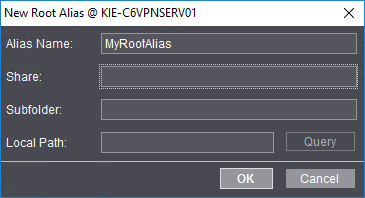
2.Enter the desired name in "Alias Name".
3.In "Share" select a folder shared in the file system of the Prinect server. The selected folder will be used as the root alias location.
4.To use a subfolder of the shared folder as root alias, type the name of the subfolder into the appropriate box. You must have created the subfolder in the file system beforehand.
5.Click "Query" beside "Local Path". When the path is correct, a green dot appears in front of the box.
6.Press "OK" to confirm the entries.
Click "Edit" if you wish to subsequently change a custom alias name. Below the list box for the alias names, the UNC path (computer name + share name) and the local path (drive letter + folder name) of the folder defined as an alias are displayed for the currently selected root alias. The local path refers to a "local" folder on a drive directly connected to the Prinect server. If the "Local Path" has no entry, the Prinect Manager accesses this root alias always through the "UNC path", i.e. through the network. This can cause performance to drop. For this reason, enter the local path manually in this box if necessary, e.g. "E:\PTConfig\MyRootAlias".
A "Job Location" is the folder where the Prinect jobs are stored. Normally, the "\PTJobs\Jobs" folder is defined as default job location folder. This folder is set up and automatically shared in the network during installation of the Prinect Manager. At the same time, this folder is assigned a "Job Root Identifier" named "PTJobData/Jobs". This identifier serves as an abbreviation for the display of the job location within the Prinect neighborhood. The folder "\PTJobs" is located on a hard disk of the Prinect Server. The "Job Root Identifier" is shown in the "PRJOBS" box and also in the list of root alias entries.
apart from a pre-installed job location you can also define one or several additional job locations.

Prerequisite: Before defining a new job location, you must define a new root alias for it. The new job location can then be the folder belonging to the root alias, or a subfolder thereof.
1.Click the "New" button.
The "Create Job Location" window appears.

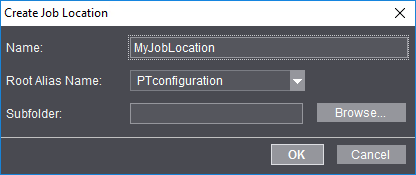
2.Select the root alias intended for the job location in the "Root Alias Name" list box.
3.Enter a short name for the job location in the "Name" field.
4.To use only a subfolder of the shared folder as job location, type the name of the respective subfolder in the respective box. You must have created the subfolder in the file system beforehand.
5.Confirm your inputs with the "OK" button.
6.Restart all the Prinect services.
You can exit and restart the Prinect services with the Prinect Supervisor. The Supervisor can be operated in the "Prinect Maintenance Center".

Caution: Jobs are deleted from the system!
If you delete a job location which contains data from jobs which have already been processed or are currently being processed, then these jobs are removed from the system! In such a case, the Prinect Manager can find itself in an undefined state. For that reason, be very sure that you delete a job location only when it has no job data.
It is generally recommended that you use the predefined folder as the job location. If there is no longer enough hard disk space in this folder, you can create a new folder on a free drive, configure it as a root alias and then as a new job location.
CTP devices of third parties are set up in "PlatesetterExternal". Because such devices generally do not have the same direct data exchange capabilities like Heidelberg CTP devices, a folder in the file system is used for data exchange with the Prinect Manager and this folder is monitored by the Prinect Manager.
Proceed as follows to set up an external CTP device:
1.In the tree structure, mark the "PlatesetterExternal" folder and select "Add Device" in the context menu.

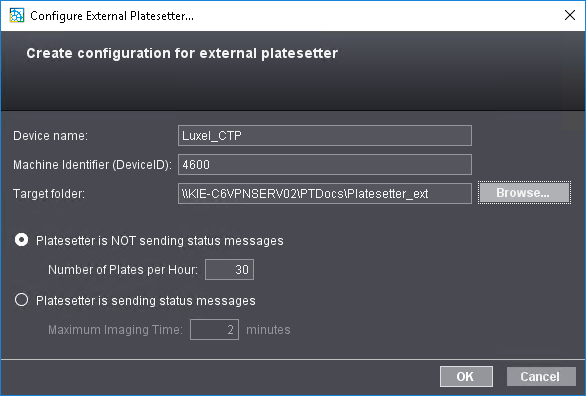
2.Give the device a name and enter the machine identifier.
3.In "Target folder", you can use "Browse" to select a target folder for data exchange in the file system of the Prinect server or to create a new folder. We recommend that you set up the folder in one of the network folders (PTTransfer or PTDocs) shared in the Prinect system environment because this folder must be accessible in the network even when security is enabled. See Security.
4.Which option you enable, either "Platesetter does NOT send status messages" or "Platesetter sends status messages", depends on whether the CTP device can send suitable status messages to the Prinect Manager. If necessary, ask your Heidelberg support or the support of the CTP manufacturer for details. If the CTP device cannot send any status messages, enter the imaging speed of the CTP device in "Number of Plates per Hour". We recommend specifying the maximum number of possible plates that, according to your experience, can be produced in the most adverse case (complex content) because imaging can vary depending on the content and this number is used for precise scheduling. This value is needed, for example, for the Plate Pilot or the Scheduler.
5.Confirm the dialog with "OK". The new device is set up and is available as an output device in the Prinect Manager.
If "System" is selected in the tree structure, you can add other computers to the system in addition to the server using the "Add Computer" command in the context-sensitive menu or with "File > New > Add Computer". Only the network name of the computer need be entered in the dialog.

Prerequisite: The new computer to add must be accessible in the network neighborhood of the Prinect Server.
In this way, you can add an additional data server to the system, for example. Define a root alias for a folder on this computer so that the folder can be used for saving job data.
You can configure your own "Job Location" for this where all the job data will be saved. You can use the directory linked to the root alias to save the job contents if you do not wish to define a "Job Location" for this newly added computer. In this case, the job contents (PDF files) are saved separately from the JDF files. The job-related JDF files are saved in "Job Location".