
Creating Time Sheets of an Employee
Proceed as follows to create a time sheet:
1.Go to "Analyze Point > Employees".
2.Set up the "Month","Employee" and "Shift End" parameters.
•Month
This is where you select the month in which the time sheet was printed. Up to 12 months are available. The last 30 shifts display if you select "Current".
•Employee
This is where you select the employee whose time sheet will be displayed. All employees who have messages in the selected period are displayed.
This is where you select the shift for which the time sheet will be generated. As many as 100 shifts in the selected month are available.
What is a shift?
A shift is the period in which an employee was not logged out of the system longer than four hours. If an employee was logged out for a longer period, the last logout period is recorded as the shift end.
The time sheet is generated automatically and displayed at the bottom as soon as you have selected all the parameters.
What information is contained in the time sheet?
The following information displays when you have generated a time sheet for an employee.
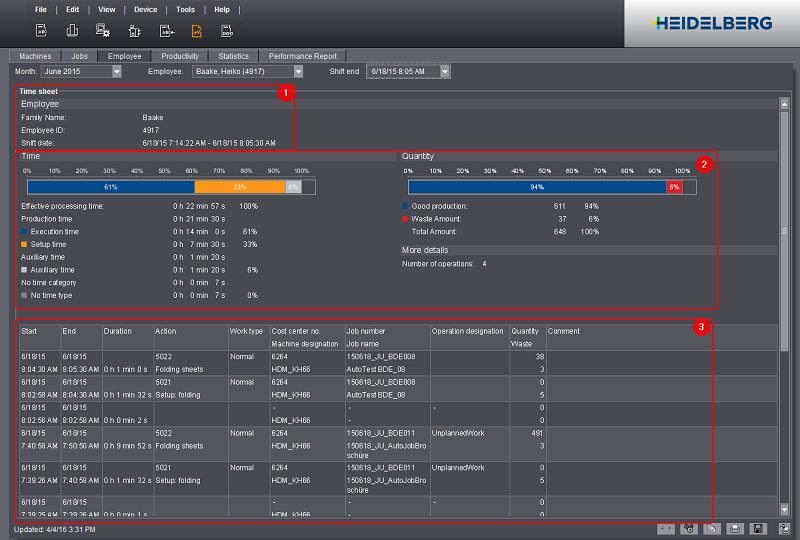
Employee (1)
This is where you can see information about the employee and the shift selected.
These items can be seen only if you enabled "Show Details" in the Presettings (see Customizing the Time Sheet Appearance). All times and quantities refer to the selected shift of the employee. You can find more details about the various parameters in "Time" group.
List of captured times (3)
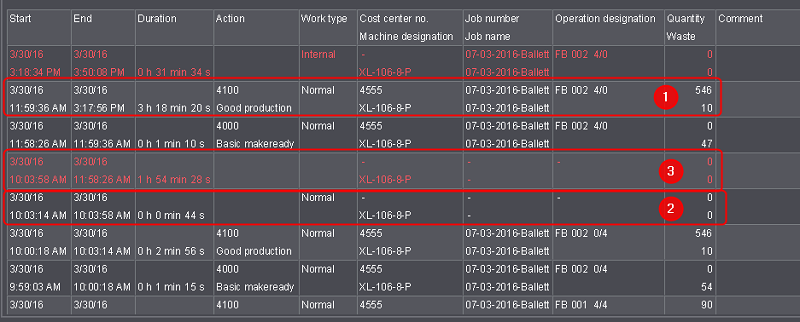
In the time sheet list, you can view up to 1000 actions of an employee within a shift. The following times are recorded:
•(1) All times which the employee reported manually or which were automatically booked as a result of him being logged in to a machine during the period in question.
•(2) All job-related and non-job-related times (for example maintenance or repairs).
•(3) Gaps in time that did not have a message booked, neither by the machine nor by the employee. Time gaps appear if, for example, an operator is logged in at the Data Terminal and does not report an operation (PDC message).
These times display as red blank lines in the time sheet. Refer to Mark unspecified times greater or equal n minutesfor more information about how to define as of when a missing period will be recorded.
The recorded data CANNOT be corrected electronically.

Note: The recorded times (actions) depend on several factors. For example, a machine connected to the Prinect Press Center can automatically send the times for basic makeready, waste sheets produced and good production.
·Basic makeready
·Waste printing,
·Waste printing.
A Heidelberg Versafire / Linoprint digital press on the other hand is immediately in good production. Only the warm-up period is booked at the makeready time.
Are times recorded retroactively?
No, times are not recorded retroactively.
This can be important, for example, to capture machine standstills. In case of a machine standstill, the machine operator must report an appropriate operation (PDC message) as soon as possible after the standstill has occurred. The time sheet indicates the time at which the operation (PDC message) was reported as the start time of the machine standstill.
Presettings for the time sheet
Customizing the Time Sheet Appearance
You can define general settings such as unspecified times in red type for the time sheet report. Make these settings in the Presettings of Analyze Point. See Presettings in Analyze Point.
Changing the time to industrial or standard time or changing the sorting order of actions
See Presettings in Analyze Point.
Print, Save and Export the Time Sheet
You can print the electronic time sheet generated for a staff member by clicking the following button.

If necessary, the staff member can make handwritten corrections on this printout and also enter the material required.
You can save the generated time sheet to a PDF file with the following button. Only the active time sheet is saved.

The procedure is described in detail in Saving the reports in a PDF file.
You can copy the data of the time sheet to the clipboard. You can then paste this data into other applications. To copy the data to the clipboard, click the following icon.

The procedure is described in detail in Exporting the report data via the clipboard.