Privacy Policy | Imprint | Prinect Know How | Prinect Release Notes ![]()
 Note: You can enable or disable "Automatic Output Mode" for Labelfire digital presses as well as for toner-based digital presses. Also in cases where large-scale print jobs for Labelfire presses are processed at night, it can be a good idea to disable the automatic output mode to avoid too great a capacity utilization of the High Performance Renderer causing the hard disk to overflow. See also Automatic output mode.
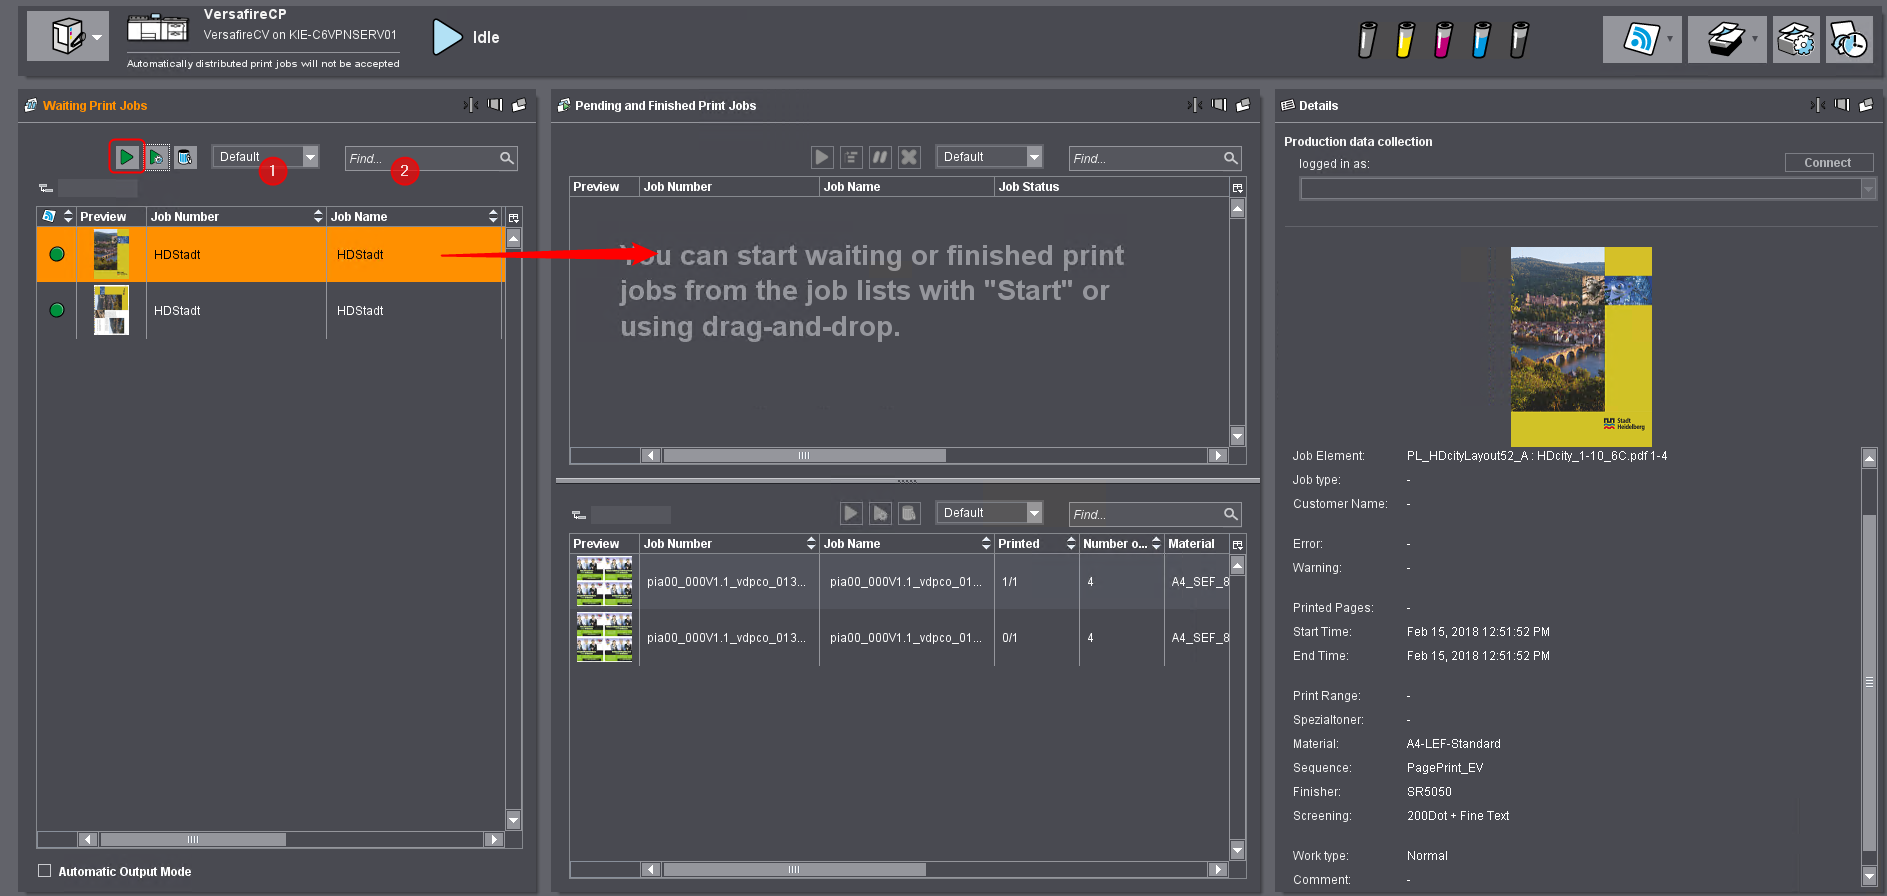
This window collects the print jobs that were submitted to output in the "Digital Printing" step.
Note: Like in "Jobs", there are also various views for the three windows ("Waiting Print Jobs", "Pending and Finished Print Jobs" and "Details") of the Digital Printing Terminal. You can find details about influencing the display of the window (show/hide, scale up/down, detach single windows) in: Setting Options for "Job List", "Job", "Job Notes" and "Digital Printing Terminal" Windows.
Columns in the "Waiting Print Jobs" and "Pending and Finished Print Jobs" lists
You can set up a column set in each case that will display in the lists.
If necessary, you can customize the number of columns shown and their order. To do this, click the "Customize Columns" button.
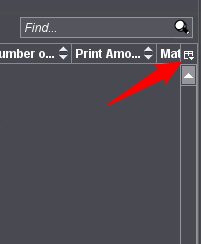
The "Customize Columns" window opens:
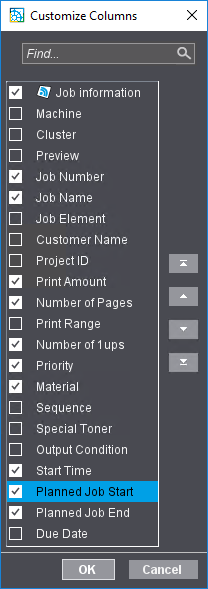
This is where you can select or deselect single columns and set the order of the columns. To do this, mark a column item and use the Move buttons to place the item at the position you want. The column that is at the top of this dialog displays on the far left in the table.
Columns "Planned Job Start", "Planned Job End" and "Due Date"
These columns display scheduled times planned in Prinect Scheduler. These columns are invisible by default but can be displayed with the "Customize Columns" function.
In this mode, the submitted print jobs are not collected for manual control of the output but are submitted automatically to the press. If a cluster of digital presses was selected in the device selection, the jobs are submitted automatically to the press that meets the criteria for automatic distribution and is the next one available. See Cluster setup. The "Waiting Print Jobs" window is dimmed. The order of printing is determined solely by the priority and the time a job was submitted. See Priority.
The "Waiting Print Jobs" window can nevertheless show print jobs that do not disappear because they cannot be printed right now due to the wrong paper loaded or the wrong fifth toner color (Versafire CV / EV) inserted. These jobs are identified by a warning icon. Waiting print jobs will be submitted automatically as soon as the paper and toner configuration of the device allows an output.
"Automatic Output Mode" option
You switch the Digital Printing Terminal to the "manual output mode" when you disable this option in the "Device configuration" dialog (you can enable it again at any time). In this mode, the print jobs are collected in the "Waiting Print Jobs" window according to their priority and you can submit them manually to the press.
You can submit a job manually to the press as follows:
•Using the buttons in the. Button bar above the "Waiting Print Jobs" list
•With the commands of the context menu of selected jobs. See Context menu for jobs selected in the "Waiting Print Jobs" list.
Button bar above the "Waiting Print Jobs" list
 Prerequisite: The buttons are operable if one or more jobs are selected in the list.
| Start: The selected jobs are moved to the "Pending and Finished Print Jobs" window and output immediately. |
| Start and pause: The selected job is moved to the "Pending and Finished Print Jobs" window and paused there. To output the job, you must select and start it there. |
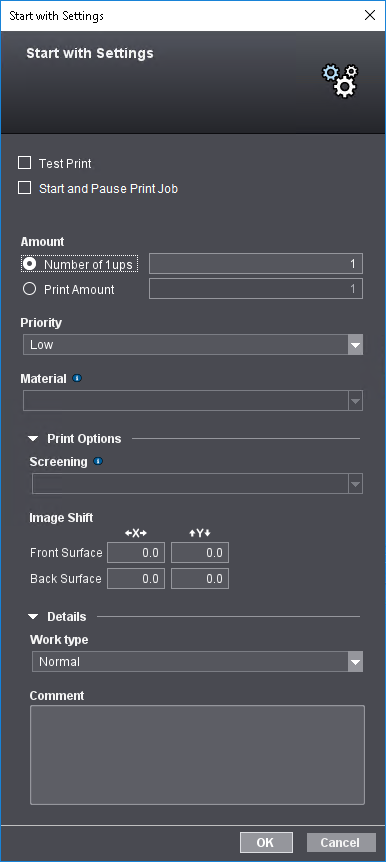
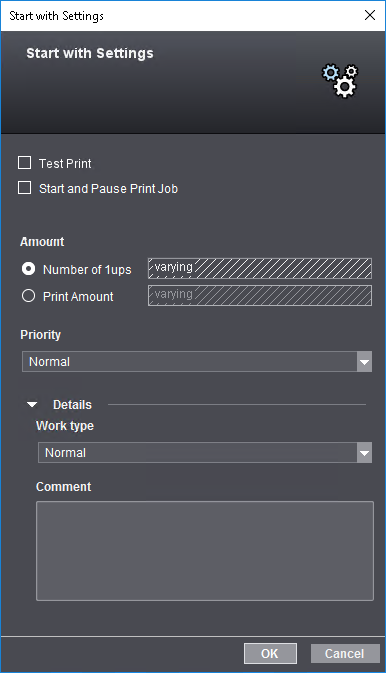
| Start with settings: The "Start with Settings" dialog opens when you click this button. See "Start with Settings" window. This is where you can define output options that may differ from the parameters set in the "Submit" dialog in the "Digital Printing" step. Confirm the settings with "OK" and the job moves to "Pending and Finished Jobs". |
| Start Test print: A test print of the job is printed; a single copy of all pages contained in the job is printed. The test print lets you check and, if necessary, adapt the job settings. The test print prints one copy of the job. When test printing has finished, the job is queued again. |
| Cancel: Processing of the selected job(s) is aborted. The job is moved to the "Finished Jobs" list. See Cancel jobs. |
Note: These commands are available also in the context menu of selected jobs in the list.
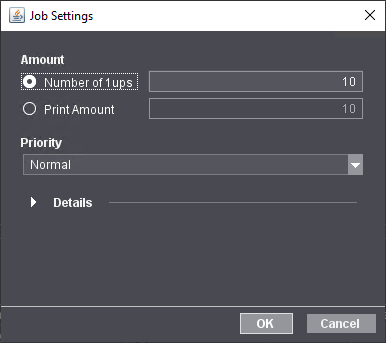
If you mark one or more jobs in one of the job lists in the Digital Printing Terminal, you can invoke the "Job Settings" dialog with the "Settings" command in the context menu.
If you mark one or more jobs in one of the job lists in the Digital Printing Terminal, you can invoke the "Start with Settings" window with the "Start with Settings" command in the context menu.
In this window, you can make last corrections to the print settings just before printing.
Note: The "Job Settings" window opens if you double-click a job in the "Waiting Print Jobs" or "Pending Print Jobs" list. The content of this window is identical to the "Start with Settings" window, but confirming it with "OK" does not result in the job(s) being submitted to printing but only in the entered parameters being saved and assigned to the print jobs. See Job settings.
"Machine" list box
Prerequisite: This option is available only if the print job concerned was submitted to a cluster of digital presses.
This is where you can select a specific machine in the cluster on which the job is to be printed.
Test print
Enabling this option will print a test print of the job, i.e. a single copy of all pages contained in the job is printed. The test print lets you check and, if necessary, adapt the job settings. The test print prints one copy of the job. When test printing has finished, the job is queued again.
Start and Pause Print Job
The selected job is moved to the "Pending and Finished Print Jobs" window and paused there. To output the job, you must select and start it there.
Amount
This is where you can set the number of 1ups and the print quantity. The print quantity is always the number of printed copies of the press sheets of the job (in the case of single 1ups, the number of copies). The number of 1ups is the quantity of printed 1ups.
•In the case of single 1ups, the number of 1ups is the same as the print quantity.
•With copies, the print quantity is the same as the number of 1ups divided by the number of 1ups per sheet (rounded up if necessary).
Material
Note: You cannot use the "Material" and "Screening" parameters if "Start with Settings" in the context menu was selected for several print jobs selected at the same time that are assigned to different presses. The parameters set on the press are used.
This is where you can select which paper will be used for the waiting print job. Only papers that are available on the press display for selection. This option lets you print a job that was already printed on a different paper.
If several print jobs are selected at the same time before you invoke "Start with Settings", you can define one joint paper grade for these jobs. This requires, however, that all selected print jobs are defined for papers whose dimensions match each other and those of the selected paper grade. This can be used for reprinting jobs already printed or for the case that jobs were not printed because the paper set in the jobs is not available.
Note: The paper parameters are checked for the following properties:
•Paper size
•Grain direction and
•gradation.
Priority
This is where you can define the priority for printing.
Print Options
This is where you can set single print and finishing options. The options available vary according to the output device selected. See also "Print and finishing settings" tab.
Details
This is where you can select a work type and/or enter a comment. See "Details" group.
"OK" button
Confirm the settings with "OK" and the job moves to "Pending and Finished Jobs" where it is first paused or started immediately, depending on the setting for "Start and Pause Print Job".
Context menu for jobs selected in the "Waiting Print Jobs" list
Open | Use this command to go to "Jobs" where you open the print job if it is not already open. |
Settings | This command opens the "Job Settings" window. The content of this window is identical to the "Start with Settings" window, but confirming it with "OK" does not result in the job(s) being submitted to printing but only in the entered parameters being saved and assigned to the print jobs. See Job settings. |
Start and pause | The selected job is moved to the "Pending and Finished Print Jobs" window and paused there. To output the job, you must select and start it there. |
Start | The selected job is moved to the "Pending and Finished Print Jobs" window and output immediately. |
Test print | A test print of the job is printed; a single copy of all pages contained in the job is printed. The test print lets you check and, if necessary, adapt the job settings. The test print prints one copy of the job. When test printing has finished, the job is queued again. |
Start with settings | The "Start with Settings" dialog opens when you click this button. See "Start with Settings" window. This is where you can define output options that may differ from the parameters set in the "Submit" dialog in the "Digital Printing" step. Confirm the settings with "OK" and the job moves to "Pending and Finished Jobs". |
Cancel | The selected jobs are deleted from the list. Processing is aborted. The aborted jobs are moved to the "Finished Jobs" list. See "Finished Jobs". |
Reprinting jobs with different setups
You can reprint several jobs (if "Automatic Output Mode" is disabled) by selecting the jobs in the "Waiting Print Jobs" list and then clicking "Start" or "Start and pause". You can use "Start with Settings" if you wish to change the priority and/or work type for all selected jobs.
Because several jobs are selected, "varying" displays in "Number of 1ups" and "Print Amount". If you change the priority or work type, these changes impact all selected jobs. All other output parameters stay as were set.
| The selected jobs are deleted from the list. Processing is aborted. The aborted jobs are moved to the "Finished Jobs" list. See "Finished Jobs" |
| Move a job (or several jobs) using drag-and-drop to the "Pending and Finished Print Jobs" window. |
"Column set" list box (1)
In this list box, you can select a predefined column set, define and save a new one with "Customize" or delete a custom column set. See also Customize a column set.
Search function (2)
The search function lets you search the "Waiting Print Jobs" list by job numbers. You can enter a known part of the job number into this box. All the jobs containing the string you entered are filtered out.
Privacy Policy | Imprint | Prinect Know How | Prinect Release Notes


