Privacy Policy | Imprint | Prinect Know How | Prinect Release Notes ![]()
What are movable computers?
Movable computers are computers that are not bound to a system or subsystem or that are no client of a Supervisor Master. Theses computers can be "moved". You can move movable computers to another location in the navigation pane using the context menu command "Move":
•To a system,
•To a subsystem,
•To a custom group,
•To the "Computer" group.
If you move a movable computer to one of these items, that computer becomes part of the respective system or group. The computer is then updated along with the system or group — except the "Computer" group.
You can also move movable computers from one system or group to another. See Movable computers in a system.
A group combines several computers all of which can be updated to the same software version. The "Computer" group is an exception because it is not intended for joint updating of computers. See The "Computers" group.
For example, you can use a group to temporarily remove movable computers, such as Cockpit clients, from a system to separate the time-consuming process of updating the system server from updating the clients.
The update process then looks as follows:
1.A new group is created.
2.The movable computers are moved out of the system and into the custom group.
3.The remaining system is updated.
4.Later, the movable computers are moved out of the group and back into the original system, i.e. the group is dissolved.
5.The system is updated again. This will update only the movable computers because the other computers in the system were already updated to the new software version.
You can create a custom group by clicking the plus button in the navigation pane header:
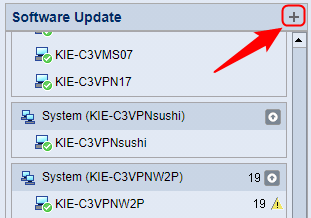
The "Create New Computer Group" window opens:
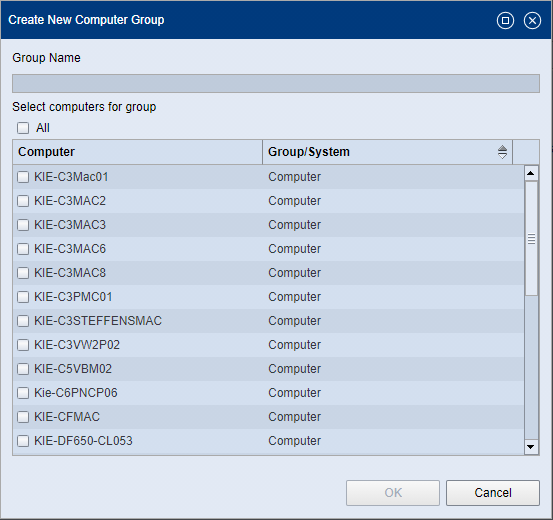
1.Enter a name for the group. Note that you must not use the following characters for the group name:
:
: | " | % | ’ | * | ; | < | > | ? | ^ | ` | { | / | } | ~ | / | \ |
2.In the list, highlight the computers you want to join the new group. All movable computers are offered. These are movable computers that are contained in one of the following structural elements:
•In the "Computer" group,
•In a system or subsystem or
•In another custom group.
This "origin" is displayed in the "Group/System" column. The names of the respective Master computers for systems or subsystems are listed here. The selected movable computers are moved to the new group.
If you enable the "All" option, all items in the list are selected.
 Note: If you want to include computers in the group that belong to a system, only the movable computers of the system are offered for selection. You cannot move a system server or computers bound to a system to a custom group.
3.Confirm the dialog with "OK".
The group appears in the navigation pane:
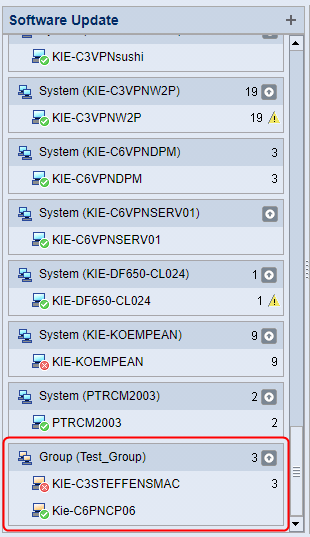
You delete a custom group by selecting the group title and using the context menu command "Delete Group". A safety query appears. If you confirm with "OK", the group is deleted and the computers it contains are moved to the "Computer" group. If needed, you can also move the computers of the group to another location (system, other group) and then delete the group.
The navigation pane of the Software Update view contains the "Computer" group. This group contains only movable computers that are not assigned to a system, subsystem, or custom group. Unlike a system or a custom group, the computers in that group are not updated at the same time. This group serves as a "pool" for movable computers.
You can open a context menu for the individual elements in the navigation pane.
Note: Not all context menu commands are available for all computers or groups. This depends, for example, on whether the computer is connected to the PMC or not, etc. These menu items are dimmed.
Context menu for a movable computer
The context menu for a movable computer can contain the following items:
•Send Message
•Remove from Maintenance Center
•Move to
•Checking the Prinect user's login data
•Update Information about Pending Operating System Updates
Context menu for a computer bound to a system
The context menu for a computer bound to a system can contain the following items:
•Send Message
•Move to
•Checking the Prinect user's login data
•Update Information about Pending Operating System Updates
The context menu for a system can contain the following items:
•Send Message
•Restore Subsystems (for systems only)
•Update Information about Pending Operating System Updates
The context menu for a subsystem can contain the following items:
•Send Message
•Dissolve Subsystem (for subsystems only)
•Update Information about Pending Operating System Updates
Context menu of a system computer
The context menu for a system computer (Production Server) can contain the following items:
•Send Message
•Checking the Prinect user's login data
•Update Information about Pending Operating System Updates
Context menu for a computer bound to a system
The context menu for a computer bound to a system can contain the following items:
•Send Message
•Move to
•Checking the Prinect user's login data
•Update Information about Pending Operating System Updates
Context menu for a custom group
The context menu for a custom group can contain the following items:
•Rename Group
•Delete Group
Context menu of a computer in a custom group
The context menu for a computer in a custom group can contain the following items:
•Remove from Maintenance Center
•Move to
Context menu commands in the navigation pane
The context menu commands that may appear in the navigation pane are listed below.
The "Send Message" window opens. Here you can enter a text message and broadcast it to selected computers in the Prinect system environment. See The "Send Message" window. | |
The Supervisor view opens and a new Supervisor Properties tab opens for this computer in the detail area. See Detail area in the "Software Update" view. | |
The "Computer Inventory" view opens and shows the inventory of the respective computer. See "Computer Inventory" View. | |
A dialog opens where you can rename the group. | |
A dialog opens where you must confirm the deletion of the group. The group will then be deleted. | |
The affected computer is removed from the PMC administration. This means that this computer will no longer receive any updates from the PMC and is no longer displayed in the PMC user interface. You can only remove "movable computers" from the PMC, that is, only computers that are not bound to a system or subsystem. | |
The movable computer is moved to the system or group offered in the drop-down list. | |
You can move the movable computers of the group to one of the destinations (system or group) offered in the drop-down list. | |
(system/group only) | You can add a movable computer from the drop-down to the system or group. |
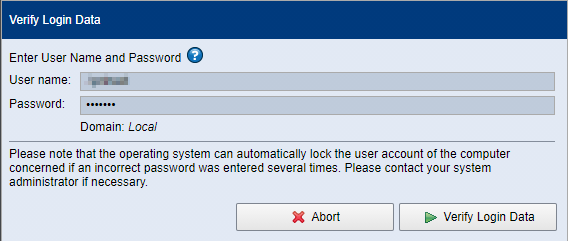
This allows you to verify that you have valid login data for a user account on the selected computer and are authorized to perform update installations on that computer. "User account" designates a user account for the operating system running on the computer in question, not a Prinect user account that is configured in the Cockpit user administration. The "Verify Login Data" dialog displays:
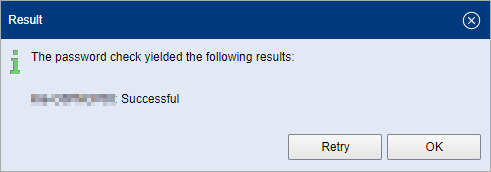
Check the username (if necessary, exchange it with a username whose password you know), enter the corresponding password and click on "Verify Login Data". The "Result" dialog displays:
| |
Managing the SQL Server administrator's login data | This is where you can check or edit the SQL database server administrator's password. There are the following submenu items for these functions: •Check Password Type the name of the SQL Server in the upper text box. Then type the password of this SQL server's administrator and click "Check Password". The result displays in a further dialog. •Reset Password You can reset the password if the SQL Server administrator's is known or if it was checked successfully. For reasons of security, it is recommended to do this. "Reset Password" opens a dialog where you must type the name of the SQL server and the old password. Then click "Check Password". If the check was successful, a further dialog opens where you can specify a new password. Repeat the password in the "Confirm password" box. Then click "Set Password". Attention! Make sure the password complies with password policy. See Password policy. A further dialog will only confirm the password if the policy is complied with. |
A service report is created. See Create service report. | |
Occasionally, information about operating system updates may not be sent to the PMC right away. Use this command to get this information from the computer in question. | |
Use this command to dissolve a subsystem. See Dissolve or restore subsystems. You must first confirm a safety query:
| |
Use this command to restore a resolved subsystem or resolved subsystems in a system. See Dissolve or restore subsystems. You must first confirm a safety query:
|
The service report comes with a ZIP file containing service data for the selected computer. Proceed as follows to create a service report:
1.Select the computer item in the navigation pane and use the context menu command "Create service report" (right mouse button).
The "Service Report" window opens:

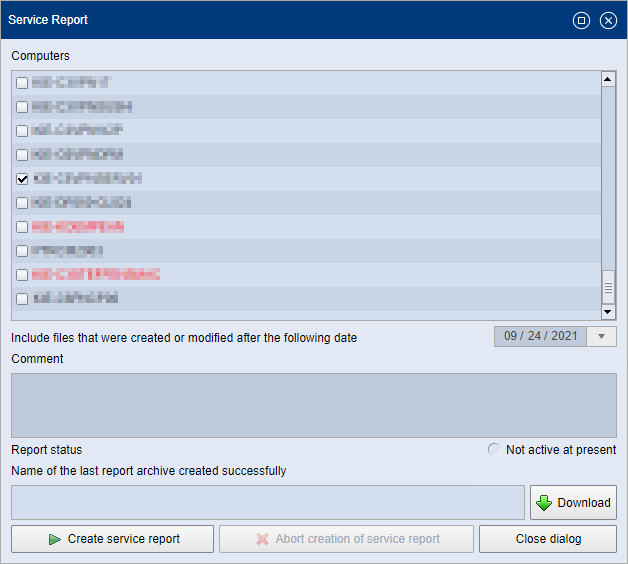
The selected computer is enabled in the list.
2.You can select a date from the date selection box. Service files created or modified after the selected date are then included in the report.
3.You can also enter a comment if desired.
4.Click "Create service report". The creation process may take some time. Upon completion, the following message appears:
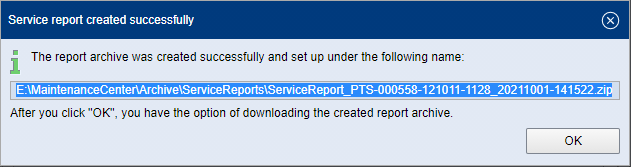
5.Confirm with "OK". A new entry is now displayed in the "Name of the last report archive created successfully" field:
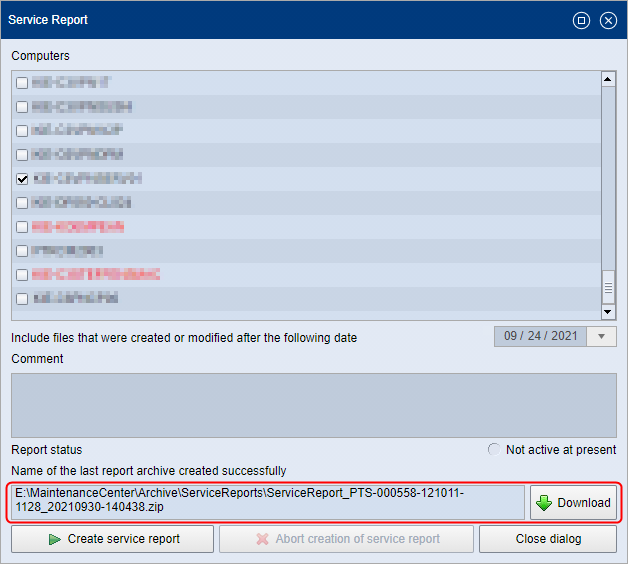
6.Click "Download". The service report is downloaded as a ZIP archive file to the download area of the browser you use to operate the PMC.
Privacy Policy | Imprint | Prinect Know How | Prinect Release Notes