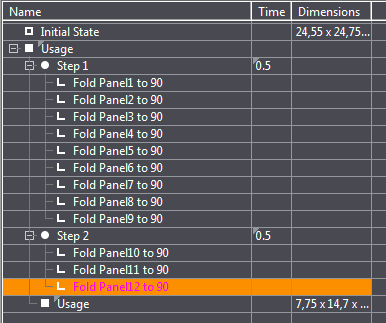
The folding sequence tree view represents the sequence of phases, steps, and actions defined in the 3D presentation of a package. The duration of each folding step in seconds and the dimensions of the model are displayed at the end of the folding phase. The sequence is structured in three levels:
•The basic level consists of phases.
Phases made up of one step or several steps are used to distinguish each of the final states of a folding sequence. As a rule, every 3D presenter drawing has two predefined phases: Initial State and Usage. The first phase is the normal state of the blank and corresponds to its 2D state after cutting; the latter is an editable phase where all panels are folded by 90 degrees until the blank has been erected completely.
•Each phase consists of steps which form the second level.
A step is a number of actions taking place simultaneously. Steps are used for better grouping and differentiating the processes in a particular phase. You should, for example, create individual steps for folding all the upright panels, dust flaps and glue flaps.
•Each step consists of a multitude of actions which apply on this step and form the third level.
An action is the basic motion directly associated with a particular panel. Actions determine how a panel is folded during a folding sequence; in a multi-part folding sequence, actions also define how the inserted part moves.

Note: All steps in a phase are accomplished one after the other.
All actions in a step are accomplished at once.
|
Column names in the "folding sequence tree" |
|
|---|---|
|
Name |
The name of the phase/step/action in the 3D presentation sequence. |
|
Time |
The defined time for executing a step. |
|
Dimensions |
Dimensions of the folded or unfolded 1up. |

Note: The Usage phase is the default phase in a project. Each time a project is created, a Usage phase is generated as well.
The Final state shows the state of the package in the last step of the sequence.
You can create phases in the tabular area as follows:
1.Right click on a phase and in the context menu select "Insert phase above" or "Insert phase below".
2.Type a name for the new phase in the "Edit phase" dialog and click "OK".
To rename a phase, click the name in the tabular area. The background turns blue and indicates that you can type a new name.
To move a phase within a folding sequence, click the phase and drag it to where you want it to be.
You cannot make any changes to the "Initial State" phase.
Creating steps is only possible in phases and only in the tabular area. Proceed as follows:
1.Right-click the phase and select "Insert step" from the context menu.
Alternative:
Right click an existing step and in the context menu select "Insert step above" or "Insert step below".
2.Change the folding time if necessary. 0.5 seconds are set as standard.
To move a phase within a folding sequence, click the phase and drag it to where you want it to be.
To delete a step, right click the step and select "Delete action".
Creating actions is only possible in steps and only in the tabular area. Proceed as follows:
1.Select the step you want in the tabular area.
2.Click the desired area on the canvas. A context-sensitive edit bar appears above the canvas. See Mode "Selecting 3D Presenter Panels".
3.Select an action in the context-sensitive edit bar: Fold, Prefold or Deform. The new step is created.
4.Specify the properties (angle, radius) of the action.
To delete an action, right click the action and select "Delete action".
Continue with List of inserted elements.
Back to Overview of the "3D View" tab.