Right-click on an object (for the layout sheet, See Context Menu of the Layout Sheet . A context menu with the following items appears:
|
Context Menu of an Object |
||
|---|---|---|
|
Delete |
Deletes the selected object. |
|
|
Here you can simultaneously select all objects sharing a property with the selected object. |
||
|
"Select" submenu |
||
|
By Color |
Selects all objects with the same color as the selected object. |
|
|
By Style |
Selects all objects with the same style as the selected object. |
|
|
By Attributes |
Opens the Dialog "Select Objects". |
|
|
Highlighted |
Selects only the current object. |
|
|
Deselect Highlighted |
Here you can simultaneously deselect all objects sharing a property with the selected object. See the description of menu item Select. |
|
|
Hide |
Hides the selected object. To show it again, choose Show in the general context menu. |
|
|
Convert to objects |
(Only in the "Layout" tab) |
|
|
Convert Parts |
(Only in the "Layout" tab) |
|
|
(Only in the "1up" tab) This is where you can construct a grid. In this process, grid lines are generated that run perpendicularly to the selected object and split the object in equal sections. After having clicked this menu item, you can choose the number of grid lines. Choose between 3 and 6 lines or click "More" to set any number of lines you want. |
||
|
Object Properties ... |
(Only in the "1up" tab) Opens the Dialog "Object Properties". |
|
|
Select viewed image |
|
|
|
Layers |
(Only in the "1up" tab) |
|
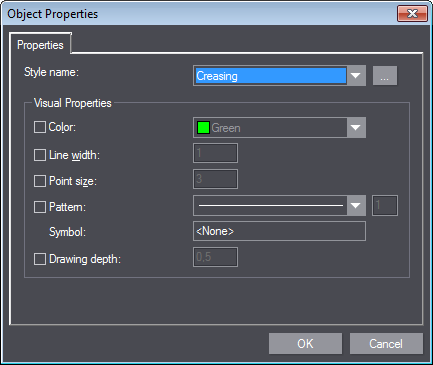
Every geometric object has a style which is global to the system and determines certain properties of the object, like the color, width and pattern of its structural line/curve. Changing the style globally automatically reflects on the respective properties of all objects having the modified style. However, the system lets you set the style-related properties of each object individually - e.g. you can have two lines with the same style, but with different colors, line patterns, etc., overriding the default style settings.
To open the "Object Properties" dialog, right click on the object and choose the "Object Properties" item in the context menu. As an alternative, you can also double click the object.
|
Controls in the Dialog "Object Properties" |
|
|---|---|
|
Style name |
This is where you choose the style to be assigned to the object. You can set its visual characteristics in the lower area. |
|
|
Click this button to create a new object style for the selected object. The dialog "Browse Styles" displays. Then click the "New Modification" button. The dialog "New Object Style" displays where you can specify the name and the properties of the style. |
|
Visual Properties |
Explanation of the setting options: See Tab "Visual". |
Back to Context Menus.