Each job list panel has a toolbar. In the toolbar you will find the buttons that let you influence job processing or change the view of the job lists:
Icon
Effect
Start / Restart Entire Job / Bracket
Start or restart of the selected job or bracket.
Start / Restart Job / Separation Selection
When you click this, a window opens where you can select the separations to output. Here, you can select the work type ("Normal", "Customer Related", "Operation Related" or User-defined from Prinect Cockpit) and enter a comment, select the priority and the number of copies. See Reprinting Jobs or Single Separations.
Pause
The marked, active job is paused. Multiple selection is possible.
Cancel
Processing of the marked job is aborted. Multiple selection is possible.
Delete
The marked job is deleted. Multiple selection is possible.
Set job to urgent
The job marked in the list of active jobs is given "urgent" as its priority. This means that the job is processed immediately as soon as the current job in processing is finished.
Context menu
Opens the context menu for the selected job that can have different menu items depending on the type of list. See Context menu commands.
Find
Opens the Search box. See Finding Jobs. The magnifying glass icon is cyan for filtered job lists.
Settings (table view)
Opens the View menu in the table view, where you can switch between the table view and the strip view and edit the columns in the table view.
Settings (strip view)
Opens the View menu in the strip view, where you can switch between the table view and the strip view and edit the columns of the table view.
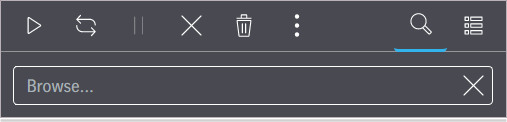
Finding Jobs
The Search button is located at the top right of all job lists. The search function lets you filter single jobs fast.
In principle, the search function acts as a full text search for the job name. For that reason, it is generally enough to enter a part of a search term to filter all jobs with this wording. If you do not enter enough information in the search term, too many jobs may be filtered out. You can also enter special characters.
All the jobs containing the string you entered display immediately and the magnifying glass icon for the filtered list is cyan. All the functions presented in the unfiltered lists are also available for the jobs shown.
Note: You cannot use wildcards such as "*" or "?" for your search.
All the jobs display again when you delete all the characters in the Search box (or click "X").
Change display of job lists
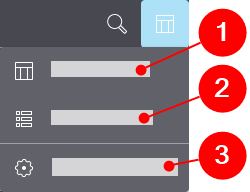
You can change how the job lists display. To do this, click the "Settings (table view/strip view)" button in the toolbar of the job list. See Buttons in the toolbars of the job lists. The view menu opens:
To view the job list in the table view, select the "Table view" item (1). In this view, you can sort the list items by clicking the column header which you want to sort in ascending or descending order. The arrows beside the selected column header show the sorting order. You can cancel sorting by clicking several times (arrow disappears).
To display the job list in the strip view, select "Strip view" (2). In this view, you can see all the data for each job at a glance. This view is particularly useful for viewing on mobile devices.
To specify which data display and in which order, select "Edit columns" (3). The "Edit Columns" dialog opens, showing you all the available columns. You can disable or enable the checkbox for each column separately. Accordingly, the data in question display or are hidden in the table view and the strip view.
In addition, you can customize the order of the columns in the "Edit Columns" dialog. To do this, click the column name (multiple selection of single items with the Ctrl key or Shift key held down) and drag-and-drop it to the position you want. Alternatively, you can use the buttons on the right to move the selected columns. Use the Refresh button to restore the original state (all columns display in the default order).
Note: The settings in the "Edit Columns" dialog also apply to the display of data in the strip view.
Explanation of the column headers in the job lists
ID:
Internal identification number
Job name:
Name of the print job
Status:
Processing status of the job
Order:
Order of the jobs in the job processing queue (only in the list of active jobs)
Job number:
The number of the print job is taken from a JDF-based system environment, e.g. from a MIS.
Color:
Color name of the separation
Perfecting:
Shows whether the printing plate is for the front or the back
Output Date:
Time imaging will run
Customer name:
Customer name from the job information of the upstream workflow system
Material Consumption:
This displays the number of finished plates and planned plates in a job and, if there is a reprint of single signatures, their total number. A tooltip explains what the indicated figures mean.
This information can be helpful especially with faulty/aborted jobs.
Creation date:
Time the job was created by Prinect Shooter
Priority:
Priority of the job (Urgent, High, Medium, Low)
Material:
Plate material used
Versions:
Information about versioning from the job settings of the upstream workflow system
Product Parts:
Information about which product part a job is part of displays if versioning of the upstream workflow system is used.
Layout Name:
The name of the layout used is sent by a JDF-based system environment, e.g. by a Prinect Manager.
Sheet Name/Elements:
The sheet name is sent by a JDF-based system environment, e.g. by a Prinect Manager.
Sheet Description:
A user-specific description of the sheet that can be set in the Prinect Cockpit.
Version Description:
A user-specific description of the version that can be set in the Prinect Cockpit.
Planned Start Time:
The scheduled start is taken from the job information of a connected Prinect Manager. It only displays the scheduled start. This scheduled time has no impact on automatic job processing in Prinect Shooter. The scheduled times are entered manually by the user at the Prinect Scheduler.
Deletion Date:
Optional date on which the job will be deleted automatically
Plate No:
Plate number of the upstream workflow system
Virtual Printer:
The configurable input channels of Prinect Shooter are called "virtual printers". Blank if the job was sent via Prinect/JDF.
Sheetinfo:
Automatically created string from the "Job name_Job number_Sheet description_F/B" boxes, with F = front/B = back.
If a job is made up of more than one separation, you can show or hide the separations in it with Expand or Collapse. This is done either by double-clicking single jobs or with the "Expand/Collapse All Jobs" menu command in the context menu. See Context menu commands.
Jobs in brackets display visually as one job, and you can also expand and collapse them.
Context menu commands
When you mark an item in the job lists and click the three-dot button, a context menu displays where you can invoke functions for job processing.
Whether or not a function is available depends on the context and on what options are installed. The commands in the context-sensitive menu are listed below:
•"Priority": Sets the priority of the job (Urgent, High, Medium, Low). The setting does not affect jobs whose processing is so far on that you can no longer change the processing order. See Print "Urgent" jobs next.
•"Statistics": Open the "Statistics" dialog with a table, showing you an overview of the type and number of plates required/used for selected jobs.
•"Expand/Collapse All Jobs": Expand or collapse all grouped jobs sent with the "File Based Device Information (FBDI)" protocol. You can recognize these jobs by a folder icon.
•"Move Job to Depot": Move the job to the depot. See "Job Depot" List.
•"Send to": Send a copy of the job to a virtual printer. A list box with virtual printers displays if several virtual printers are set up.
Job status
The status of all jobs displays as a meaningful icon plus description. When processes are running, you will see a progress bar on the job status. Some statuses are shown here as an example:
The job is being processed. A progress bar in the job list and in the status panel below the job list show at what stage processing is.
"Pause Jobs before Reprint" is enabled. This status is assigned to jobs affected by this. See System.
Wait for start time
In the Java-based UI in "Administration > Virtual Printer", you can set the interval for job processing in the "Job Handling" group. Jobs that are waiting to be processed at the period defined are given this status.
Aborted
Processing of the job is aborted manually by clicking "Cancel".
Error
An error occurred during processing.
Finished
Jobs in which conflicts occurred during processing and which were remedied by Prinect Shooter are also given the "done" status.


 Waiting
 Paused
 Paused (before reprint)
 Wait for start time
 Aborted
 Error
Error Finished