
Start, Restart, Resume, Pause, Finish Jobs
In the toolbars of the job lists, you will find the buttons needed for controlling processing of the selected jobs. See Buttons in the toolbars of the job lists.
Reprinting Jobs or Single Separations
Reprint jobs or single separations with modified output settings:
Prerequisite: You can see whether the "Pause job before reprint" option is enabled in "Administration > System". If it is not enabled, the whole job is reprinted without a chance to make any changes to the output settings. See Exposure Repetition.
|
|
Restart Job / Separation Selection To reprint a job or individual separations of a bracket with modified settings, select the job or job folder in the list of finished jobs or in the depot. |
1.Click the "Restart job /Separation Selection" button.
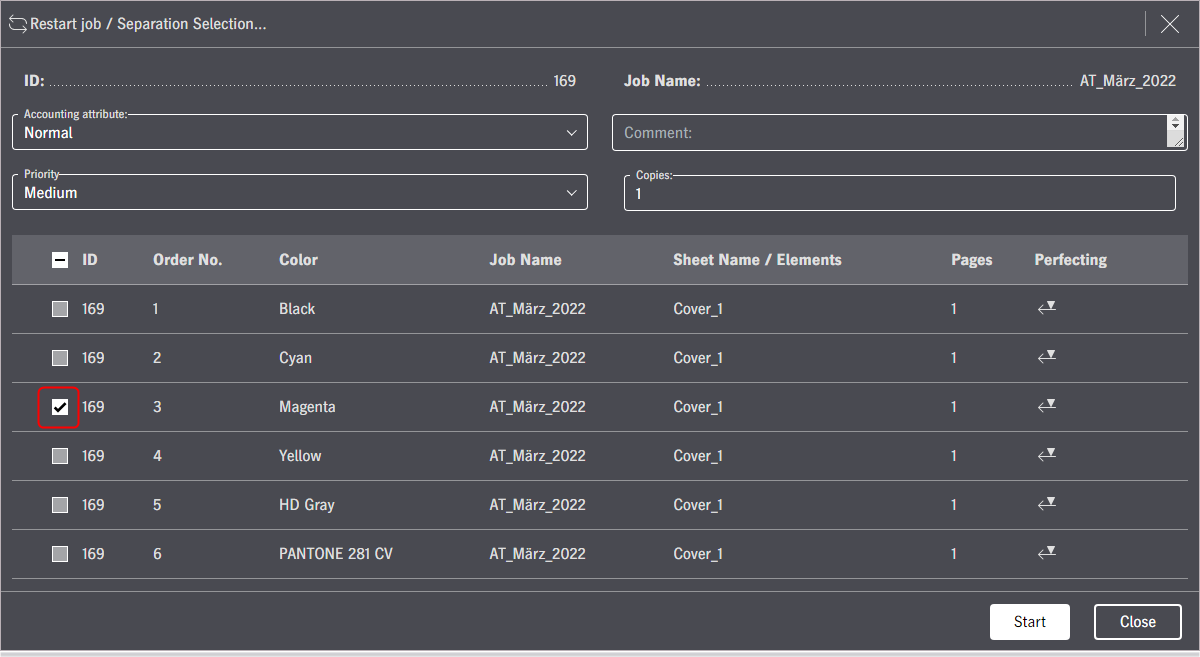
2.Set or remove the checkmarks before the separations you want.
3.If necessary, customize the order of the separations using drag-and-drop.
4.If necessary, change the work type in the "Accounting attribute" list box.
In the "Accounting attribute" list box, you can assign a work type within a Prinect system environment that marks the reason for reprinting the plates. This attribute is registered, for example, by "Prinect Analyze Point" and can be used for a later analysis. You can choose between the following work types:
•"Normal": The reason for the reprint is not specified any further when this option is set.
•"Operation Related": The reprint was run for operational reasons, e.g. because an imaged plate was damaged.
•"Customer Related": The reprint was run by order of the customer, e.g. because more plates were needed because the print quantity was upped. See Tab: Signatures.
•"User-defined": If user-defined work types were assigned in Prinect Cockpit, you can select them here.
5.If necessary, change the priority in the "Priority" list box. See Rearrange by changing the priority.
6.Type an explanation for the reprint into the "Comment" box.
7.If necessary, change the number of plates to be printed in the "Copies" box.
8.Click the Start button. A copy of the job is created in the Incoming Job List.
If you click "Close" or the X button in the top right corner, you save the selection and can start it later if necessary.
9.Wait until the job with a "paused" status displays in the Incoming Job List.
10.Start the job by clicking the "Start" button.
At this point, you can still select separations. In this case, click the "Start/Separation Selection" button.
Reprint without modified output settings:
|
|
If you wish to reprint one or more plates as they are, for example, because an imaged plate was damaged, mark the job concerned and click the "Start" button or select "Start / Job Modification" in the context menu. |
The status of the reprint jobs is first "paused (before reprint)" if "Pause job before reprint" is enabled. See Exposure Repetition. To print the jobs, select them in the job list and click the Start button.
The reprint jobs are processed and printed automatically if "Pause Jobs before Reprint" is not enabled.

Note: If you have many jobs waiting to be processed, and you want to output this component job urgently, you can change its priority to immediate output by setting "Urgent" as the "Priority" in the context menu. See Print "Urgent" jobs next.

