Automarks sets for packaging
In the case of automarks sets for "Packaging" or "Sheet Optimization for Packaging" jobs, you can set that 1up ID, 1up cover clip path mark, cutting die register marks, 1up label and precutting marks will be placed automatically. Control by way of rules is also possible in the "Packaging" mode.
The setting options for "Colors and Scaling" are equivalent to the settings for the marks in the "Imposition" mode and differ slightly depending on the mark (see Colors and Scaling for Automatic Marks).
Information regarding possible settings for Automarks Set Packaging:
Automarks Attributes
Restriction (Controlling with Rules)
 Note: Like in the "Imposition" mode, you can also use multiple Automarks sets in the "Montage" and "Packaging" mode (see Example 3: Use of Multiple Automarks Sets). In this context, make sure to clearly name the shape or specify suitable criteria to restrict the marks selection.
Automarks Attributes
Cutting Die Register Marks
Automatic "cutting die register marks" can be added to the corners of each cutting die (with offset). The positions of these marks are sent to the cutter that "punches" the cutting die. This is designed especially with CAM/CNC machines in mind.
The "Arc" mark from the "Standard" group is set by default. The cutting die register marks are set on the corners of a cutting die. The offset to the cutting die can be specified. An offset of, for example, 15 mm in x sets the register marks on the left 15 mm further to the left and on the right 15 mm further to the right.
If the offsets are set to 0 mm, then the marks are placed exactly on the four corners of the cutting die. If required, the "Delete, if this juts into another 1up" option removes one or more of the register marks to prevent them from being in the content.
1up Cover Clip Path Mark
With the attributes, you can make a 1up cover clip path mark bigger or smaller.
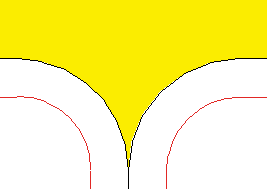
The default 1up cover clip path mark creates a clip path having the size of the 1up including the bleed. If a large ink pickup mark is now placed in the background of the 1ups, white flashes may occur at the 1up edges under certain circumstances.
To prevent this, a size reduction for the 1up cover clip path mark can be specified in the "Automarks Attributes" tab. The size can also be increased in 2 steps, for example to prevent printing of the background in the cutting area.
|
Original size (page/1ups)
|
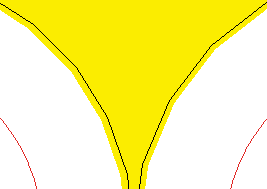
Zoom Out: The size of the 1up cover clip path mark (shown in white) is reduced by a predefined value in order to prevent flashes.
|
Background visible in the cutting area
|
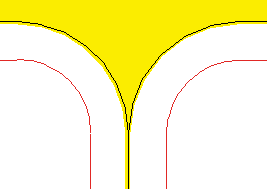
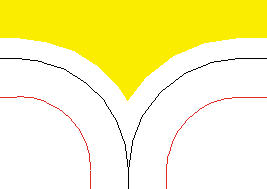
Zoom In: The size of the 1up cover clip path mark will be increased by one or two steps.
|
|
|
|
|
|
The default setting is "Original size".
When zooming in, adjacent 1up cover clip path marks can overlap. But the only effect is that marks in the background will be covered and therefore not displayed. This does not affect the contents of the 1up.
 Note: Flashes may still occur when zooming out in the graphics view since the view is usually heavily scaled and rounding errors may therefore occur. In the output (TiffB), the flashes then no longer occur.
Precutting Marks
One or more cutting dies are placed on the press sheet in the "Packaging" and "Ganging Optimization Packaging" product parts.
There is a cut block for each cutting die. This is found as a bounding box of the 1ups next to the dielines and can be extended with margins. Precutting marks can be placed (like with "Montage") in order to be able to cut them then.
The setup is the same as the setup of the precutting mark in the "Montage" mode. When the precutting mark is enabled, it is placed on the margins of the cutting die.
Use Inner Marks
If precutting marks are defined as inner, they are placed on the margins.
Delete, if this juts into another page
When this option is set, the mark is removed when the clip path of the mark collides with the clip path of another page. The original precutting marks display again when enough space is made for the mark, for example, by offset.
Cutting Die Label
The "Cutting Die Label" automark in the "Packaging" mode can be used to give cutting dies individual marks. This means that these marks do not have to be placed manually using the Cutting Die Inspector (analogous to the folding sheet label in the "Imposition" mode or the assembly block label in the "Montage" mode).
Like with the setup options of the assembly block label, you can set in the automarks attributes where the cutting die label is to be placed. For cutting die labels, the lay edge or infeed edge is not relevant as the reference point for the "Position" because of further processing. For this reason, there are four basic setting options for the position, with placement not related to the 1up in contrast to the assembly block label but always related to "beside cutting die". In addition, positioning centered on the cutting die is possible.
The "Rotated" option rotates the label so that the foot of the mark points to the 1up.
Enable the "Cutting Die Middle" option if the label is to be positioned in the middle. The label is then centered below the cutting die and not on the left.
If "Delete, if this juts into another 1up" is enabled, the mark is removed whenever the label collides with another cutting die.
Custom Position: With the 1up reference "Cutting Die (custom position)", it is possible to set the label according to a given reference point including displacement in the X and/or Y direction. You can specify an angle for Orientation. Currently, the angles 0°, 90°, 180° and 270° are supported, as well as a custom angle (counter-clockwise rotation).
When you specify a custom angle, you cannot select "Delete, if this juts into another page" because the trim path is formed from the surrounding rectangle. Rotation is done in relation to the reference point of the mark.
1up Label
Automatically placed print control marks similar to the folding sheet label; any number of 1up labels can be created.
When a label is selected, it is placed on all 1ups. You can define the reference point on the page onto which the label will be set and the position of the label relative to the reference point. In addition, you can define the orientation (0°, 90°, 180°, 270° and custom). You can restrict placement to left pages only or right pages only.
Tip on labels
Because each automarks set can have multiple labels, it can be a good idea to customize their names, for example, with regard to a rule you will use. To do this, simply click the "Type" box and enter a name. The original type name is added to the end in parentheses.