Packaging (only in the "Packaging" work mode and in "Sheet Optimization for Packaging")
The "Packaging Pro" and/or "Label Pro" license is a prerequisite in Signa Station for the "Packaging" step. We will explain the functionalities in this step in the sections below.
You can find a description of how to work in the "Packaging" work mode in Packaging (Packaging Pro, Label Pro).
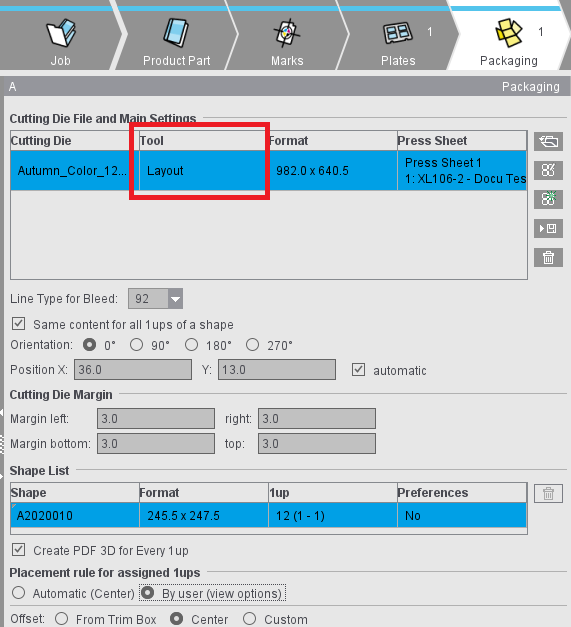
Cutting Die File and Main Settings
The table shows all loaded cutting die files with file name, tool and format. You have the option of changing the tool ID in the "Tool" box.
Notes on the table
"Press Sheet" column
The "Press Sheet" column indicates the press sheet and the related plate template on which the cutting die is placed.
In the "Sheet Optimization for Packaging" work mode: "Sheet Layout" column
This column displays the set sheet layout that the cutting die is assigned to.
The term "sheet layout" describes the combination of plate template and the number of cutting dies placed on the press sheet resulting from this plate template.
You can undo an optimization process that was run using the button at the bottom right edge of the table. This makes it possible to restore the situation before optimization (quantity of sheet layouts) as this can change fundamentally after an optimization. The button is enabled after an optimization process is run.

Note: The sheet layouts used display with plate and paper in the "Press Sheet" table in the "Results" step and in the HTML report.
Context menu
•"Duplicate Cutting Die"
Existing cutting dies can be duplicated via the context menu and added to the table. All properties of the source cutting dies are transferred to the newly created cutting dies. Multiple selection is possible. The newly created cutting dies are arranged below the respective source cutting die in the table and selected directly.
•"New Press Sheet" or "New Sheet Layout"
A new press sheet or a new sheet layout based on the appropriate plate template is generated and the selected cutting dies placed. The default position setting of the plate template is always used when a new press sheet/sheet layout is being generated.

Note: The "New press sheet" entry can only be selected if this action results in a change to the assignment of the selected cutting dies to the press sheets or sheet layouts. This is the case if all selected cutting dies are not on the same press sheet or if there are other cutting dies on this press sheet.
•Press sheet or sheet layout selected
The selected cutting dies are moved and placed on this press sheet or sheet layout as specified in the position setting. Any empty press sheet or empty sheet layout (without cutting dies) resulting from such an action is deleted automatically.
•"No Press Sheet" or "No Sheet Layout"
Assignment of the cutting die to a press sheet or sheet layout is deleted.
A dash displays in the "Press Sheet" or "Sheet Layout" column if a cutting die is not assigned to a plate template. If a plate template is deleted, the assignments of cutting dies to this plate template are also deleted.
"Positioning of Cutting Dies" column
The "Positioning of Cutting Dies" column shows the positioning of the cutting die analogous to the positioning buttons in "Plates" (see Points to note for "Plates" in the "Packaging" or "Sheet Optimization" mode). This setting refers to the press sheet. In other words, this value is valid for all the cutting dies placed on a press sheet.
In an automatic placement, the icon displayed is similar to that selected in the "Plates" step. This setting changes to "manual" (hand) if a cutting die is moved manually in the graphic view or if its position values are changed. You can edit the position setting of the press sheet in the context menu on this column. The placed cutting dies are positioned as indicated in this setting.
Button functions

|
Folder button |

|
PackagingPro button |

|
LabelPro button |

Note: The following requirements must be met to be able to use the LabelPro button:
- There must be at least one plate template in the product part
- No other cutting dies are open
- For all plate templates, positioning of the subject is set to whole sheets (see Subject Settings (positioning of the cutting dies))
In the "Ganging Optimization" mode:
- There are items in the "Input List for Sheet Optimization"
- A shape is set for all these items
In the "Packaging" mode:
- Documents with content are in the job.

|
Save CAD file |

|
Save CAD file to AutoToolPool |

|
Trashcan button |
•It is also possible to set a default folder for CAD files in "Preferences > Packaging" if you are working with cutting die files.
You can also load a cutting die file with drag-and-drop. See Drag-and-Drop for details.
Apart from details about the files, the table also displays all contours of the cutting die in the "Contours" column (number of contours in brackets), and in the "Relevance" column a percentage indicating how well the cutting die fits the contours demanded by the Multiple Sheet Optimizer (only if the Multiple Sheet Optimizer is enabled).
You can also view the shape by selecting the related tab above the preview window.
In the "Line Type for Bleed" list box, you can select the line types available for the selected cutting die.
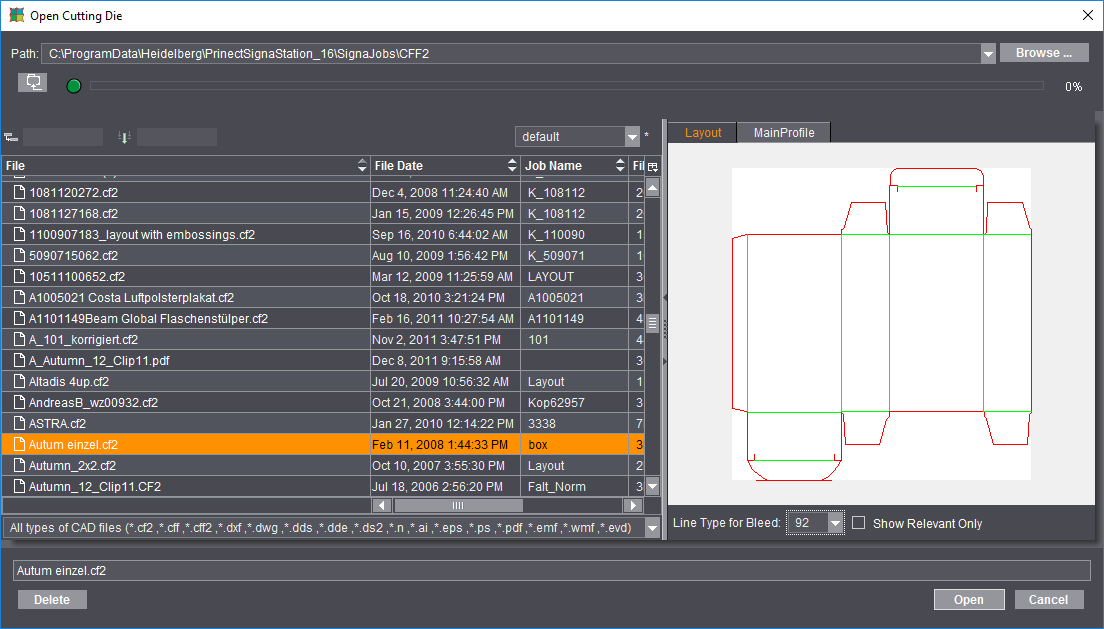
Besides the most frequently used files of type CF2, CFF and CFF2, you can also load or import other types of CAD files as cutting dies. Basically, there are three different procedures when opening the cutting die file:
·Cutting die files of type *.cff, *.cf2 and *.cff2 that were created, for example, with Package Designer or ArtPro.
You can load these files directly to Signa Station. You only have to open a correct CFF2 cutting die with Packaging Pro if you want to create a PDF 3D or specify the trim on the sheet layout.
·Cutting dies of type *.evd created with Package Designer
You can also load these files in Signa Station directly without automatically starting Packaging Pro and without requiring manual intervention. This means that evd files can also be processed in automated workflows. The evd files can be linked in an MIS-JDF or Multi-GangPart-XML. The prerequisite is that the evd files are saved in the specified network folder with the correct name. The result is a cutting die file of type "evd" if all contours of a job are available in evd format. A cutting die file in cf2 format is generated for mixed jobs.
If an EVD file contains several layouts, the "Open Cutting Die" dialog automatically appears when the file is opened in the "Packaging" step. All the layouts contained are displayed here and you can select the desired layout. If the EVD file is imported using drag & drop, the "Select Layout" dialog for opening the desired layout appears automatically.
·Other vector-based formats like, for example, AutoCAD files of type *.dxf or *.dwg, *.ai files created with Adobe Illustrator, DieCAD files (*.n), DDS (*.dds, *.dde, *.ds2), PDF, EPS/PS and Windows meta formats (*.wmf, *.emf)
Here, too, Packaging Pro launches automatically for the import. You first see the "Import Preview" window where you can set various filters for the import, for example, which line types will be assigned to cutting, creasing, etc. After the import, the die first displays in Packaging Pro where you can revise and correct data (e.g. incorrectly defined line type) and create the layout for the sheet.

Note: You will find details about these topics and working with Packaging Pro and Label Pro in their respective Online Helps that you invoke with the F1 key from that option or using the Help menu in Signa Station.
In the graphic window, the hulls of the loaded cutting die file have green lines.
Line Type for Bleed
The default value is "92".
All the lines of this type in the cutting die file are considered bleed lines. This should produce a closed path.
In the "Sheet Optimization for Packaging" work mode: "Order of Indices"
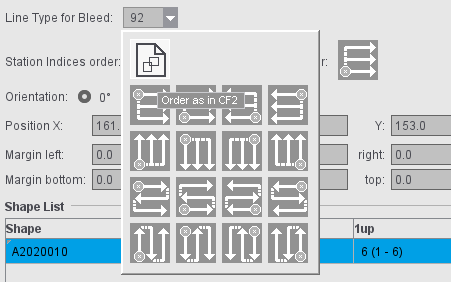
By default, the order of indices as set in the CF2 file is used. You can choose another order as the default for each cutting die by clicking the icon. The change immediately displays in the graphic window; repeating the optimization is not necessary. You can change the setting in the "Packaging" tab if a certain order is to be used by default.
In the "Sheet Optimization for Packaging" work mode: "Order of Station Numbers"
In "Preferences > Packaging > Order of Indices and station numbers" you can set the default order of station numbers. This presetting is effective when creating new jobs/job templates or product parts/product part templates in "Packaging" and "Sheet Optimization for Packaging" mode.
In the "Ganging optimization > Sheet Optimization for Packaging" mode, the sequence of the station numbers can also be specified directly in the "Packaging" step. This step is initially assigned the order of the station numbers from the default settings. If the sequence of the station numbers is changed, this has an immediate effect - without new optimization. When importing MIS JDFs, the order of the station numbers from the default settings is used.
Same Content for All 1ups of a Shape
When this option is set, a hull (shape) is automatically assigned the same content. In the graphic window, you will see that all the hulls have the same number.
The numbers are incremented if the option is not set and if a hull has different content. In this case, you must assign the contents separately for each hull.
The cutting die selected in "File" is rotated counterclockwise by the selected angle on the paper.
Manual positioning is possible using "Position X" and "Y".
In addition, you can use the four buttons to position the cutting dies horizontally or relative to the center of the paper (useful when working with a separating cut) and vertically or with the gripper margin. Positioning relative to the center is useful when working with a separating cut and is available only if multiple cutting dies are loaded.
By enabling the "automatic" option (to the right of the position values), the subjects are arranged according to the template in the "Plates" step (see Subject Settings (positioning of the cutting dies)). This setting applies per press sheet and therefore for all cutting dies that are placed on the same press sheet.
You can specify margins for cutting dies. By default, the values predefined in the Preferences in "Packaging" for the four margins (left, right, bottom, top) are applied to the job.

Note: In the case of cutting dies from program versions that do not support margins, the margins of these cutting dies will automatically be set to "0".
There are two different cases in the positioning of cutting dies:
•Jobs with all margins in all cutting dies with the value equal "0":
The cutting dies are positioned on the available space, evenly distributed.
•Jobs with at least one margin of a cutting die with a value unequal "0":
The cutting dies are positioned directly side by side taking into account the margins.
You can find examples for positioning in Positioning of Cutting Dies Depending on Work Style and Margin
Table showing the hulls of a cutting die file.
Each hull displays its name, styles (geometry data), number of 1ups and the defined presettings.
You can rename a hull manually and delete a selected one.

|
You will see the trashcan to the right of the table. You can use this to delete hulls that are no longer needed from the table. Deleted hulls are no longer shown in the graphic window. |
An accurate preview is calculated for each 1up (with all existing marks) when this option is enabled. You can disable it to save time when saving your data. In this case, a preview is created only of the first 1up.
Placement rule for assigned 1ups
This is where you define the placement for all the 1ups of the selected hull. The default in the "Packaging" mode differs from that in "Imposition" "By user" > "Center".