Note: Configuration of the PPF connection of a prepress system described below refers to prepress systems that are supplied by third parties and do not permit a JDF connection (only PPF connection). In a Prinect Integration Manager configuration (or Prinect Production Manager configuration), the Prinect Prepress Manager is normally installed and used as the prepress system. The Prinect Prepress Manager communicates with the Prinect Pressroom Manager via a JDF connection. No manual configuration is needed for the internal communication and data exchange between the Prinect Prepress Manager and the Prinect Pressroom Manager. All required settings are set up automatically during the installation.
In this workflow described below, a PPF/CIP3 file is generated for each job by the upstream prepress system and processed by the Prinect Manager. After a PPF/CIP3 file is processed, a job is created in the Prinect Manager and then appears in the job list. You can define whether this takes place manually or automatically via the process in each case.
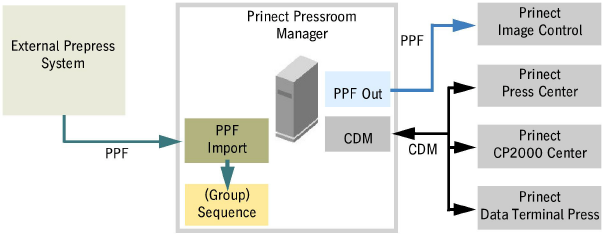
The machines are connected via the "Central Device Manager" (CDM). Machines that cannot be connected online (e.g. GTO 52) can be connected via a Data Terminal if wanted.
•Define the general process setting
•Attribution Rules (filtering information from the PPF/CIP file)
•Transfer curves (characteristic printing curve)
•Process job manually or automatically?
•Calculating area coverage values and ink consumption for paper only
Whether or not the Prinect Manager generates a new job from the processed PPF/CIP3 files depends on the job number and sheet designation that are integrated in the PPF/CIP3 files.

Note: A new job is usually generated only if the job number (from the PPF/CIP3 file) was not yet created in the Prinect Manager and the "Job attachment from PPF" option in the PPF import configuration was enabled. If this option has not been activated, manual intervention is necessary.
If several PPF/CIP3 files with the same job number but different sheet designations are generated by prepress, the Prinect Manager merges them into one job.
So that you can understand the effects better, we have listed some practical cases in the table below.
|
Import of the PPF file from the prepress system: |
Job ID already exists |
Option "Job attachment from PPF" is activated. |
Option "Job attachment from PPF" is deactivated. |
|---|---|---|---|
|
1. PPF file is imported: •Job number: 01-0001 •Sheet name: Sheet_1 |
No |
•The job is created automatically. •The job displays in the job list in the "Jobs" view and in the "Job Combiner" view. |
•The job is not created. •The PPF file displays in the "Unassigned jobs" section of "Job Combiner" and must be converted manually to a job. |
|
2a. Another PPF file is imported: •Job number: 01-0001 •Sheet name: Sheet_2 |
Yes from the previous file. |
•The job is not created. •Because the PPF file has the same job ID as the PPF file before. The sheet "sheet_2" is automatically assigned to the job generated beforehand •Prerequisite: The "Define new sheets" option must be enabled in the general process settings. |
|
|
2b. Another PPF file is imported: •Job number: 01-0002 •Sheet name: Sheet_1 |
No |
•The job is created automatically. •The job displays in the job list in the "Jobs" view and in the "Job Combiner" view. |
•The job is not created. •The PPF file displays in "Job Combiner" and has to be converted manually to a job. |
|
2c. Another PPF file is imported: •Job number: 01-0001 •Sheet name: Sheet_1 |
Yes from the import of the first PPF file. |
•The job is not created. •Case 1: The "Replace existing sheets" option is enabled in the general process settings. The existing sheet is replaced fully by the new sheet. •Case 2: The "Replace existing sheets" option is disabled in the general process settings. New separations from the new sheet are added to the separations of the existing sheet. |
|

Prerequisite: The user who is to perform the configuration must have the necessary permissions to be able to do this. The procedure for creating a new user is described in the section How do I create a new user account?.
In order for the jobs from a prepress system to be processed by the Prinect Manager and submitted to the machine, the following steps must be done:
1.A machine must be connected via the "Central Device Manager" (CDM).
2.The automatically generated sequence (SheetfedPrinting sequence or PagePrint/ImposedPrint sequence) for the machine created previously must be adapted if necessary.
Here you define what is to happen with the imported data. For instance sheet preview generation, ink zone calculation, calculation of the ink consumption, and to which connected printing press the job should be sent.

Note: After automatic creation of a "SheetfedPrinting" sequence, a corresponding process will also be created automatically.
The Prinect Manager needs to know where the prepress system saves the PPF/CIP3 files. A target directory ("Hotfolder") that automatically processes incoming PPF/CIP3 files is defined via the process. You can also define how the job data from the prepress system are to be processed, for example, "Apply transformations" or "Enable automatic combiner".
Each automatically generated process is created with default settings which are defined in the "General" section in the PPF import (see Define the general process setting).
You can then manually change these standard settings individually for each defined process.
3.Optional: The settings of the automatically generated process may also have to be changed.
4.You must define whether the job is to be forwarded in advance.
Define the general process setting
As mentioned earlier, a "SheetfedPrinting" sequence and a corresponding process are created automatically when an offset press is created. This means that you have an "operable" configuration right away and you can process and forward jobs. Therefore, make the settings before creating a new press so that you will have to edit as few processes as possible afterward.
1.Go to "Administration > System".
2.Highlight the Prinect Manager server (computer name of the server).
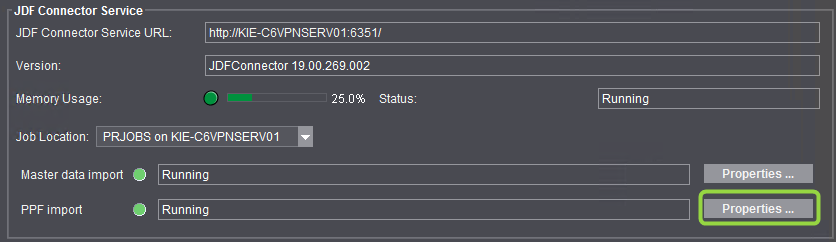
3.Scroll to the "JDF Connector Service" section.


4.Click the "Properties" button beside "PPF Import".
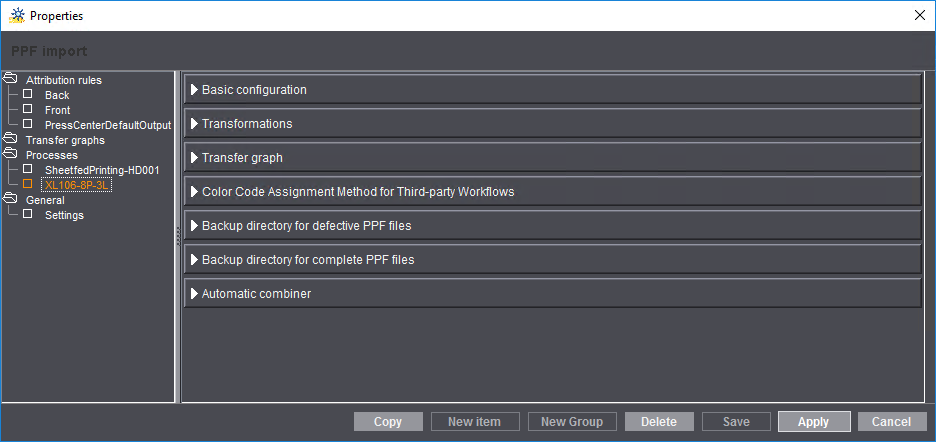
The PPF import configuration window opens.
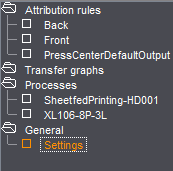
5.Double-click the "General" folder.
6.Highlight the "Settings" sub-folder. The standard settings are now displayed.

Only the default values you can modify are described below.

Image directory
The previews of the jobs are saved to this directory.
Internal data directory
All data is saved to this temporary directory while a PPF file is processed.

This is where you can define the default path where the PPF/CIP3 files generated by your prepress system will be filed. After a device is set up and the "SheetfedPrinting" sequence created, the sequence name is simply added to this path name during the automatically generated process. This produces a suitable number of new subfolders.
Example: Sequence Name: SM74 -> input directory \\KIE-C6VPNSERV01\PTConfig\PPFIn\SM74
Example: Sequence Name: XL105_8_P5 -> input directory \\KIE-C6VPNSERV01\PTConfig\PPFIn\XL105_8_P5

Note: If you define a new input directory which is not located in the file system of the Prinect Manager server but on an external computer, you need to make sure that the "prinect" user was defined on this external computer with all required permissions and that the input directory is shared for this user.
"Job attachment from PPF" option
If you are working on a pure PPF workflow, you have to enable this option. Only then is a new job automatically generated from the imported PPF/CIP3 file (see System behavior). Otherwise you have to intervene manually. This option must not be activated when working with a JDF-PPF workflow, as the job is created by the JDF file.
"Folder name not case-sensitive" option
This should be enabled only by a service technician if needed.
"Create process automatically" option
Activate this option if an associated process is to be created automatically after a device has been defined. If this option is deactivated, the process must be created manually and assigned to a sequence.
"Replace existing sheets" list box
•Do not replace existing sheets
The sheet from a PPF/CIP3 file which was already imported is added to when another PPF/CIP3 file with the same job number and sheet designation is imported. This means, for example, that a 4/0 sheet would not replace an existing 0/6 sheet, but rather be added to it. In this example, this would result in a 4/6 sheet.
•Replace existing sheets
The sheet from a PPF/CIP3 file which was already imported is completely replaced when another PPF/CIP3 file with the same job number and sheet designation is imported. This means, for example, that a 4/0 sheet would replace an existing 0/6 sheet.
•Replace surface of existing sheets
This setting is only relevant for an MIS workflow.
Enable this option to discard colors defined in the MIS that do not match the colors of the PPF.
Example: A sheet with CMYK + Silver has been defined in the MIS. The PPF/CIP3 file imported from prepress contains only CMYK. In this case, the color "Silver" is discarded.
Time until sheet is deleted
Here you can define the time period which elapses before the imported and processed sheet is deleted from the sheet list. This helps you maintain a better overview of the sheet list in the Job Combiner (imported PPF files). If the imported sheet is to remain in the sheet list permanently (for example, for combining jobs), you have to set 0 m (months), 0 d (days) and 0 h (hours) here.
"Delete Duplicated Sheets" option
•Option enabled: If the same sheet is imported again, the existing sheet will be overwritten.
•Option disabled: The sheet that was imported again is processed in addition. Now there are two identical sheets in the sheet list.
Define color
In order to display the preview images with their color separations, the Prinect Manager needs color values for the spot color definitions contained in the PPF file. You can define special colors manually, using the "Define Color" symbol.
"Allow resource files from MAC" option
Enable this option if the PPF files are generated by a Macintosh computer. Only then can the PPF files be processed.
"Delete process automatically" option
Activate this option if, after deleting a sequence, the accompanying process should also be deleted.
Enabled: If a new job was generated from a JDF or PPF file and a new PPF file (new sheet) with the same job number but a different sheet designation is then imported, the new sheet is automatically assigned to the job that was already created.
To illustrate this, a new job is first generated from the "Innenteil_3" (body) sheet.
The "Innenteil_4" sheet is only assigned to this job automatically if the "Define new sheets" option is enabled. If the option is disabled, "Innenteil_4" must be assigned to the job manually.
As mentioned earlier, a "SheetfedPrinting" sequence and a corresponding process with defined default values are created automatically when a device is created (see Define the general process setting). However, this requires that the "Create process automatically" option was already enabled.

Note: If you have created several presses with the corresponding sequences, you may also have to alter the configurations of several processes, e.g. the process for the "XL106" press and the process for the "SM74" press.
We will describe the configuration of an automatically created process for the "XL106-8-P5-SIM" press as an example here.
1.Go to the "Administration > System" menu.
2.Highlight the Prinect Manager server (computer name of the server).

3.Scroll to the "JDF Connector Service" section.
4.Click the "Properties" button beside "PPF Import".
The PPF import configuration window opens.
5.Open the "Processes" folder and select the automatically generated process of a press.