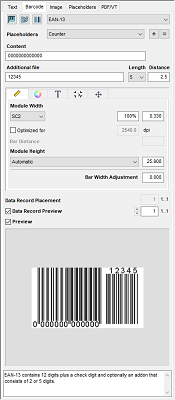
In the "Barcode" tab, you can create barcodes with dynamic placeholders and edit or correct existing ones. You can customize the geometry, color, etc. of each barcode.
You select and set up the barcode in the top part of the tab. You can customize the barcode in the middle part.
The lower part shows you a preview of the currently setup barcode. There is a panel for messages, properties or comments on the currently selected barcode below the preview of this. In another info box, you can view a list of all barcodes and placeholders in the document.
To position a barcode, click the preview image and drag-and-drop it to the PDF document. You can also use the buttons in the toolbar. See Toolbar and Context Menu.
Barcode type
Select the barcode type you want. Click the "Barcodes", "2D barcodes" or "Binary codes" buttons.
A difference is made only between these three types. You then select the barcode you want in the right list box.
At present, you can select the following barcodes:
|
Barcodes |
2D barcodes |
Binary codes |
|---|---|---|
|
EAN-8 /EAN-13 |
Data Matrix (standard and GS1) |
Klebrand |
|
UPC-A / UPC-E |
QR (standard and GS1) |
Eberle |
|
SICK |
||
|
CIP 39 |
|
Bobst |
|
PZN |
|
Kurandt |
|
Code 128 |
|
Pharma 0-1-2 |
|
GS1-128 |
|
Laetus |
|
2/5 Interleaved |
|
Laetus mini |
|
ITF-14 / ITF-16 |
|
Laetus two-track |
|
Codabar |
|
|
The view can vary according to what you selected.
Placeholders
This is where you select the placeholder that contains the content of the barcode. You define the CSV file with the barcodes beforehand in the "Placeholders" tab.
Click the plus button to insert the placeholder into the "Content" box. If you hold down the Shift key while clicking the plus button, the placeholder is then copied to the "Additional file" box (displays only with EAN 13 barcodes).
This is where you enter the content of the barcodes. You can also insert placeholders.
For QR and Data Matrix codes, set in a list box whether it is a normal or GS1 code. In addition, you can also import .vcf or .txt text files for these codes.
Additional file / Length / Distance (only for EAN 13 barcodes)
An EAN 13 barcode can be supplemented by two or five digits. To insert a placeholder into this box, keep the Shift key pressed down when clicking the plus button.
When you use a placeholder, select the length of the additional file from the list box.
In the "Distance" box, enter the distance between the EAN 13 barcode and the additional code.
Control characters (only for 2D barcodes)
Select "Hexadecimal 00..FF" from the list box to use the special address code format of Deutsche Post (German postal service).
Data Record Placement (not for iVDP)
This is where you can assign the data record if you have several placeholders of the same kind on one page. First, type the number of the data record and then click the placeholder. See also Data Record Placement (not for iVDP).
When you edit the placeholder, e.g. change its color or size, the final result is not necessarily clear just based on the view of the variables. For that reason, checkmark this box to view a preview of the data records.
Preview
You can enable and disable the preview of placeholders.
We recommend to disable the preview if you are working with many placeholders in order to boost performance.
This tab has the following subtabs:
Code 39 supports "*" as a start or stop character. If set in the CSV file, these limiters will be ignored. You can enable or disable the display of "*" in the "T" (Text) subtab.
GS1 codes (GS1 QR code, GS1 Data Matrix, GS1 128 barcode) make it possible for you to place different information in a code. This is controlled using control characters known as application identifiers (AI). These are digits that are either enclosed by round parentheses "()" or prefixed by a "~". They specify the type of information that follows. (01), for example, signalizes the global article number (GTIN). (8200) is followed by the Extended Packaging URL. Other information like (21) serial number, (10) lot number or (15) best-before date can be encoded.
This code developed by HEIDELBERG is printed with a special multidot screen on a hidden part to make the printed product safe from forgery. Using a smartphone app, it is possible to scan this code and, by doing this, identify the original print. Copied labels lose this information.
To insert a HiCode:
1.Open the "Barcode" tab.
2.Click the "2D barcodes" button and select "HiCode" from the list box.
3.Insert a number into "Content".
4.Set a HDM multidot screen for "Screen System". You can install the screens in the Screening Selector if these are not yet in the system. See Renderer screen system information.
5.Drag the HICode from the preview pane to a low-key position.
6.Go to the "Color" subtab. See "Color" subtab.
7.Use the pipette tool to match the color of the HiCode to the environment.
8.Enable "Use Object Screening Information" for the output.